Category: Other

  • K8S Cluster autoscaler crashlooping on EKS

    I just fixed a badly crashlooping cluster autoscaler on EKS. Two things I found noteworthy:

    • On weird error messages (failed to list *v1.CSIStorageCapacity) it might be a version mismatch: The autoscaler version must match the k8s version used (e.g. k8s v1.21 requires cluster autoscaler 1.21.x)
    • On no error messages at all (see below for example) it might be a permissions issue with the AWS APIs.

    Fixing the image version

    I’m using the autoscaler helm chart for it, this just needs an annotation:

    image:
      # IMPORTANT: this value _MUST_ match the k8s version: x.y.(patch)
      tag: v1.21.1
    

    Note: You do not have to use the repo mentioned in the original comment.

    Fixing the permissions issue

    In my case, I referenced the wrong ServiceAccount in my AWS IRSA role trust policy. So for “future me”, check this:

    • does the autoscaler pod have IRSA credentials assigned from its ServiceAccount?
    • to add the reference using the helm chart, see below
    • does the ServiceAccount reference the correct AWS IRSA policy? (typos, wrong policy, …)
    • does the AWS IRSA policy reference the designated ServiceAccount correctly`? (wrong namespace, typos, …)

    Also, i explicitly name the ServiceAccount created by the helm chart, so I don’t have to guess what I need to reference from AWS:

    rbac:
      serviceAccount:
        annotations:
          # this adds the IRSA reference to the ServiceAccount created
          "eks.amazonaws.com/role-arn": "arn:aws:iam::123456789012:role/whatever-your-role-name-is"
    
        # this explicitly controls the name of the ServiceAccount, so we can refernce safely from AWS
        name: cluster-autoscaler
    

    Error examples

    Exmaple of “no error” crashloop

        /gopath/src/k8s.io/autoscaler/cluster-autoscaler/vendor/k8s.io/apimachinery/pkg/watch/streamwatcher.go:71 +0xbe
    
    goroutine 297 [sync.Cond.Wait]:
    runtime.goparkunlock(...)
        /usr/local/go/src/runtime/proc.go:310
        [...]
    created by k8s.io/autoscaler/cluster-autoscaler/vendor/k8s.io/apimachinery/pkg/watch.NewStreamWatcher
        /gopath/src/k8s.io/autoscaler/cluster-autoscaler/vendor/k8s.io/apimachinery/pkg/watch/streamwatcher.go:71 +0xbe
    
    goroutine 299 [sync.Cond.Wait]:
    runtime.goparkunlock(...)
        /usr/local/go/src/runtime/proc.go:310
        [...]
    created by k8s.io/autoscaler/cluster-autoscaler/vendor/k8s.io/apimachinery/pkg/watch.NewStreamWatcher
        /gopath/src/k8s.io/autoscaler/cluster-autoscaler/vendor/k8s.io/apimachinery/pkg/watch/streamwatcher.go:71 +0xbe
    
    goroutine 366 [IO wait]:
    internal/poll.runtime_pollWait(0x7f2e1059ebb0, 0x72, 0xffffffffffffffff)
        /usr/local/go/src/runtime/netpoll.go:203 +0x55
        [...]
    created by net/http.(*Transport).dialConn
        /usr/local/go/src/net/http/transport.go:1706 +0xc56
    
    goroutine 367 [select]:
    net/http.(*persistConn).writeLoop(0xc0017e8480)
        /usr/local/go/src/net/http/transport.go:2336 +0x11c
    created by net/http.(*Transport).dialConn
        /usr/local/go/src/net/http/transport.go:1707 +0xc7b
    Stream closed EOF for kube-system/cluster-autoscaler-aws-cluster-autoscaler-69f85b8f6d-hbpvv (aws-cluster-autoscaler)
    

    Example of “error” crashloop

    Failed to watch *v1.CSIStorageCapacity: failed to list *v1.CSIStorageCapacity: the server could not find the requested resource
    
  • Circular imports for Python typing annotations

    Problem:

    # ###############################################################
    # models.py
    from controllers import BookController
    
    class Book:
        def get_controller(self) -> BookController:
            return BookController(self)
    
    # ###############################################################
    # controllers.py
    from models import Book
    
    class BookController:
        def __init__(self, book: Book) -> None:
            self.book = book
    

    Do you see it? Try it out – it will generate a “circular import” Exception.

    The solution is very nicely described in Adam Johnson’s blog post (credit where credit’s due).

    Copy-pasted for myself (still, please visit Adam’s page!!, he explains it much better and with more detail), this is it:

    # ###############################################################
    # models.py
    from __future__ import annotations
    from typing import TYPE_CHECKING
    
    if TYPE_CHECKING:
        from controllers import BookController
    
    class Book:
        def get_controller(self) -> BookController:
            return BookController(self)
    
    # ###############################################################
    # controllers.py
    from __future__ import annotations
    from typing import TYPE_CHECKING
    
    if TYPE_CHECKING:
        from models import Book
    
    class BookController:
        def __init__(self, book: Book) -> None:
            self.book = book
    

    This fucking rocks. :))

  • opnSense reply-to & AWS’ source/destiny check

    Never forget those two things:

    • disable the AWS source/destiny check
    • disable the reply-to check (functionality?) in opnSense (Firewall -> Settings -> Advanced)
    • interestingly, this applies to “WAN interfaces” according to the help string, yet my instance only has a LAN interface … 🤷🏼‍♂️
  • Managing S3 bucket permissions with terraform

    This is what I did today, and I found it useful. And yes, sometimes I over-engineer a bit.

      # IN FILE: locals_constants.tf
    
      iam_s3_perms_list = ["s3:List*",]
      iam_s3_perms_read = ["s3:List*", "s3:Get*",]
      iam_s3_perms_write = ["s3:List*", "s3:Get*", "s3:PutObject",]
    
      s3_permissions_rw = distinct(concat(
        local.iam_s3_perms_list,
        local.iam_s3_perms_read,
        local.iam_s3_perms_write,
      ))
    
      s3_permissions_ro = distinct(concat(
        local.iam_s3_perms_list,
        local.iam_s3_perms_read,
      ))
    
    
    # IN FILE: locals.tf
    
    team_dev_bucket_configs = {
      "ReadWrite" = {
        actions = local.s3_permissions_rw
        buckets = [
          "yo-corp-yoman-dev",
          "yo-corp-yoman-test",
          "yo-corp-playground",
        ]
      }
      "ReadOnly" = {
        actions = local.s3_permissions_ro
        buckets = [
          "yo-corp-yoman-prod",
          "yo-corp-yoman-archive",
        ]
      }
    }
    
    
    # IN FILE: permissions.tf
    
    # so this policy is now assigned to a group with every dev team member.
    # easy. :)
    resource "aws_iam_policy" "s3_team_dev_bucket_permissions" {
      name        = "s3-team-dev-bucket-permissions"
      description = "Dev team S3 bucket permissions"
      policy      = data.aws_iam_policy_document.s3_team_dev_bucket_permissions_document.json
    }
    
    data "aws_iam_policy_document" "s3_team_dev_bucket_permissions_document" {
      dynamic "statement" {
        for_each = local.team_dev_bucket_configs
        content {
          sid     = "TeamDevBuckets${statement.key}"
          effect  = "Allow"
          actions = statement.value["actions"]
          resources = flatten(
            [
              for bucket in statement.value["buckets"] :
              [
                "arn:aws:s3:::${bucket}", "arn:aws:s3:::${bucket}/*"
              ]
            ]
          )
        }
      }
    }
    
  • GitLab runners, EKS, IRSA and S3 caching

    The problem

    • You do not want to set AWS_* credentials all over your gitlab pipelines
    • You have distributed GitLab runners hosted on kubernetes, and you want to use S3 as a build cache.
    • You want to access AWS resources from your build chain

    The solution

    There’s an official AWS solution: “IRSA”, which stands for “IAM roles for k8s service accounts”. (There is at least another non-AWS one, kube2iam, but this is not subject of this post.)

    IRSA assigns an AWS IAM role to a K8S serviceaccount, which then in turn can be specified for a running pod. There are a couple of pages documenting this, but they are all either too much or too little. I now try do write what I wanted to have.

    Also, nobody has ever documented using that for configuring S3 caching on a K8S GitLab runner. Which is not easy, cause the documentation could honestly be better.

    Advantages of this solution

    • That works with k8s runners just as well as with fargate runners (the way I do them)
    • You are independent from AWS_* credentials in your pipeline
    • You can simply change the IAM role in your pipeline job to get different permissions, you don’t need to create a new user and create new credentials and set them as CI variables, etc.

    What you need

    You need (out of scope):

    For every role you want to use in the cluster, you need …

    • … an IAM role with referencing k8s namespace & service account name
    • … a K8S cluster service account referencing the role ARN
    • this is a reciprocal reference, one references the other, and vice versa!

    That’s what we will do in here.

    The IAM role

    You basically configure a role as every other one, but you will specify a special trust policy. That policy references the OIDC provider, the k8s namespace and the service account in that namespace.

    # terraform code - die hard terraform addict here, sorry.
    
    locals {
      oidc_arn = "arn:aws:iam::123456789012:oidc-provider/oidc.eks.eu-central-1.amazonaws.com/id/deadbeefaffe1234deadbeefaffe1234"
      oidc_url = "https://oidc.eks.eu-central-1.amazonaws.com/id/deadbeefaffe1234deadbeefaffe1234"
      k8s_namespace = "gitlab"
      k8s_service_account_name = "gitlab-runner"
    }
    
    # eks / pod / role stuff: https://is.gd/2skBH7
    resource "aws_iam_role" "k8s_irsa_example_role" {
      name                = "k8s-irsa-example-role"
      assume_role_policy  = data.aws_iam_policy_document.trust_k8s_irsa_example_role.json
      managed_policy_arns = [aws_iam_policy.some_policy.arn]
    }
    
    # this is the PERMISSIONS policy
    data "aws_iam_policy_document" "perms_k8s_irsa_example_role" {
      statement {
        actions = ["s3:*", ]
        resources = [
          "arn:aws:s3:::my-super-duper-gitlab-runner-cache",
          "arn:aws:s3:::my-super-duper-gitlab-runner-cache/*",
        ]
      }}
    
    # this is the TRUST policy
    # the TRUST policy references k8s namespace and service account
    data "aws_iam_policy_document" "trust_k8s_irsa_example_role" {
      statement {
        effect  = "Allow"
        actions = ["sts:AssumeRoleWithWebIdentity"]
        principals {
          type        = "Federated"
          identifiers = [local.oidc.arn]
        }
        condition {
          test     = "StringEquals"
          variable = "${replace(var.oidc_url, "https://", "")}:sub"
          values   = ["system:serviceaccount:${local.k8s_namespace}:${local.k8s_service_account_name}"]
        }
      }
    }
    

    For completeness the trust policy as JSON:

    {
      "Version": "2012-10-17",
      "Statement": [
        {
          "Effect": "Allow",
          "Principal": {
            "Federated": "arn:aws:iam::123456789012:oidc-provider/oidc.eks.eu-central-1.amazonaws.com/id/deadbeefaffe1234deadbeefaffe1234"
          },
          "Action": "sts:AssumeRoleWithWebIdentity",
          "Condition": {
            "StringEquals": {
              "oidc.eks.eu-central-1.amazonaws.com/id/deadbeefaffe1234deadbeefaffe1234:sub": "system:serviceaccount:gitlab:gitlab-runner"
            }
          }
        }
      ]
    }
    

    This is, in fact, all you need from the AWS side of things.

    Some notes:

    • Be absolutely aware that this policy references the name and the namespace in k8s. Also, the service account will reference this policy ARN. So if you change either name, you have to always adjust the other side!

    • For GitLab, you might want to have two of those (you’ll see why later)

    General serviceAccount info

    So this is how any serviceAccount connected to an IAM role looks like:

    apiVersion: v1
    kind: ServiceAccount
    metadata:
      annotations:
        # this is the magic
        # it references the role ARN, which contains the role's name
        eks.amazonaws.com/role-arn: arn:aws:iam::123456789012:role/k8s-irsa-example-role
    
      # the name referenced in the AWS IAM trust policy
      # ("system:serviceaccount:<namespace>:<SERVICEACCOUNTNAME>")
      name: gitlab-runner
    
      # ("system:serviceaccount:<NAMESPACE>:<serviceaccountname>")
      # if you change one, you change both - they reference each other BY NAME
      namespace: gitlab
    

    If you want to test this right now, feel free:

    # $ kubectl apply -n gitlab -f THIS_FILE.yml
    # $ kubectl exec -ti -n gitlab quick-debug-pod -- /bin/bash
    # and then install awscli & ca-certificates to try accessing your s3 bucket :)
    apiVersion: v1
    kind: Pod
    metadata:
      name: quick-debug-pod
      namespace: gitlab
    spec:
      serviceAccountName: gitlab-runner
      containers:
        - name: shell
          image: "ubuntu:latest"
          args: [sleep, infinity]
          resources:
            limits:
              memory: "128Mi"
              cpu: "500m"
    

    General info about GitLab configuration

    REMARK: If you only want to enable your jobs to access AWS resources, you’re in luck. You can skip straight to “Addendum – enabling gitlab JOBS” and you’re done.

    If you want to use the S3 cache, well, … more work.

    Let’s start like this: WHAT YOU MUST KNOW, SUPER IMPORTANT:

    • The main gitlab runner instance will create a pre-signed S3 URL for the gitlab job, and pass it to the k8s pod running the actual job, so the pod running the gitlab job will not need those cache access rights.
    • That means, the S3 policy from above must be attached to the runner itself, and not the pods created by the runner that run the actual pipelines.

    Also, going forward I assume you deploy the gitlab runner using the GitLab runner helm chart.

    Annotate runner pod, short variant

    If you …

    • have only one GitLab runner,
    • and you know the serviceAccount name created by the helm chart,

    … you’re almost done.

    You just need to replace the serviceAccount name (gitlab-runner) name with the actual serviceAccount name on your system, and change one thing in the helm chart:

    ## https://is.gd/Qu1gGv
    rbac:
      create: true
      serviceAccountAnnotations:
        eks.amazonaws.com/role-arn: arn:aws:iam::123456789012:role/k8s-irsa-example-role
    

    See the bottom on how to configure the cache, this is just the role association.

    Annotate runner pod, LONG variant

    In my case it was not so easy:

    • First, I have several runners deployed, and all of them use a different serviceAcount, so that one Role is not going to cut it.
    • Second, I like to have more control over naming, I don’t want to “guess” which name the helm chart gives my serviceAccount, and I don’t want to be vulnerable to name changes.

    So I had to do a bit more work.

    To work in K8S, the GitLab runner needs a …

    • serviceAccount,
    • role,
    • roleBinding.

    We will create those three resources manually now, so we have control over naming and they can be re-used by several gitlab runners (e.g. fargate & cluster).

    In K8S objects, that looks like this:

    # the role
    apiVersion: rbac.authorization.k8s.io/v1
    kind: Role
    metadata:
      name: gitlab-runner-common
      namespace: gitlab
    rules:
      - apiGroups:
          - ""
        resources:
          - "*"
        verbs:
          - "*"
    ---
    # the service account
    apiVersion: v1
    automountServiceAccountToken: true
    kind: ServiceAccount
    metadata:
      annotations:
        eks.amazonaws.com/role-arn: arn:aws:iam::123456789012:role/k8s-irsa-gitlab-runner-common
      name: gitlab-runner-common
      namespace: gitlab
    ---
    # the role binding
    apiVersion: rbac.authorization.k8s.io/v1
    kind: RoleBinding
    metadata:
      name: gitlab-runner-common
      namespace: gitlab
    roleRef:
      apiGroup: rbac.authorization.k8s.io
      kind: Role
      name: gitlab-runner-common
    subjects:
      - kind: ServiceAccount
        name: gitlab-runner-common
        namespace: gitlab
    

    (Btw, I’m using the serviceaccount, role & rolebinding charts here to simplify things – I only want to deal with helm and not with “plain” k8s objects.)

    Adjust your helm chart

    Let’s recap: We now have …

    • An AWS IAM role
    • referencing a namespace & serviceAccount in k8s by name
    • with permissions to access S3
    • A k8s role bound to a serviceAccount in a certain namespace via a rolebinding

    To do that, we need to …

    • disable RBAC creation and reference “our” serviceAccount, and
    • configure the cache.

    Here are the relevant values.yaml file parts:

    ## https://is.gd/Qu1gGv
    rbac:
      # this is basically documented NOWHERE, except here:
      #   https://gitlab.com/gitlab-org/gitlab-runner/-/issues/25972#note_477243643
      create: false
      serviceAccountName: gitlab-runner-common
    

    Configure GitLab S3 cache

    Finally, still in the helm chart’s values file, we do this:

    runners:
      name: "whatever-runner"
    
      config: |
        [[runners]]
          # ...
          [runners.cache]
            Type = "s3"
            Path = "runners-all"
            Shared = true
            [runners.cache.s3]
              ServerAddress = "s3.amazonaws.com"
              BucketName = "my-super-duper-gitlab-runner-cache"
              BucketLocation = "eu-central-1"
              Insecure = false
          # ...
    

    Yup, that’s actually it.

    We should be done.

    Enjoy 🙂

    Addendum – enabling gitlab JOBS

    Now, remember that anything from above will NOT give the actual pipline jobs any additional AWS permissions.

    If you want to access AWS resources out of your jobs, just do this:

    • Create another role, with another association to a serviceAccount,
    • and configure this serviceAccount to be used by the job pods.

    How? Simple. Modify the values file:

    runners:
      config: |
        [[runners]]
          # ...
          [runners.kubernetes]
            # ...
            service_account = "gitlab-jobs"
    

    Bonus – a test pipeline

    # .gitlab-ci.yml
    stages:
      - test
    
    variables:
      CACHE_DIR: hey-ho-cache
    
    .all: &all
      before_script:
        - mkdir -p "$CACHE_DIR"
        - NOWDATE=$(date +%Y%m%d_%H%M%S)
        - CACHEFILE="${CACHE_DIR}/heyho_${NOWDATE}"
        - set -x
    
    .cache: &cache
      paths: [hey-ho-cache]
    
    runner-test-create-cache:
      <<: *all
      image: alpine:edge
      stage: test
      script:
        - echo "waahwaahboogah $NOWDATE" > $CACHEFILE
      cache:
        <<: *cache
      tags:
        - fargate-small
    
    runner-test-check-cache:
      <<: *all
      image: alpine:edge
      stage: test
      script:
        - cat $CACHE_DIR/*
      cache:
        <<: *cache
      needs:
        - runner-test-create-cache
      tags:
        - cluster
        - kubernetes
    

    Troubleshooting

    It doesnt work

    It does.

    If it does not, you have a naming error in your references, or you’re using a wrong serviceAccount for your pods, or you assigned the permission to the wrong entity (jobs instead of runner, or vice versa).

    First, check your annotations and that they reference exiting things.

    It still doesnt work

    It does. Your references are wrong.

    I checked.

    Check again.

    Really.

    Believe me.

    But …

    NO. REALLY.

    And if not, I can’t help you, cause this works.

    (If I have an error here, the principle should be clear – nevertheless I would appreciate a hint if you find one)

    Sources
  • Fix tmux on Mac

    I started tmux. Every time i pressed <BACKSPACE> got got a … space. This felt wrong, so the internets had a solution ready.

    This is it:

    mkdir -p $HOME/.config/tmux
    echo 'set-option default-terminal "screen-256color"' > $HOME/.config/tmux/tmux.conf
    

    Apparently the Mac OS ncurses database on Mac does not contain the settings for tmux’s default value of tmux-256color, but the ones for screen.

    Sources (including some more ways to fix it):

  • Accessing data from defunct iOS apps

    I had an app called “TankPro” in which I tracked all my car expenses, including – and this was the crucial part – each and every refueling and service cost. Now with the latest update of iOS that app stopped working – “This app is too old, the developer has to update”. I had that fear, but I never got around to export and look for something new. So now – boom, you’re fucked, no more data for you today.

    Internet to the rescue.

    Assumptions

    Since a fuel cost tracking app is basically something for which you’d use a database, I assumed that developer did the same and used the Apple-provided database API internally. Which is good since this is backed by SQLite. (none of this I knew for sure, this is all stuff I just picked up over time – yet I was just hoping to be right).

    Now the question is how to access this data.

    Get access to the data

    Accessing the data using iTunes (now Music) did not work, the developer never added this functionality. Export did not work because the app didn’t start any longer. The developer’s web page was also quite discouraging. Finally I found a blog post which gave me hope, describing how to access the application’s files in an iOS backup performed by Music to the local Mac. Boom.

    So first step, connect the iPhone to the Mac and perform a backup using the ‘Music’ app (yes, this is as stupid as it sounds, it should be a separate app now if you ask me).

    Now find what you’re looking for …

    After the backup is complete, all the backup data will be available here:

    # the last part MIGHT change
    $HOME/Library/Application Support/MobileSync/Backup/746acd60cc3e4674ab61071e390c4bce601c259f
    

    The directory contents look like this:

    # DIRS                            |   # FILES
    0a/                               |   Info.plist
    0b/                               |   Manifest.db
    0c/                               |   Manifest.db-shm
    [...maaany more directories...]   |   Manifest.db-wal
    fe/                               |   Manifest.plist
    ff/                               |   Status.plist
    

    Turns out the file called Manifest.db is itself a SQLite database. Let’s analyze:

    $ sqlite3 Manifest.db
    sqlite> .schema
    CREATE TABLE Files (fileID TEXT PRIMARY KEY, domain TEXT, relativePath TEXT, flags INTEGER, file BLOB);
    CREATE INDEX FilesDomainIdx ON Files(domain);
    CREATE INDEX FilesRelativePathIdx ON Files(relativePath);
    CREATE INDEX FilesFlagsIdx ON Files(flags);
    CREATE TABLE Properties (key TEXT PRIMARY KEY, value BLOB);
    

    Hmmh. One table, with content of files. The domain field looked interesting:

    sqlite> select distinct domain from Files;
    [...]
    AppDomainPlugin-net.whatsapp.WhatsApp.TodayExtension
    AppDomainPlugin-org.linphone.phone.linphoneExtension
    AppDomainPlugin-org.linphone.phone.msgNotificationContent
    AppDomainPlugin-org.linphone.phone.msgNotificationService
    AppDomainPlugin-org.whispersystems.signal.NotificationServiceExtension
    AppDomainPlugin-org.whispersystems.signal.shareextension
    AppDomainPlugin-org.wordpress.WordPressAllTimeWidget
    AppDomainPlugin-org.wordpress.WordPressDraftAction
    AppDomainPlugin-org.wordpress.WordPressIntents
    [...]
    

    All right. It seems those are the apps. Now the defunct app’s name is “TankPro” by “osxwerk”, let’s see if it’s in there.

    sqlite> select distinct domain from Files where domain like '%werk%';
    AppDomain-de.osxwerk.TankPro
    

    I’m on to something. More digging lead to this:

    sqlite> select fileID, relativePath from Files where domain = 'AppDomain-de.osxwerk.TankPro';
    607abd5ade35b2839a2fbd83378797ef6a66e74e|
    521dd6d864d15473f598c8376e22177654039d17|Library
    83a94dda1e6957a7dd823e07b76a117605912688|Library/Preferences
    c3c18f8333773453136410a4210f1aea0b9fe199|Library/Preferences/com.apple.PeoplePicker.plist
    ff0500ead582024057d7b4202da23d13ba9aee39|Library/Preferences/.GlobalPreferences.plist
    078e4d9f26a620de79bd950cac5ffbb41db6f07f|Library/Cookies
    e5aa547333c2d26ee8866db1ec4d6ab4826751cc|Documents
    1c70ac9b8b843a69c96b29b202958834a12f159a|Documents/tankbuch.sqlite
    967d44623183390c36989f8574a946222e5dee63|Documents/tankpro.sqlite.old
    787938b3c7f21fe178d59f4c030e3451f2f3dd23|Library/Preferences/de.osxwerk.TankPro.plist
    

    Very promising, right?? Let’s see what 1c70ac9b8b843a69c96b29b202958834a12f159a might be … :

    $ find . -iname 1c70ac9b8b843a69c96b29b202958834a12f159a
    ./1c/1c70ac9b8b843a69c96b29b202958834a12f159a
    
    $ ll ./1c/1c70ac9b8b843a69c96b29b202958834a12f159a
    Permissions Size User Date Modified Name
    .rw-r--r--   77k tm   30 Apr 18:56  ./1c/1c70ac9b8b843a69c96b29b202958834a12f159a
    
    $ file ./1c/1c70ac9b8b843a69c96b29b202958834a12f159a
    ./1c/1c70ac9b8b843a69c96b29b202958834a12f159a: SQLite 3.x database, last written using SQLite version 3032003
    
    $ sqlite3 ./1c/1c70ac9b8b843a69c96b29b202958834a12f159a
    
    sqlite> .schema
    CREATE TABLE ZCAR ( Z_PK INTEGER PRIMARY KEY, Z_ENT INTEGER, Z_OPT INTEGER, ZACTIVE INTEGER, ZCONSUMPTIONDISPLAYUNIT INTEGER, ZFUELCAPACITYUNIT INTEGER, ZFUELTYPE INTEGER, ZODOMETERUNIT INTEGER, ZIMAGE INTEGER, ZCREATEDAT TIMESTAMP, ZUPDATEDAT TIMESTAMP, ZLICENSEPLATE VARCHAR, ZMAKE VARCHAR, ZMODEL VARCHAR, ZNAME VARCHAR, ZREMARK VARCHAR );
    CREATE TABLE ZCARIMAGE ( Z_PK INTEGER PRIMARY KEY, Z_ENT INTEGER, Z_OPT INTEGER, ZCAR INTEGER, ZCREATEDAT TIMESTAMP, ZUPDATEDAT TIMESTAMP, ZIMAGE BLOB );
    CREATE TABLE ZCOST ( Z_PK INTEGER PRIMARY KEY, Z_ENT INTEGER, Z_OPT INTEGER, ZODOMETER INTEGER, ZREFUND INTEGER, ZCAR INTEGER, ZAMOUNT FLOAT, ZCREATEDAT TIMESTAMP, ZDUEDATE TIMESTAMP, ZUPDATEDAT TIMESTAMP, ZCOMMENT VARCHAR, ZREASON VARCHAR );
    CREATE TABLE ZFILLUP ( Z_PK INTEGER PRIMARY KEY, Z_ENT INTEGER, Z_OPT INTEGER, ZFUELTYPE INTEGER, ZODOMETER INTEGER, ZQUANTITYUNIT INTEGER, ZTYPE INTEGER, ZCAR INTEGER, ZCREATEDAT TIMESTAMP, ZDATE TIMESTAMP, ZLATITUDE FLOAT, ZLONGITUDE FLOAT, ZPRICE FLOAT, ZQUANTITY FLOAT, ZUPDATEDAT TIMESTAMP, ZCOMMENT VARCHAR );
    CREATE TABLE Z_PRIMARYKEY (Z_ENT INTEGER PRIMARY KEY, Z_NAME VARCHAR, Z_SUPER INTEGER, Z_MAX INTEGER);
    CREATE TABLE Z_METADATA (Z_VERSION INTEGER PRIMARY KEY, Z_UUID VARCHAR(255), Z_PLIST BLOB);
    CREATE TABLE Z_MODELCACHE (Z_CONTENT BLOB);
    CREATE INDEX ZCAR_ZIMAGE_INDEX ON ZCAR (ZIMAGE);
    CREATE INDEX ZCARIMAGE_ZCAR_INDEX ON ZCARIMAGE (ZCAR);
    CREATE INDEX ZCOST_ZCAR_INDEX ON ZCOST (ZCAR);
    CREATE INDEX ZFILLUP_ZCAR_INDEX ON ZFILLUP (ZCAR);
    

    … aaaand I got my receipts back. Boom baby!! Happy day.

  • GitLab, App Service & CI/CD – Variant 1

    [Updates]

    • 2020-11-29 – reference terraform simple-appservice module
    • 2020-11-29 – add small fix for GitLab CI script

    Since I spent way more time fighting with this I though I might write a proper recap and maybe help others to get started. I also set up a repository with example code which should (!) be a “pull-and-run” thing once you have your ARM_ACCESS_KEY ready, which goes along with this blog post.

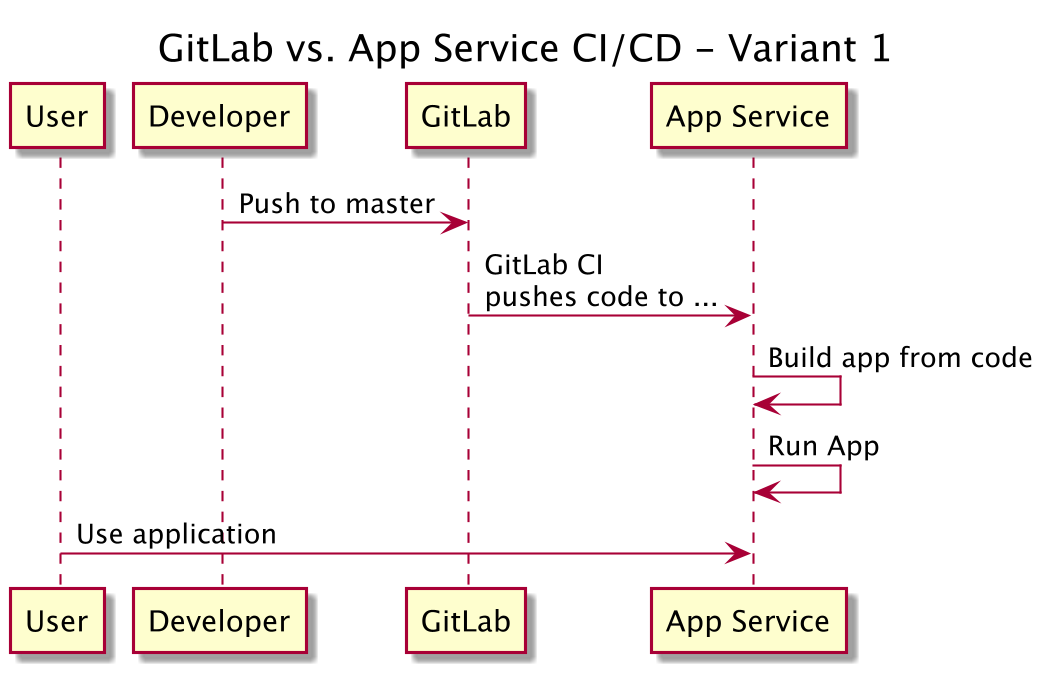
    Now, let’s get started. What we want to do here is basically pretty simple, and detailed in the picture below:

    git flow variant 1

    This sounds easy, right? It is, if you are done fighting Azure stupidity and know a couple of things. So what we need to do for this? We need to …

    • Create the App Service (I use terraform for this, and you can use my example repo or my terraform simple-appservice module to get started)
    • Create a GitLab repo (of course, that’s what this is all about, right? An example “hello world” flask up can also be found in the mentioned repo)
    • Configure the GitLab CI system to contain some credentials for the App Service
    • Add a .gitlab-ci.yml file to your GitLab repo to enable CI
    • … done.

    That should be exactly all. Let’s get started.

    Create the app service

    As said – please use my example repo and terraform. That should be enough:

    • make init
    • make plan
    • make do

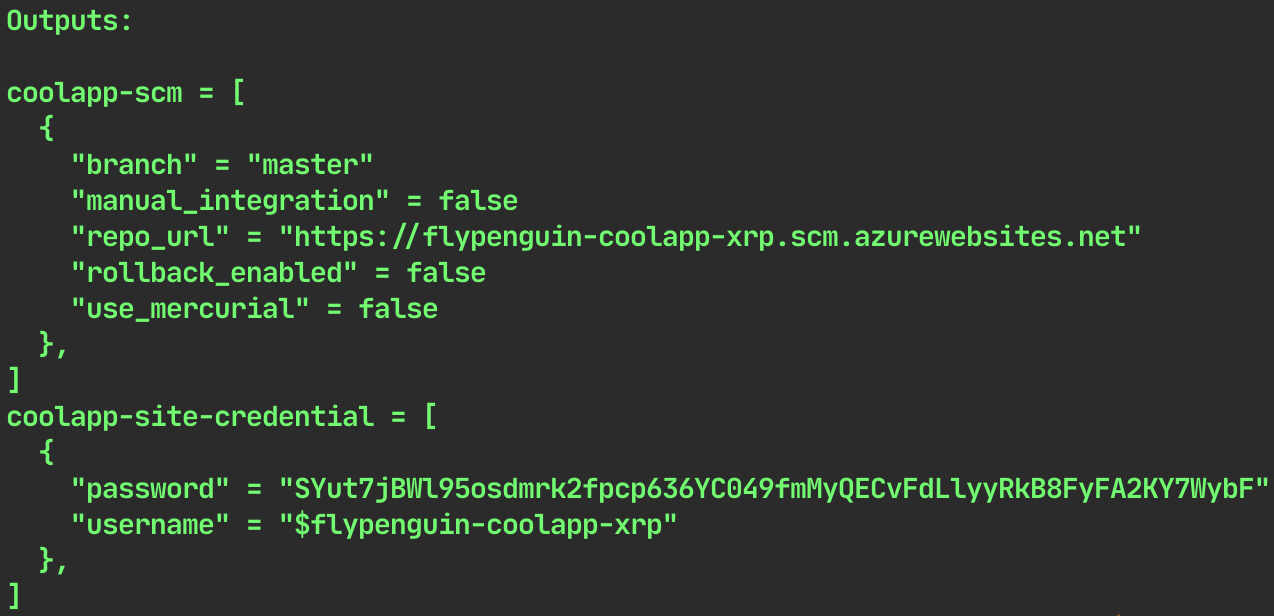
    Terraform should just output the needed credentials.

    terraform credential output

    Important to know:

    • use at least “B1 | Basic” for your SKU settings
    • your “source_control” setting should be “LocalGit” I guess. There is an error in either Terraform or Azure (I think the latter) if you use “ExternalGit”, which would be “variant 2” (a blog post to follow)

    Create a GitLab repo

    This one should do, and if you are rightfully annoyed by Azure give Render a try, they look cool (just found them about 2 mintes ago). To fork the repo you have to click the very unobtrusive “fork” button in the top right.

    Configure GitLab CI

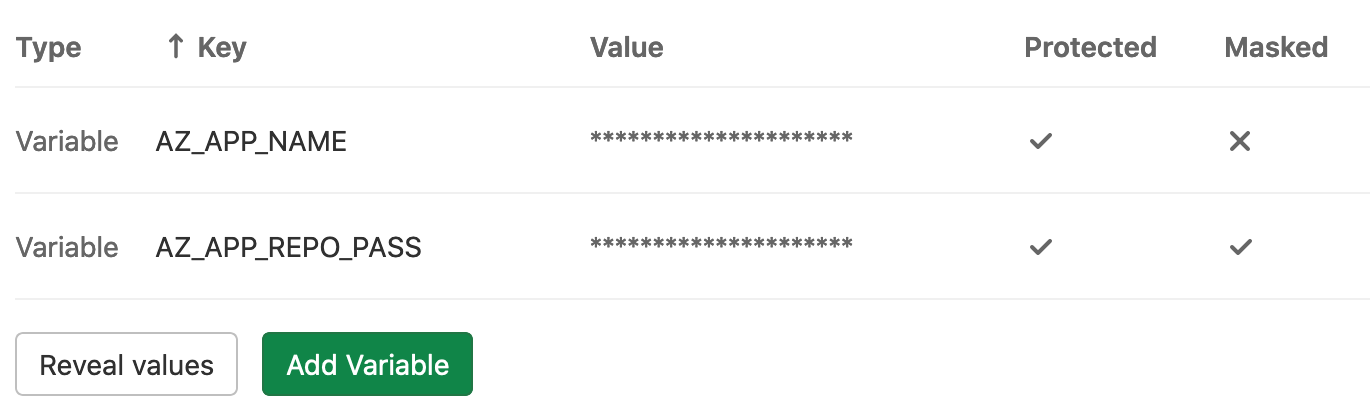
    The only thing to do is set two environment variables for the test runner. The information you need can be found either from my terraform output, or fom the Azure portal (images below). Then you add two variables in GitLab CI (GitLab repo -> settings -> CI/CD -> Variables):

    • AZ_APP_NAME (in this case this would be “flypenguin-coolapp-xrp”)
    • AP_APP_REPO_PASS (in this case this would be “SYut….”)

    set gitlab variables

    There are again a few caveats:

    • Basically the whole thing is based on the app name. Your user name should be your app name prefixed by a “$” sign, which is highly annoying.
    • If you ever want to use a “$” sign in any GitLab runner environment variable, you have to escape it with another “$”. Example: “my$variable” should be “my**$$**variable” in the “value” field of GitLab.

    Add .gitlab-ci.yml file to repo

    Well, just add the file and push the repo.

    stages:
      - push_to_azure
    push_it:
      stage: push_to_azure
      only:
        - master
      allow_failure: false
      before_script:
        - git config --global user.email "some@email.address"
        - git config --global user.name "GitLab CI Pipeline"
      script:
        - export REPO_FQDN="$AZ_APP_NAME.scm.azurewebsites.net"
        - export REPO_URL="https://\$$AZ_APP_NAME:$AZ_APP_REPO_PASS@$REPO_FQDN/$AZ_APP_NAME.git"
        - git remote add azure_app_service "$REPO_URL"
        - git remote -v
        # DEEP DIVE INFORMATION, DELETE ME IF YOU WANT
        # the local branch is 'detached head' - which is fucked.
        # we can't do "git push --force azure HEAD:master" on the FIRST push.
        # we can't push into an empty repository at all, even when using
        #   git push --force azure HEAD:refs/heads/master
        # because on the first push this will still not work.
        # the actually easiest way seems to be to not do "detached head" here.
        # so let's try to "unshallow" that thing.
        # https://is.gd/t7y7LM / https://is.gd/8YE4Ua
        # https://is.gd/rZDwxy / https://is.gd/rZDwxy
        - git fetch --unshallow origin || true
        - git push --force azure_app_service HEAD:refs/heads/master
    

    Finally – test.

    Just push a change to your repo and see if it works. The first obvious change is the addition of the .gitlab-ci.yml file … .

    Hope that helped, hope it works 🙂

  • Azure App Service & Python, Part II

    God I hate Microsoft.

    TL;DR – use “Basic” and “B1” as your app service SKUs. Anything “below” won’t work and you won’t know why.

    So, why I am again angry? Cause I want to deploy an app service, using terraform. Sounds soooooooooo simple, right? Except I fail at the creation of the app service (even without code, yet).

    Example:

    resource "azurerm_app_service_plan" "plan" {
      name                = "pkd-appservices0"
      location            = azurerm_resource_group.rg.location
      resource_group_name = azurerm_resource_group.rg.name
      kind                = "Linux"
      reserved            = true
    
      sku {
        tier = "Dynamic"     # WRONG, use at least "Basic"
        size = "Y1"          # WRONG, use at least "B1"
      }
    }
    
    resource "azurerm_app_service" "appservice" {
      name                = random_string.server.result
      location            = azurerm_resource_group.rg.location
      resource_group_name = azurerm_resource_group.rg.name
      app_service_plan_id = azurerm_app_service_plan.plan.id
    
      site_config {
        scm_type         = "LocalGit"
        linux_fx_version = "PYTHON|3.8"
      }
    }
    

    Now. What happens? Let’s see:

    Error creating App Service "wzkytawt" (Resource Group "pkd-it-appservices0"):
       web.AppsClient#CreateOrUpdate: Failure sending request: StatusCode=0 --
       Original Error: autorest/azure: Service returned an error. Status=<nil> <nil>
    

    What? Okay, our app service fails without any indication. By setting “TF_LOG=TRACE” and reading through 100s of lines of code we get this:

    Consumption pricing tier cannot be used for regular web apps
    

    What the fuck is a “consumption pricing tier”? Well, turns out MS doesn’t know as well, at least it’s described exactly nowhere. Also, can you get a list of tiers? No! Of course not! Why would you?  Stackoverflow to the rescue, again, btw, and no idea where that guy pulled that priceless list from.

    So, set things to “F1 | Free” and everything works.

    … or not. Now we get this:

    There was a conflict.                                              (really?!)
    
    64 Bit worker processes cannot be used for the site as the plan
    does not allow it.                                                 (WTF?)
    
    For more information on pricing and features, please see:
    https://aka.ms/appservicepricingdetails                            (oh! a link! NICE)
    

    Formatting and comments by me … . Now, wondering why the fuck a multi-billion-dollar corp can do less than my Raspi (run 64bit code) I head over to said page. And find nothing. There is not a single mention about 64bit, 32bit, or anything helpful. Just … prices.

    Assuming the fuckers just want more money I upgrade SKU to “B1 | Basic”, and everything works. (Update: I just saw that this is actually mentioned in the terraform docs 🙂

    This time for real, and I think I might be onto the path of finally understanding everything Microsoft does.

  • SARS-CoV-2, a.k.a “Corona Virus”, pseudo “data science” and Twitter

    Some terminology (taken from – who would have thought it – t-online.de) and background information:

    • SARS-CoV-2 is the correct name of the virus. Everybody calls him “the Corona Virus” though, which is technically incorrect, cause there’s only the family of corona viruses – it’s a group, not a single one.
    • COVID-19 is the name of the disease. It’s an acronym made of “COrona VIrus Disease 19“. (It’s basically the same as HIV and AIDS – one is the infection, the other the actual illness).
    • It’s not the flu, but I think everybody has that down by now
    • It’s R0-value (how many people are infected by one person on average) is about 3 (source: RKI Germany)

    All of us are following the development of this very closely, cause we have no choice since we’re all basically locked at home. And even if we would go out everything’s closed. That gives us a ton of time to play DOOM Eternal (me), or write twitter bots who regularly publish the numbers of COVID-19 infections in Germany (me as well). As macabre as it is, this is very good oppotunity to start fooling around with data science. But to do this you need datasets, which are surprisingly hard to get. For the current case numbers  I found those:

    There’s probably more, but like I said – it’s surprisingly hard to find regularly updated, publicly available data sets in machine-readable form. (Also, this is the first time I go looking for this stuff, so maybe I just have no clue).

    Now back to the twitter bot. What does it do exactly? Go look for yourself, but if you are too lazy:

    • It prints the current infection rate at 8h, 12h, 16h, 20h. At the last time it will include a graph, a 1-week-forecast and a small evaluation how are stand today in comparison to the forecast which would have been made a week ago.
    • A friend helped me greatly by providing first a Holt-Winters prediction (which is live now), and then upgraded this to a more intelligent ARIMA prediction, which is still buried in a jupyter notebook and waiting for daylight. (Maybe she will write a guest post here to explain what it does and how it works – but I haven’t asked yet).
    • As for the bot’s code – it’s not (yet) public. Which is unusual for me, really. I should remedy that.

    What I learned so far:

    • It’s surprsingly easy and hard at the same time to get a Twitter developer account
    • Twitter does not permit publishing the exact same tweet multiple times in a short period of time
    • Heroku is really really nice for this, as long as you don’t need to pay for it. I would be interested in alternatives.
    • matplotlib is a lot more complicated than I expected
    • but strangely neither bokeh, nor plotly can actually export png graphics without either a separate electron app (WTF?) or a headless browser and selenium (W-T-F?!?)
    • pandas rocks, or more precisely: pandas data frames rock.
    • there does not seem to be a single properly maintained Twitter library for JavaScript, but there is at least tweepy for Python. (I mean I want to try something in JS, but honestly, if everything I find is outdated, I just stay with good old Python …)
    • The infection growth is intensely exponetial – almost a straight line on a log scale plot.

    Let’s see where this goes, and I hope you all stay healthy.