Category: Snippets

  • Unix path too long for domain socket

    I wanted to SSH into a machine, and I got a very weird error message: unix_listener: path "/Users/me/.ssh/sockets/myservername_ansible@000-servername001.subdomain.main-domain-in-use.de-22.gFthlK8q5qNkrXW4" too long for Unix domain socket.

    This seems to be the culprit:

    • I am “persisting” SSH connections in my SSH config folder, precisely here: $HOME/.ssh/sockets
    • The configuration for this is: Host ... ControlMaster auto ControlPath ~/.ssh/sockets/%r@%h-%p ControlPersist 600
    • Before opening a connection, SSH looks for an existing socket in $HOME/.ssh/sockets, and if found re-uses it
    • There is a 100-something length limit for “path to a socket” under Mac OS
    • This path length limit was overshot with that 106-character long path

    Solution: Shorten the path by using %C instead of %r@%h-%p:

    Host ...
      ControlMaster auto
      ControlPath ~/.ssh/sockets/%C
    

    That is it.

    Sources:
  • Container Linux Distributions

    A short list of the perceived active ones in alphabetical order:

    Honorable mentions (not a container distro):

    Personally, I’d start with CoreOS, and exclude Bottlerocket (too AWS, not “for the public” although open source 😉

  • AWS – Forced MFA and the CLI

    Let’s say you want to force every user to enable MFA for AWS IAM accounts. Sure, that is possible.

    Now there’s just one problem: This does not work on the CLI. The credentials in $HOME/.aws/credentials are “static”, they never have a aws:MultiFactorAuthPresent flag attached.

    That would mean that CLI users are either not forced to use MFA, or they just can’t use the CLI any more. Which would – for example – break terraform.

    There’s a solution though. Just get a token using aws sts get-session-token --serial-number ... --token-code ....

    To ease this process (cause it’s really annoying) I created this function, which you can add to your .bashrc or .zshrc (or equivalent shell startup script).

    Enjoy.

    Update 2026-09-03: source available on github

  • Mac quick action – edit PDF documents

    I had another Automator / quick action post before: shrink images

    Problem: My health insurance has the stupidest billing letters imaginable, but at least they come as PDF. The 2nd page is the one you want, the first is useful for the letter’s date. Third and fourth pages are just useless.

    Solution: Another OS X Finder Quick Action using Automator, this time based on pdftk. It keeps pages two and one (in this order) and removes the rest.

    Prerequisites: pdftk (brew install pdftk-java)

    In case you don’t speak German:

    • Receive PDF files from Finder (the image shows “all applications” though – if you want you can do that as well)
    • Files come as script arguments

    Here we go. Automator config:

    And the script for copy-pasting.

    export PATH=$PATH:/usr/local/bin
    
    # now we iterate over a script's arguments, not using stdin as file input
    for f in "$@"
    do
        # ONLY NEEDED IF YOU WANT TO KEEP BACKUPS. Since we're modifying PDF
        # file contents, of files that could be important, I'm paranoid.
        BASE=${f%.*}
        EXT=${f##*.}
        ORIG_FILE="$BASE.orig.$EXT"
        COUNT=0
        while [ -f "$ORIG_FILE" ] ; do
            COUNT=$(($COUNT + 1))
            ORIG_FILE="$BASE.orig.$COUNT.$EXT"
        done
        # HERE IS THE MAGIC.
        # you need pdftk installed (brew install pdftk - probably)
        mv "$f" "$ORIG_FILE"
        pdftk A="$ORIG_FILE" cat A2 A1 output "$f"
    done
    
  • “Old” K8S API reference docs

    I don’t know what happened, but old K8S API reference docs are unavailable from the “original” kubernetes.io website. Try it out, prove me wrong. I still don’t believe it.

    Some netlify-guy to the rescue:

    k8s-dev-ko.netlify.app/…/v1.18 <– open link & change version here.

    Some more info:

    Or just click here:

    You’re welcome.

    (Links working as of 2022-09-03)

    Updates:

    • 2022-09-03: added v1.25
    • 2022-07-20: added v1.24
  • Postgres – restore database with different owner

    Situation:

    • You have a database
    • You want to “clone” this database into another database
    • That one should get a different owner

    Go.

    Step one, dump the database.

    pg_dump -h database.host            \
      -U database_user                  \
      -W                                \
      -O -Ft                            \
      database                          \
      > database.dump.tar
    

    Important here is -O, which means --no-owner, which means “do not include owner information.

    Step two, restore the database. The database in which the dump file is restored has to exist. If you don’t know how to create it, see here.

    pg_restore                          \
      -h database.host                  \
      -U different_database_user        \
      -W                                \
      -d different_database             \
      --no-owner                        \
      --role=different_database_user    \
       -Ft                              \
       database.dump.tar
    

    DISCLAIMER: I have no idea if there is a better way. That just worked.

  • “Fix” Raindrop addon in Firefox

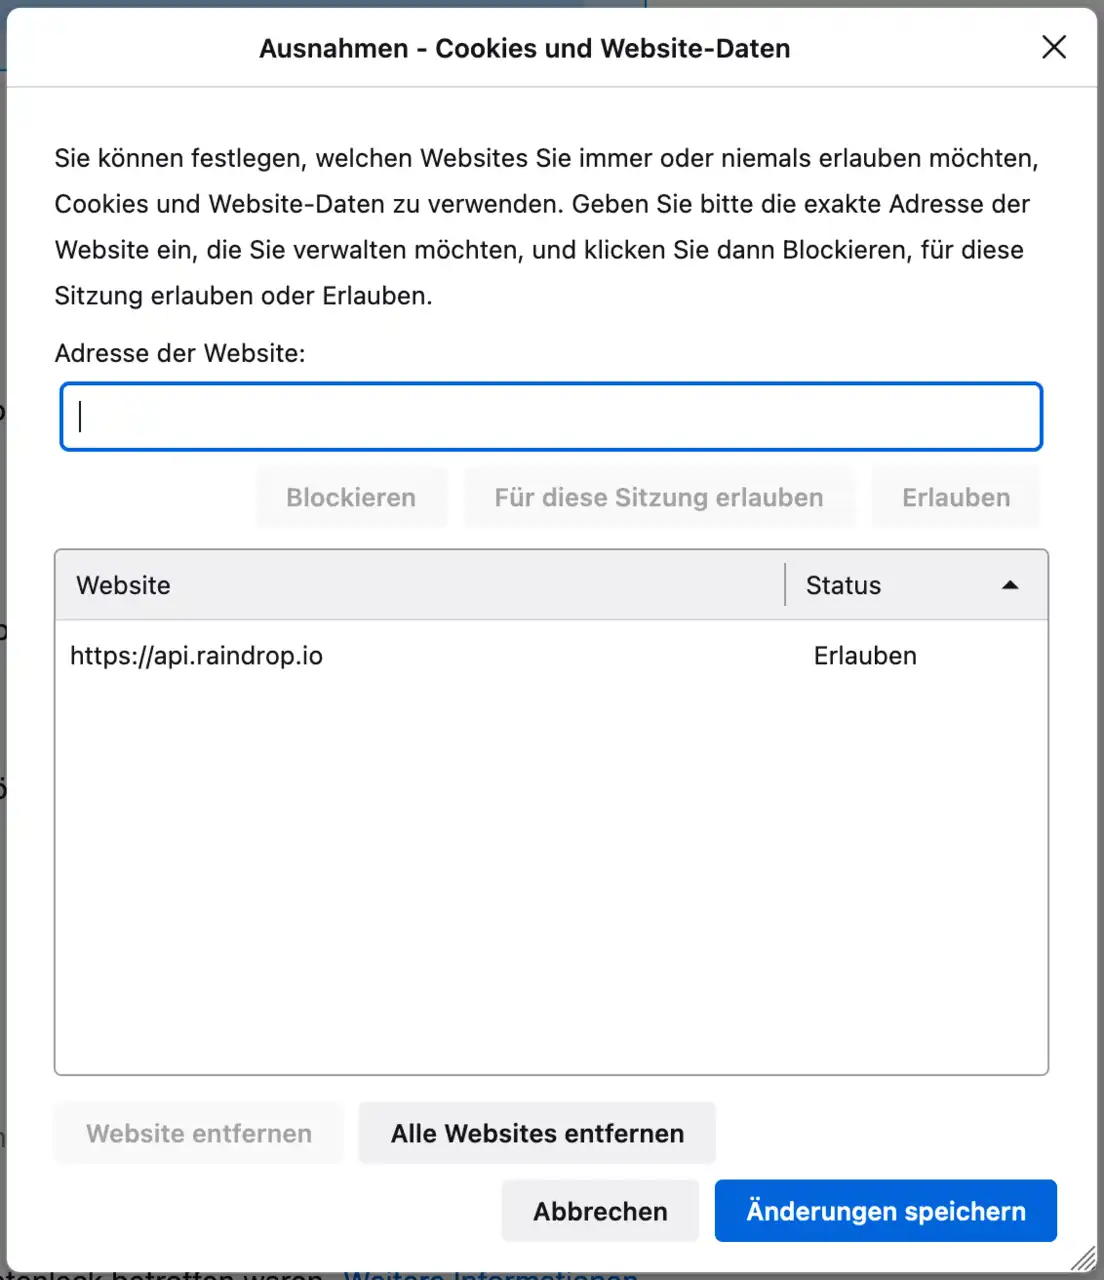
    If you want to use a keyboard shortcut for the Raindrop addon in Firefox, and you keep getting “Please log in” windows, do this:

    https://help.raindrop.io/login-problems/#add-raindropio-to-your-browsers-whitelist

    Or copy-pasted here:

    • open settings
    • go to “Privacy & Security”
    • go to “Cookies and Site Data”
    • click on “Manage Permissions”
    • add https://api.raindrop.io

    Done.

    firefox preferences with raindrop exception

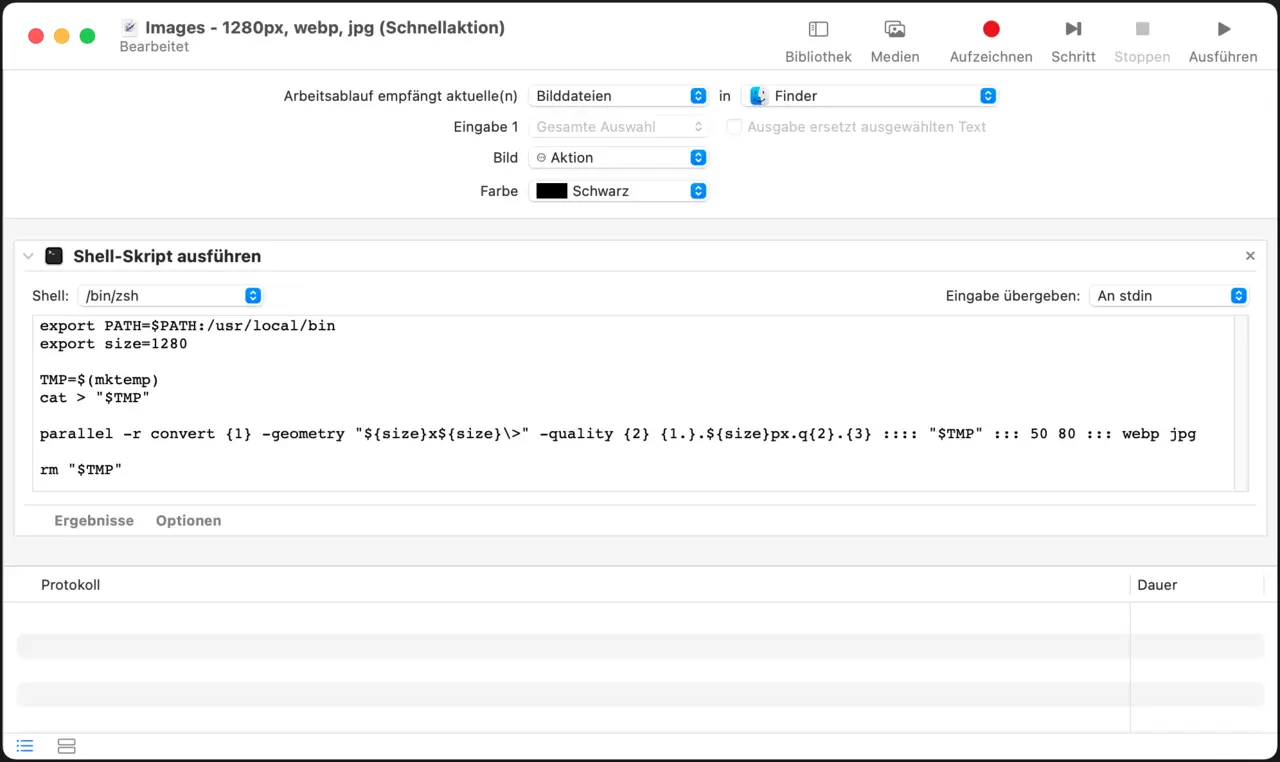
  • Mac quick action – shrink images

    Problem: A list of images, which are big. And one wants to make them smaller, maybe for the web.

    Solution: A Mac Automator quick action.

    Prerequisites: GNU parallel, ImageMagick (both via homebrew)

    You …

    • open Automator
    • create a new quick action
    • add Shell script action
    • paste in the script below
    • make sure arguments are passed via stdin

    automator quick action for shrinking images

    export PATH=$PATH:/usr/local/bin
    export size=1280
    
    # that SHOULD work, but DOES NOT (at least not on my machine)
    #parallel -a - convert {1} -resize "${size}x${size}\>" -quality {2} {1.}.${size}px.{2}.{3} ::: 50 80 ::: webp jpg
    
    # that works.
    TMP=$(mktemp)
    cat > "$TMP"
    parallel -r convert {1} -geometry "${size}x${size}\>" -quality {2} {1.}.${size}px.q{2}.{3} :::: "$TMP" ::: 50 80 ::: webp jpg
    rm "$TMP"
    

    … or use the easier to understand, non-parallel version:

    export PATH=$PATH:/usr/local/bin
    export size=1280
    
    while read f ; do
      for ext in webp jpg ; do
        for q in 50 80 ; do
          convert "$f" -resize ${size}x${size} -quality $q "${f%.*}.$size.q$q.$ext"
        done
      done
    done
    
  • Location of Mac “Quick Actions”

    I created a “quick action” with Automator on my Mac. Once saved, there are a few ways you can find them:

    • “Open” in Automator, then choose “quick actions” in the “type” dropdown
    • Look in $HOME/Library/Services

    That’s about it.

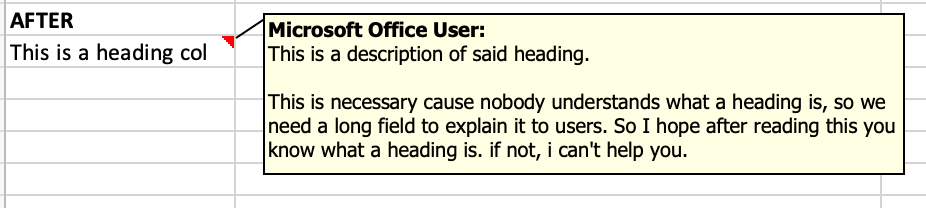
  • Excel – convert columns to comments

    Situation: You have table rows containing short headings, and the cell next to it a long text description. You want to “convert” the description column into comments on the “heading” cells to make the table smaller or save vertical space. Maybe a two images explain that better.

    So we want to go from “before” …

    setup screen

    … to “after” …

    setup screen

    Now this is the Excel VBA code to achieve this:

    Sub convert_to_comment()
    ' convert_to_comment Makro
    ' Tastenkombination: Strg+k
        ' step 1 - create (VISIBLE!) comments
        ' visible because excel has a bug. yeah ... .
        Dim commentText As String
        ActiveCell.Comment.Delete
        commentText = ActiveCell.Offset(0, 1).Text
        ActiveCell.AddComment commentText
        ActiveCell.Comment.Visible = True
        ActiveCell.Comment.Shape.Width = 450
        ActiveCell.Comment.Shape.Height = 150
        ActiveCell.Offset(1, 0).Select
    
        ' make comments invisible in step 2
        ' just comment all lines from step1, and uncomment all of the following
        ' lines, and re-run the macro with each cell. see notes below in the
        ' blog post.
        'ActiveCell.Comment.Visible = False
        'ActiveCell.Offset(1, 0).Select
    End Sub
    

    Some notes:

    • Excel does not seem to support auto-sized comments since v2016. Don’t get me started on how much I “dislike” this pile of … whatever.
    • At least Excel v16.55 has a bug which makes this 2-step-approach necessary (otherwise the comment boxes just won’t show).