Tag: devops

  • GitLab runners, EKS, IRSA and S3 caching

    The problem

    • You do not want to set AWS_* credentials all over your gitlab pipelines
    • You have distributed GitLab runners hosted on kubernetes, and you want to use S3 as a build cache.
    • You want to access AWS resources from your build chain

    The solution

    There’s an official AWS solution: “IRSA”, which stands for “IAM roles for k8s service accounts”. (There is at least another non-AWS one, kube2iam, but this is not subject of this post.)

    IRSA assigns an AWS IAM role to a K8S serviceaccount, which then in turn can be specified for a running pod. There are a couple of pages documenting this, but they are all either too much or too little. I now try do write what I wanted to have.

    Also, nobody has ever documented using that for configuring S3 caching on a K8S GitLab runner. Which is not easy, cause the documentation could honestly be better.

    Advantages of this solution

    • That works with k8s runners just as well as with fargate runners (the way I do them)
    • You are independent from AWS_* credentials in your pipeline
    • You can simply change the IAM role in your pipeline job to get different permissions, you don’t need to create a new user and create new credentials and set them as CI variables, etc.

    What you need

    You need (out of scope):

    For every role you want to use in the cluster, you need …

    • … an IAM role with referencing k8s namespace & service account name
    • … a K8S cluster service account referencing the role ARN
    • this is a reciprocal reference, one references the other, and vice versa!

    That’s what we will do in here.

    The IAM role

    You basically configure a role as every other one, but you will specify a special trust policy. That policy references the OIDC provider, the k8s namespace and the service account in that namespace.

    # terraform code - die hard terraform addict here, sorry.
    
    locals {
      oidc_arn = "arn:aws:iam::123456789012:oidc-provider/oidc.eks.eu-central-1.amazonaws.com/id/deadbeefaffe1234deadbeefaffe1234"
      oidc_url = "https://oidc.eks.eu-central-1.amazonaws.com/id/deadbeefaffe1234deadbeefaffe1234"
      k8s_namespace = "gitlab"
      k8s_service_account_name = "gitlab-runner"
    }
    
    # eks / pod / role stuff: https://is.gd/2skBH7
    resource "aws_iam_role" "k8s_irsa_example_role" {
      name                = "k8s-irsa-example-role"
      assume_role_policy  = data.aws_iam_policy_document.trust_k8s_irsa_example_role.json
      managed_policy_arns = [aws_iam_policy.some_policy.arn]
    }
    
    # this is the PERMISSIONS policy
    data "aws_iam_policy_document" "perms_k8s_irsa_example_role" {
      statement {
        actions = ["s3:*", ]
        resources = [
          "arn:aws:s3:::my-super-duper-gitlab-runner-cache",
          "arn:aws:s3:::my-super-duper-gitlab-runner-cache/*",
        ]
      }}
    
    # this is the TRUST policy
    # the TRUST policy references k8s namespace and service account
    data "aws_iam_policy_document" "trust_k8s_irsa_example_role" {
      statement {
        effect  = "Allow"
        actions = ["sts:AssumeRoleWithWebIdentity"]
        principals {
          type        = "Federated"
          identifiers = [local.oidc.arn]
        }
        condition {
          test     = "StringEquals"
          variable = "${replace(var.oidc_url, "https://", "")}:sub"
          values   = ["system:serviceaccount:${local.k8s_namespace}:${local.k8s_service_account_name}"]
        }
      }
    }
    

    For completeness the trust policy as JSON:

    {
      "Version": "2012-10-17",
      "Statement": [
        {
          "Effect": "Allow",
          "Principal": {
            "Federated": "arn:aws:iam::123456789012:oidc-provider/oidc.eks.eu-central-1.amazonaws.com/id/deadbeefaffe1234deadbeefaffe1234"
          },
          "Action": "sts:AssumeRoleWithWebIdentity",
          "Condition": {
            "StringEquals": {
              "oidc.eks.eu-central-1.amazonaws.com/id/deadbeefaffe1234deadbeefaffe1234:sub": "system:serviceaccount:gitlab:gitlab-runner"
            }
          }
        }
      ]
    }
    

    This is, in fact, all you need from the AWS side of things.

    Some notes:

    • Be absolutely aware that this policy references the name and the namespace in k8s. Also, the service account will reference this policy ARN. So if you change either name, you have to always adjust the other side!

    • For GitLab, you might want to have two of those (you’ll see why later)

    General serviceAccount info

    So this is how any serviceAccount connected to an IAM role looks like:

    apiVersion: v1
    kind: ServiceAccount
    metadata:
      annotations:
        # this is the magic
        # it references the role ARN, which contains the role's name
        eks.amazonaws.com/role-arn: arn:aws:iam::123456789012:role/k8s-irsa-example-role
    
      # the name referenced in the AWS IAM trust policy
      # ("system:serviceaccount:<namespace>:<SERVICEACCOUNTNAME>")
      name: gitlab-runner
    
      # ("system:serviceaccount:<NAMESPACE>:<serviceaccountname>")
      # if you change one, you change both - they reference each other BY NAME
      namespace: gitlab
    

    If you want to test this right now, feel free:

    # $ kubectl apply -n gitlab -f THIS_FILE.yml
    # $ kubectl exec -ti -n gitlab quick-debug-pod -- /bin/bash
    # and then install awscli & ca-certificates to try accessing your s3 bucket :)
    apiVersion: v1
    kind: Pod
    metadata:
      name: quick-debug-pod
      namespace: gitlab
    spec:
      serviceAccountName: gitlab-runner
      containers:
        - name: shell
          image: "ubuntu:latest"
          args: [sleep, infinity]
          resources:
            limits:
              memory: "128Mi"
              cpu: "500m"
    

    General info about GitLab configuration

    REMARK: If you only want to enable your jobs to access AWS resources, you’re in luck. You can skip straight to “Addendum – enabling gitlab JOBS” and you’re done.

    If you want to use the S3 cache, well, … more work.

    Let’s start like this: WHAT YOU MUST KNOW, SUPER IMPORTANT:

    • The main gitlab runner instance will create a pre-signed S3 URL for the gitlab job, and pass it to the k8s pod running the actual job, so the pod running the gitlab job will not need those cache access rights.
    • That means, the S3 policy from above must be attached to the runner itself, and not the pods created by the runner that run the actual pipelines.

    Also, going forward I assume you deploy the gitlab runner using the GitLab runner helm chart.

    Annotate runner pod, short variant

    If you …

    • have only one GitLab runner,
    • and you know the serviceAccount name created by the helm chart,

    … you’re almost done.

    You just need to replace the serviceAccount name (gitlab-runner) name with the actual serviceAccount name on your system, and change one thing in the helm chart:

    ## https://is.gd/Qu1gGv
    rbac:
      create: true
      serviceAccountAnnotations:
        eks.amazonaws.com/role-arn: arn:aws:iam::123456789012:role/k8s-irsa-example-role
    

    See the bottom on how to configure the cache, this is just the role association.

    Annotate runner pod, LONG variant

    In my case it was not so easy:

    • First, I have several runners deployed, and all of them use a different serviceAcount, so that one Role is not going to cut it.
    • Second, I like to have more control over naming, I don’t want to “guess” which name the helm chart gives my serviceAccount, and I don’t want to be vulnerable to name changes.

    So I had to do a bit more work.

    To work in K8S, the GitLab runner needs a …

    • serviceAccount,
    • role,
    • roleBinding.

    We will create those three resources manually now, so we have control over naming and they can be re-used by several gitlab runners (e.g. fargate & cluster).

    In K8S objects, that looks like this:

    # the role
    apiVersion: rbac.authorization.k8s.io/v1
    kind: Role
    metadata:
      name: gitlab-runner-common
      namespace: gitlab
    rules:
      - apiGroups:
          - ""
        resources:
          - "*"
        verbs:
          - "*"
    ---
    # the service account
    apiVersion: v1
    automountServiceAccountToken: true
    kind: ServiceAccount
    metadata:
      annotations:
        eks.amazonaws.com/role-arn: arn:aws:iam::123456789012:role/k8s-irsa-gitlab-runner-common
      name: gitlab-runner-common
      namespace: gitlab
    ---
    # the role binding
    apiVersion: rbac.authorization.k8s.io/v1
    kind: RoleBinding
    metadata:
      name: gitlab-runner-common
      namespace: gitlab
    roleRef:
      apiGroup: rbac.authorization.k8s.io
      kind: Role
      name: gitlab-runner-common
    subjects:
      - kind: ServiceAccount
        name: gitlab-runner-common
        namespace: gitlab
    

    (Btw, I’m using the serviceaccount, role & rolebinding charts here to simplify things – I only want to deal with helm and not with “plain” k8s objects.)

    Adjust your helm chart

    Let’s recap: We now have …

    • An AWS IAM role
    • referencing a namespace & serviceAccount in k8s by name
    • with permissions to access S3
    • A k8s role bound to a serviceAccount in a certain namespace via a rolebinding

    To do that, we need to …

    • disable RBAC creation and reference “our” serviceAccount, and
    • configure the cache.

    Here are the relevant values.yaml file parts:

    ## https://is.gd/Qu1gGv
    rbac:
      # this is basically documented NOWHERE, except here:
      #   https://gitlab.com/gitlab-org/gitlab-runner/-/issues/25972#note_477243643
      create: false
      serviceAccountName: gitlab-runner-common
    

    Configure GitLab S3 cache

    Finally, still in the helm chart’s values file, we do this:

    runners:
      name: "whatever-runner"
    
      config: |
        [[runners]]
          # ...
          [runners.cache]
            Type = "s3"
            Path = "runners-all"
            Shared = true
            [runners.cache.s3]
              ServerAddress = "s3.amazonaws.com"
              BucketName = "my-super-duper-gitlab-runner-cache"
              BucketLocation = "eu-central-1"
              Insecure = false
          # ...
    

    Yup, that’s actually it.

    We should be done.

    Enjoy 🙂

    Addendum – enabling gitlab JOBS

    Now, remember that anything from above will NOT give the actual pipline jobs any additional AWS permissions.

    If you want to access AWS resources out of your jobs, just do this:

    • Create another role, with another association to a serviceAccount,
    • and configure this serviceAccount to be used by the job pods.

    How? Simple. Modify the values file:

    runners:
      config: |
        [[runners]]
          # ...
          [runners.kubernetes]
            # ...
            service_account = "gitlab-jobs"
    

    Bonus – a test pipeline

    # .gitlab-ci.yml
    stages:
      - test
    
    variables:
      CACHE_DIR: hey-ho-cache
    
    .all: &all
      before_script:
        - mkdir -p "$CACHE_DIR"
        - NOWDATE=$(date +%Y%m%d_%H%M%S)
        - CACHEFILE="${CACHE_DIR}/heyho_${NOWDATE}"
        - set -x
    
    .cache: &cache
      paths: [hey-ho-cache]
    
    runner-test-create-cache:
      <<: *all
      image: alpine:edge
      stage: test
      script:
        - echo "waahwaahboogah $NOWDATE" > $CACHEFILE
      cache:
        <<: *cache
      tags:
        - fargate-small
    
    runner-test-check-cache:
      <<: *all
      image: alpine:edge
      stage: test
      script:
        - cat $CACHE_DIR/*
      cache:
        <<: *cache
      needs:
        - runner-test-create-cache
      tags:
        - cluster
        - kubernetes
    

    Troubleshooting

    It doesnt work

    It does.

    If it does not, you have a naming error in your references, or you’re using a wrong serviceAccount for your pods, or you assigned the permission to the wrong entity (jobs instead of runner, or vice versa).

    First, check your annotations and that they reference exiting things.

    It still doesnt work

    It does. Your references are wrong.

    I checked.

    Check again.

    Really.

    Believe me.

    But …

    NO. REALLY.

    And if not, I can’t help you, cause this works.

    (If I have an error here, the principle should be clear – nevertheless I would appreciate a hint if you find one)
    Sources

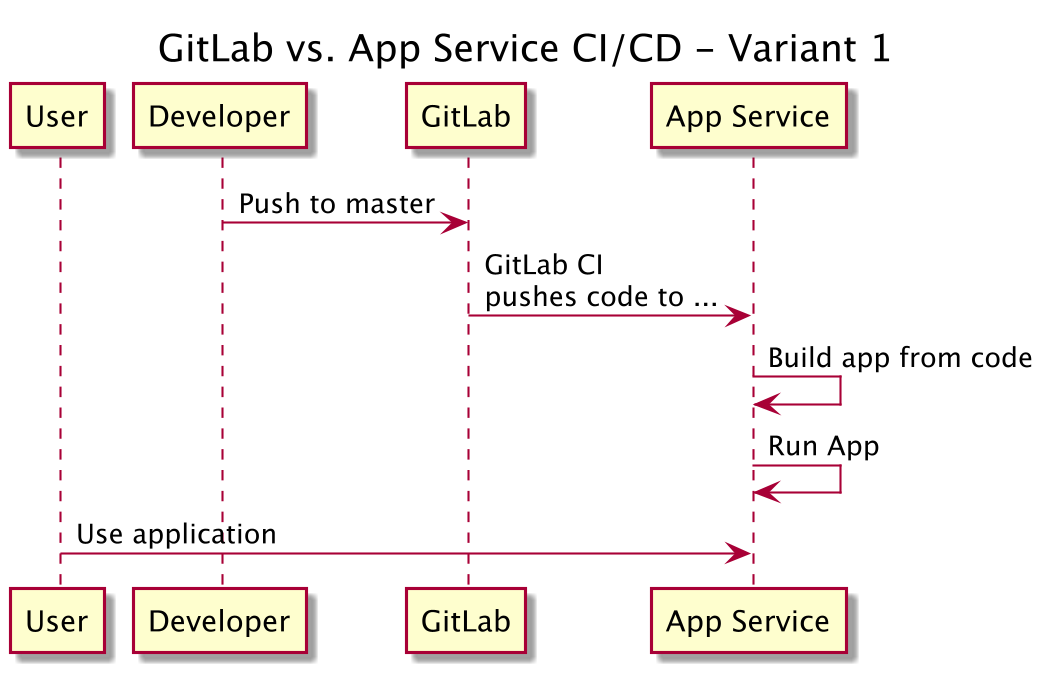
  • GitLab, App Service & CI/CD – Variant 1

    [Updates]

    • 2020-11-29 – reference terraform simple-appservice module
    • 2020-11-29 – add small fix for GitLab CI script

    Since I spent way more time fighting with this I though I might write a proper recap and maybe help others to get started. I also set up a repository with example code which should (!) be a “pull-and-run” thing once you have your ARM_ACCESS_KEY ready, which goes along with this blog post.

    Now, let’s get started. What we want to do here is basically pretty simple, and detailed in the picture below:

    git flow variant 1

    This sounds easy, right? It is, if you are done fighting Azure stupidity and know a couple of things. So what we need to do for this? We need to …

    • Create the App Service (I use terraform for this, and you can use my example repo or my terraform simple-appservice module to get started)
    • Create a GitLab repo (of course, that’s what this is all about, right? An example “hello world” flask up can also be found in the mentioned repo)
    • Configure the GitLab CI system to contain some credentials for the App Service
    • Add a .gitlab-ci.yml file to your GitLab repo to enable CI
    • … done.

    That should be exactly all. Let’s get started.

    Create the app service

    As said – please use my example repo and terraform. That should be enough:

    • make init
    • make plan
    • make do

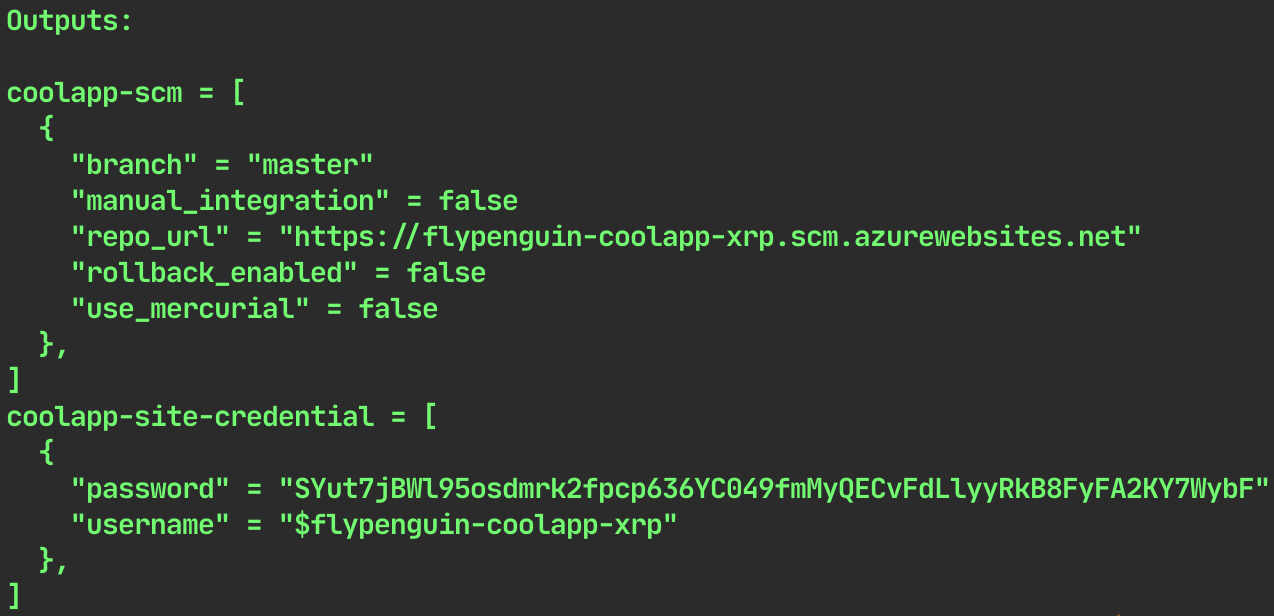
    Terraform should just output the needed credentials.

    terraform credential output

    Important to know:

    • use at least “B1 | Basic” for your SKU settings
    • your “source_control” setting should be “LocalGit” I guess. There is an error in either Terraform or Azure (I think the latter) if you use “ExternalGit”, which would be “variant 2” (a blog post to follow)

    Create a GitLab repo

    This one should do, and if you are rightfully annoyed by Azure give Render a try, they look cool (just found them about 2 mintes ago). To fork the repo you have to click the very unobtrusive “fork” button in the top right.

    Configure GitLab CI

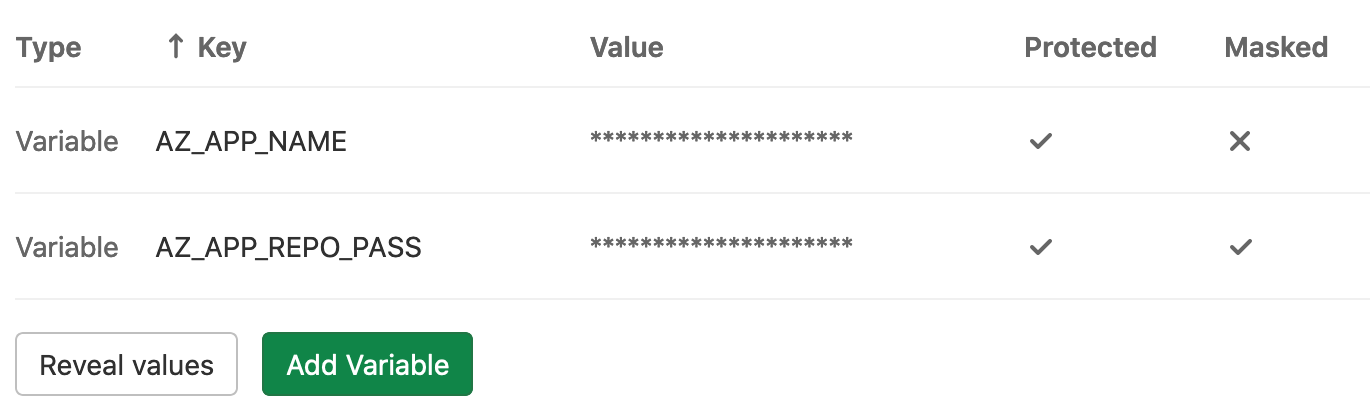
    The only thing to do is set two environment variables for the test runner. The information you need can be found either from my terraform output, or fom the Azure portal (images below). Then you add two variables in GitLab CI (GitLab repo -> settings -> CI/CD -> Variables):

    • AZ_APP_NAME (in this case this would be “flypenguin-coolapp-xrp”)
    • AP_APP_REPO_PASS (in this case this would be “SYut….”)

    set gitlab variables

    There are again a few caveats:

    • Basically the whole thing is based on the app name. Your user name should be your app name prefixed by a “$” sign, which is highly annoying.
    • If you ever want to use a “$” sign in any GitLab runner environment variable, you have to escape it with another “$”. Example: “my$variable” should be “my**$$**variable” in the “value” field of GitLab.

    Add .gitlab-ci.yml file to repo

    Well, just add the file and push the repo.

    stages:
      - push_to_azure
    push_it:
      stage: push_to_azure
      only:
        - master
      allow_failure: false
      before_script:
        - git config --global user.email "some@email.address"
        - git config --global user.name "GitLab CI Pipeline"
      script:
        - export REPO_FQDN="$AZ_APP_NAME.scm.azurewebsites.net"
        - export REPO_URL="https://\$$AZ_APP_NAME:$AZ_APP_REPO_PASS@$REPO_FQDN/$AZ_APP_NAME.git"
        - git remote add azure_app_service "$REPO_URL"
        - git remote -v
        # DEEP DIVE INFORMATION, DELETE ME IF YOU WANT
        # the local branch is 'detached head' - which is fucked.
        # we can't do "git push --force azure HEAD:master" on the FIRST push.
        # we can't push into an empty repository at all, even when using
        #   git push --force azure HEAD:refs/heads/master
        # because on the first push this will still not work.
        # the actually easiest way seems to be to not do "detached head" here.
        # so let's try to "unshallow" that thing.
        # https://is.gd/t7y7LM / https://is.gd/8YE4Ua
        # https://is.gd/rZDwxy / https://is.gd/rZDwxy
        - git fetch --unshallow origin || true
        - git push --force azure_app_service HEAD:refs/heads/master
    

    Finally – test.

    Just push a change to your repo and see if it works. The first obvious change is the addition of the .gitlab-ci.yml file … .

    Hope that helped, hope it works 🙂

  • Rancher 2.4+ installation notes

    I really like Rancher. Used in v1.x, now I’m back at a point where I might need it. Also I want to pitch it to my colleagues, which means I need to have a quick and dirty setup to fool around with. The Rancher Terraform (love it) modules are huge, and I wanted to have a simpler method (which I understand more) for my first training session with the guys.

    These are my notes:

  • cert-manager too old …

    Today cert-manager stopped issuing certificates, and all requests said “insecure website”. Uncool, since this affected our Confluence and our sign-in mechanism. So let’s find out what was happening, right? Turns out cert-manager considered itself “too old” (“your ACME client is too old”, literally) and wanted to be updated.

    So far, so good. Just perform helm update cert-manager cert-manager, right?

    Wrong.

    • First, I had to upgrade to helm3. All right, I could have used helm2, but helm3 was already on here, and it seemed easy. That went (fairly) easy.
    • Then I wanted to upgrade cert-manager. Turns out for that I actually had to upgrade the running k8s version 1.12.x to 1.13.x … otherwise I’d get errors from the helm chart. That just took ages cause AKS is a bit slow.
    • Finally done I wanted to upgrade cert-manager. Until I realized a lot of stateful pods were stuck in “initialization”. Turns out that AKS had issues moving the volumes around, I still don’t know why. (Did I mention I just don’t like pretty much anything about Azure? It’s just so incredibly cumbersome to use, and nothing is where you expect it). So I had to manually mount the volumes on the host the Pod was currently on and have an open TODO now, which just sucks.
    • Finally done I wanted to upgrade cert-manager. The upgrade went just peachy, until I realized that … nothing happened. Turns out they changed pretty much all API versions and annotation keys. So I had to rewrite / upgrade all ingress annotations, update the ClusterIssuer resources and delete the now obsolete former K8S CRDs.

    And just like that I had my certificates back. Wasn’t that easy? 😀

  • Databases with dokku

    This is part 2 of a couple of blog posts about dokku, a amazing little Heroku clone.

    In the previous post I showed how to set up Dokku on a DigitalOcean droplet, and deployed a little hello-world container with a single git push. The reason why I wanted dokku thoug was the need of a database. As said – hosting comes cheap, databases usually come either expensive or with limited flexibility, or just too annoying configuration effort.

    Dokku is the perferct middle ground. Let’s see why.

    For me it was the existing postgres plugin which you can simply install and use. The whole process is incredibly easy, takes wbout two commands, and looks like this (let’s assume our “hello world” container uses a database):

    $ sudo dokku plugin:install https://github.com/dokku/dokku-postgres.git postgres
    

    That’s it, again.

    $ dokku postgres:create hello-world
    
    dokku postgres:create hello-world
    Waiting for container to be ready
    Creating container database Securing connection to database
    =====> Postgres container created: hello-world
    =====> Container Information
           Config dir: /var/lib/dokku/services/postgres/hello-world/config
           Data dir: /var/lib/dokku/services/postgres/hello-world/data
           Dsn: postgres://postgres:bd6b0725d710bb5a662bb628eee787b1@dokku-postgres-hello-world:5432/hello_world
           Exposed ports: -
           Id: 785ef252c748ed85739d1d6ad375a1e1bd66e925ac79358e9ffaa30ab852d6c0
           Internal ip: 172.17.0.9
           Links: -
           Service root: /var/lib/dokku/services/postgres/hello-world
           Status: running
           Version: postgres:10.2
    
    $ docker ps
    
    CONTAINER ID   IMAGE                      COMMAND                  CREATED         STATUS         PORTS      NAMES
    cc99cccacf2c   dokku/hello-world:latest   "/bin/sh -c 'php-fpm…"   2 minutes ago   Up 2 minutes   80/tcp     hello-world.web.1
    785ef252c748   postgres:10.2              "docker-entrypoint.s…"   5 minutes ago   Up 5 minutes   5432/tcp   dokku.postgres.hello-world
    [...]
    

    This creates a database container with postgres 10.2, as you can see. You can influence a lot of behavior by using environment variables, see the GitHub page for more info.

    Then you link the container to the running app:

    $ dokku postgres:link hello-world hello-world
    -----> Setting config vars
           DATABASE_URL: postgres://postgres:bd6b0725d710bb5a662bb628eee787b1@dokku-postgres-hello-world:5432/hello_world
    -----> Restarting app hello-world
    -----> Releasing hello-world (dokku/hello-world:latest)...
    -----> Deploying hello-world (dokku/hello-world:latest)...
    -----> Attempting to run scripts.dokku.predeploy from app.json (if defined)
    -----> No Procfile found in app image
    -----> DOKKU_SCALE file found (/home/dokku/hello-world/DOKKU_SCALE)
    =====> web=1
    -----> Attempting pre-flight checks
           For more efficient zero downtime deployments, create a file CHECKS.
           See http://dokku.viewdocs.io/dokku/deployment/zero-downtime-deploys/ for examples
           CHECKS file not found in container: Running simple container check...
    -----> Waiting for 10 seconds ...
    -----> Default container check successful!
    -----> Running post-deploy
    -----> Configuring hello-world.my-paas.for-myself.com...(using built-in template)
    -----> Creating http nginx.conf
    -----> Running nginx-pre-reload Reloading nginx
    -----> Setting config vars DOKKU_APP_RESTORE: 1
    -----> Found previous container(s) (14c349cb496d) named hello-world.web.1
    =====> Renaming container (14c349cb496d) hello-world.web.1 to hello-world.web.1.1535285386
    =====> Renaming container (cc99cccacf2c) serene_bassi to hello-world.web.1
    -----> Attempting to run scripts.dokku.postdeploy from app.json (if defined)
    -----> Shutting down old containers in 60 seconds
    =====> 14c349cb496d95cc4be1833f2e7f6ef2bef099a37c2a22cd4dcdb542f09bea0f
    =====> Application deployed:
           http://hello-world.my-paas.for-myself.com
    

    And done.

    What happened? You have now the environment variable $DATABASE_URL set in the hello-world app, that’s why the restart was necessary (which you can postpone, if you want, but you probably need it now, right?).

    Let’s check:

    $ docker exec -ti hello-world.web.1 /bin/sh
    
    [now in the container]
    
    # env | grep DATABASE
    DATABASE_URL=postgres://postgres:bd6b0725d710bb5a662bb628eee787b1@dokku-postgres-hello-world:5432/hello_world
    

    That’s it. Super easy. Now if you’re using Django, you could use kennethreitz/dj-database-url to automatically parse and use it, and you’re done. (Probably every framework has something similar, so just have a look).

  • GitLab spot runners & Puppet

    We are on AWS with GitLab. For ease of use, and because our build hosts degenerate for some reason (network issues), we decided to use spot instances with GitLab.

    The journey was all but easy. Here’s why.

    GitLab Runner configuration complaints

    First: The process

    To configure GitLab runner, you have to …

    • install GitLab,
    • write down the runner registration token,
    • start a runner,
    • manually a registration command using above token.

    That registration command will then modify the config file of the runner. That is important because you can’t just write a static, read-only config file and start the runner. This is not possible for two reasons:

    • when you execute the registration command, the runner wants to modify the config file to add yet another token (its “personal” token, not the general registration secret), so it must not be read-only
    • the runner has to be registered, so just starting it will do … nothing.

    That is in my eyes a huge design flaw, which undoubtedly has its reasons, but it still – sorry – sucks IMHO.

    Second: The configuration

    You can configure pretty much everything in the config file. But once the runner registers, the registration process for some reason appends a completely new config to any existing config file, so that … the state is weird. It works, but it looks fucked, and feels fucked.

    You can also set all configuration file entries using the gitlab-runner register  command. Well, not all: The global parameters (like, for example, log_level  or concurrent ) cannot be set. Those have to be in a pre-existing config file, so you need both – the file and the registration command, which will look super ugly in a very short time.

    Especially if you still use Puppet to manage the runners, cause then you just can’t just restart the runner once the config file changes. Because it will always change, because of above reasons.

    Third: The AWS permission documentation

    Another thing is that the list of AWS permissions the runner needs in order to create spot instances is nowhere to be found. Hint: EC2FullAccess  and S3FullAccess is not enough. We are using admin permissions right now, until we figured it out. Not nice.

    Our solution

    For this we’re still using Puppet (our K8S migration is still ongoing), and our solution so far looks like this:

    • Create a config file with puppet next to the designated config file location,
    • containing only global parameters.
    • The file has a puppet hook which triggers an exec that deletes the “final” config file if the puppet-created one has changed.
    • Start the GitLab runner.
    • Perform a “docker exec” which registers the runner in GitLab.
    • The “unless” contains a check that skips execution if the final config file is present.
    • The register  command sets all configuration values except the global ones. Like said above, the command appends all non-global config settings to any existing config file.

    Some code

    #
    # CONFIG VALUES
    #
    
    # the configuration for the build runner running on the same host, which
    # manages the autoscaling-based spot-instance-allocation
    global::concurrent: "5"
    
    registration_command::docker_image: "ubuntu:artful"
    registration_command::token: "our-token"
    registration_command::url: "https://our.gitlab.server"
    
    runners::concurrency: "1"
    runners::limit: "10"
    runners::name: "spot-runner"
    
    cache::bucket_location: "eu-central-1"
    cache::bucket_name: "our-cache-bucket"
    cache::shared: "true"
    cache::type: "s3"
    
    machine::idle_nodes: "0"
    machine::idle_time: "1800"
    machine::max_builds: "10"
    machine::machine_name: "standard-%s"
    
    machine::option::access_key: "%{hiera('ops::gitlab::spotrunner::id')}"
    machine::option::ami: "ami-44d48eaf"
    machine::option::block_minutes: "60"
    machine::option::iam_profile: "gitlab-runner"
    machine::option::instance_type: "m4.xlarge"
    machine::option::private_address_only: "true"
    machine::option::private_address: "true"
    machine::option::region: "eu-central-1"
    machine::option::secret_key: "%{hiera('ops::gitlab::spotrunner::secret')}"
    machine::option::spot_instances: "true"
    machine::option::spot_price: "0.2"
    machine::option::subnet_id: "subnet-subbb"
    machine::option::tags: "stage,prod"
    machine::option::vpc_id: "vpc-veepeecee"
    
    machine::option::other: >
      --machine-machine-options amazonec2-security-group=cognodev3_sg_docker_machine
      --machine-machine-options amazonec2-security-group=cognodev3-SG0-shubdu
      --machine-machine-options amazonec2-security-group=cognodev3-SG1-shalala
      --machine-machine-options amazonec2-security-group=cognodev3-SG2-shubndibndu
      --machine-machine-options engine-insecure-registry=some.internal.repo
      --machine-machine-options engine-insecure-registry=other.internal.repo:5000
    
    #
    # START
    #
    
    ## GITLAB SPOT INSTANCE RUNNER
    
    create::docker_containers:
      # gitlab spot runner
      gitlab-spot-runner:
        image: gitlab/gitlab-runner:latest
        pull_on_start: true
        volumes:
          - /var/docker-apps/gitlab-spot-runner:/etc/gitlab-runner
          - /var/run/docker.sock:/var/run/docker.sock
          - /var/run/.docker:/root/.docker
    
    create::files:
      "/var/docker-apps/gitlab-spot-runner/config.toml.puppet":
        ensure: present
        notify: "Service[docker-gitlab-spot-runner]"
        content: |
          concurrent = %{hiera('global::concurrent')}
          check_interval = 0
    
    create::execs:
      "delete config file":
        command: rm /etc/gitlab-runner/config.toml
        path: /bin:/usr/bin:/sbin:/usr/sbin
        refreshonly: true
        subscribe: File[/etc/gitlab-runner/config.toml.puppet]
        before: Docker::Exec[register-spot-runner]
    
    # why are we doing this?
    # because gitlab WANTS to re-write the config file. and we CANNOT set "global"
    # parameters (e.g. "log_level", "concurrent") in using the registration
    # command line.
    # so, we ...
    #    * create a config "config.toml.puppet" file with ONLY global params
    #    * rm the config.toml file in case of changes to the .puppet file
    #    * re-execute registration using ALL other config settings when the
    #      config.toml file is no longer present
    # we do this because:
    #    * we can't watch the toml file for changes, cause the runner WILL change
    #      it
    #    * but we WANT to set global parameters, and luckily the runner seems
    #      to just append all non-global settings to an existing config file
    #      on registration.
    # THIS FUCKING SUCKS. I know. but I really have not found another way (abk)
    
    create::docker_execs:
      "register-spot-runner":
        detach: false
        container: gitlab-spot-runner
        tty: true
        command: >-
          /bin/bash -c 'cp /etc/gitlab-runner/config.toml.puppet /etc/gitlab-runner/config.toml &&
          gitlab-runner register --non-interactive
          --registration-token %{hiera('registration_command::token')}
          --url %{hiera('registration_command::url')}
          --executor "docker+machine"
          --docker-image %{hiera('registration_command::docker_image')}
          --locked=false
          --run-untagged
          --docker-volumes /var/run/docker.sock:/var/run/docker.sock
          --name %{hiera('runners::name')}
          --limit %{hiera('runners::limit')}
          --request-concurrency %{hiera('runners::concurrency')}
          --cache-cache-shared=%{hiera('cache::shared')}
          --cache-s3-bucket-location %{hiera('cache::bucket_location')}
          --cache-s3-bucket-name %{hiera('cache::bucket_name')}
          --cache-type %{hiera('cache::type')}
          --machine-machine-driver amazonec2
          --machine-idle-nodes %{hiera('machine::idle_nodes')}
          --machine-idle-time  %{hiera('machine::idle_time')}
          --machine-machine-name %{hiera('machine::machine_name')}
          --machine-max-builds %{hiera('machine::max_builds')}
          --machine-machine-options amazonec2-private-address-only=%{hiera('machine::option::private_address_only')}
          --machine-machine-options amazonec2-use-private-address=%{hiera('machine::option::private_address')}
          --machine-machine-options amazonec2-region=%{hiera('machine::option::region')}
          --machine-machine-options amazonec2-access-key=%{hiera('machine::option::access_key')}
          --machine-machine-options amazonec2-ami=%{hiera('machine::option::ami')}
          --machine-machine-options amazonec2-block-duration-minutes=%{hiera('machine::option::block_minutes')}
          --machine-machine-options amazonec2-iam-instance-profile=%{hiera('machine::option::iam_profile')}
          --machine-machine-options amazonec2-instance-type=%{hiera('machine::option::instance_type')}
          --machine-machine-options amazonec2-request-spot-instance=%{hiera('machine::option::spot_instances')}
          --machine-machine-options amazonec2-secret-key=%{hiera('machine::option::secret_key')}
          --machine-machine-options amazonec2-spot-price=%{hiera('machine::option::spot_price')}
          --machine-machine-options amazonec2-subnet-id=%{hiera('machine::option::subnet_id')}
          --machine-machine-options amazonec2-tags=%{hiera('machine::option::tags')}
          --machine-machine-options amazonec2-vpc-id=%{hiera('machine::option::vpc_id')}
          %{hiera('machine::option::other')}'
        unless: test -f /etc/gitlab-runner/config.toml
        require: Service[docker-gitlab-spot-runner]
    

    Does this look ugly? You bet.

    Should this be a puppet module? Most probably.

    Did I foresee this? Nope.

    Am I completely fed up? Yes.

    Is this stuff I want to do? No.

    Does it work?

    … Yes (at least … 🙂 )

    Remarks

    If you wander what all those create::THING  entries are – it’s this:

    $files = hiera_hash('create::files', {})
    if ! empty($files) {
      create_resources('file', $files)
    }
    

    We have an awful lot of those, cause then we can do a lot of stuff in the config YAMLs and don’t need to go in puppet DSL code.

  • Migrate Rancher database from container to external

    I wanted to switch from an in-container database setup to an external database setup. And I didn’t know what happens when you just lose all database contents, and I thought with Docker and some tweaking that should also not be necessary. So I just migrated the databases. Here’s what I did for those interested:

    • stop rancher
    • use a container (sameersbn/mysql) to mount the rancher database content and do a mysqldump
    • import the dump into the external database (AWS RDS instance)
    • start rancher up with different parameters (use external database, as described in the official docs)

    And now the actual command lines:

    # create socket directory
    $ cd RANCHER_MYSQL_MOUNT
    $ mkdir sockets
    
    # start sameersbn/mysql to have a mysql container for dumping everything
    $ docker run -d --name temp-mysql -v $(pwd)/sockets:/var/run/mysqld -v $(pwd):/var/lib/mysql sameersbn/mysql
    
    # dump the database
    $ mysqldump -S ./sockets/mysqld.sock --add-drop-database --add-drop-table --add-drop-trigger --routines --triggers cattle > cattle.sql
    
    # restore the database in AWS / whatever
    $ mysql -u USERNAME -p -h DB_HOST DB_NAME < cattle.sq
    

    (Don’t forget to stop the sammersbn container once you’re done). I have configured puppet to start rancher. The final configuration in puppet looks like this:

    ::docker::run { 'rancher-master':
      image   => 'rancher/server',
      ports   => "${rancher_port}:8080",
      volumes => [],
      env     =>  [
        "CATTLE_DB_CATTLE_MYSQL_HOST=${db_host}",
        "CATTLE_DB_CATTLE_MYSQL_NAME=${db_name}",
        "CATTLE_DB_CATTLE_MYSQL_PORT=${db_port}",
        "CATTLE_DB_CATTLE_MYSQL_USERNAME=${db_user}",
        "CATTLE_DB_CATTLE_MYSQL_PASSWORD=${db_pass}",
      ],
    }
    

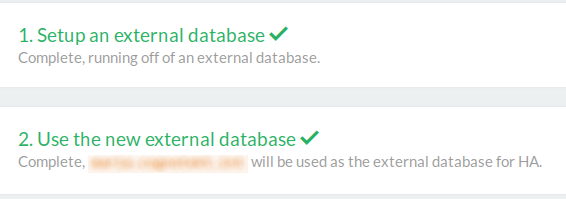
    Restart, and it seems to be working just fine. To check go to http://RANCHER_URL/admin/ha (yes, we still use HTTP internally, it will change), and you should see this:

    setup screen

    Nice.

  • Ansible inventory file from Consul

    Quick self-reminder:

    curl consul.domain:8500/v1/catalog/nodes | jq '.[]|.Address' | tr -d '"'
    
  • CI / CD solutions

    Everyone wants free candy. Or a CI/CD solution, that …

    • auto-deploys container-based servcies
    • auto-updates (roll-forward, roll-back) those services on keypress and “triggers”
    • has one-click-deployment of services.

    My definition of “service” here is “A set of containers working together in a certain way, automatically load balanced where needed”. Example: A n worker nodes, loadbalanced from a web endpoint, and a database container. All deployed at the same time. Including one-click-deployment of environments (“Oh, I’d like to test this revision again, let’s deploy it quickly”…). Note that this is mostly CD (continuous deployment), cause CI is being done for a while now with – mostly – Jenins and other tools.

    What I have found so far that seems to satisfy those requirements:

    And the service-only solutions without a tools tack which you can deploy locally:

    This is kinda it. I would love to evaluate  all those tools, but most of are not really AWS-deploy-friendly, and in the Shippable and Tectonic case they are paid full stack services without local (cloud-owned) deployment anyway. And most are in beta. But the scenery is becoming interesting …

    I will try to post my findings here, as well as the final choice I made for my current client, along with the reasons.

    And for now: Mesosphere and Rancher looks really cool. And I mean “looks” – the UI is just pleasing (which is the most important selection criteria, I know 😉

    Update 2015-12-10: Added Vamp, Kubernetes

  • My take at a CI infrastructure, Pt.1

    … so far.

    It might be crappy, but I’ll share it, cause it’s working. (Well, today it started doing this 😉 ). But enough preamble, let’s jump in.

    The Situation

    I am in a new project. Those people have nothing but a deadline, and when I say nothing I mean it. Not even code. They asked me what I would do, and I said “go cloud, use everything you can from other people, so you don’t have to do it, and you stay in tune with the rest of the universe” (read: avoid NIH syndrome). They agreed, and hired me.

    The Starting Point

    They really want the JetBrains toolchain, the devs use CLion. They also want YouTrack for ticketing (which doesn’t blow my mind so far, but it’s ok). Naturally they want to use TeamCity, which is the Jenkins alternative from JetBrains, and pretty all right from what I can see so far.

    The code is probably 95%+ C++, and creates a stateless REST endpoint in the cloud (but load balanced). That’s a really simple setup to start with, just perfect.

    Source code hosting was initially planned to be either inhouse or in the bought cloud, not with a hoster. Up to now they were using git, but without graphical frontend which involved manual creation (by the – part time – admin) of every git repo.

    The Cloud Environment

    That’s just practical stuff now, and has nothing – yet – to do with CI/CD. Skip it if you’re just interested in that. Read it if you want to read my brain.

    I looked around for full-stack hosted CI/CD systems, notably found only Shippable, and thought that they don’t fully match the requirements (even when we move source code hosting out). So I went to AWS, and tried ElasticBeanstalk. This is quite cool, unfortunately scaling takes about 3-5 minutes for the new host to come up (tested with my little load dummy tool in a simple setup, which I actually didn’t save, which was stupid).

    Anyway, before deploying services CI (the compilation & build stuff) must work. So my first goal was to to get something up and running ASAP, and thats bold and capitalized. Fully automated of course.

    For any kubernetes/CoreOS/… layout I lack the experience to make it available quickly, and – really – all the AWS “click here to deploy” images of those tools didn’t work out-of-the-box. So I started fairly conventional with a simple CloudFormation template spawning three hosts: TeamCity server, TeamCity agent, Docker registry, and – really important – GitLab. Since then GitLab was replaced by a paid GitHub account, all the better.

    Setting the hosts up I used Puppet (oh wonder, being a Puppet “Expert”). Most of the time went in writing a TeamCity puppet module. A quirk is that the agents must download their ZIP distribution image from a running master only, which is kinda annoying to do right in puppet. For now TeamCity is also set up conventionally (without docker), which I might change soon, at least for the server. The postgres database runs in a container, though, which is super-super simple to set up (please donate a bit if you use it, even 1€ / 1$ helps, that guy did a great job!). Same went for gitlab (same guy), and redis (again). I also used the anti-pattern of configuring the hosts based on their IP addresses.

    I also wanted to automate host bootstrapping, so I did this in the cloudformation template for each host. The archive downloaded in this script contains 3 more scripts – a distribution-dependent one which is called first, have a look to see details. Basically it’s just a way to download a snapshot of our current puppet setup (encrypted), and initialize it so puppet can take over. I also use “at” in those scripts to perform a reboot and an action after, which is highly convenient.

    CI (finally)

    … in the next post 😉