Tag: home it

  • Home Assistant behind proxy

    You want to place Home Assistant behind a reverse proxy, for example for SSL termination and the like? You wonder why you get a “403 Bad Request”, while being able to connect directly?

    It’s the configuration.

    # /config/configuration.yaml
    
    # ...
    http:
      use_x_forwarded_for: true
      trusted_proxies:
        - 192.168.179.13 # Add the IP address of the proxy server
    # ...
    

    Quellen:

  • Home Assistant – human readable Fritz!Box uptime

    The Fritz!Box uptime in my Home Assistant dashboard sensor looked like this:

    2021-10-15T20:45:18.294Z
    

    Super hard to read. To achieve a human readable form I had to perform a couple of steps which helped me understand HA a bit better, and serve as a good starting point for other similar actions. Here we go.

    Modify configuration.yaml

    To do this you can install the addon File Editor, which gives you a nice GUI for doing this.

    # Configure a default setup of Home Assistant (frontend, api, etc)
    default_config:
    
    # Text to speech
    tts:
      - platform: google_translate
    
    group: !include groups.yaml
    automation: !include automations.yaml
    script: !include scripts.yaml
    scene: !include scenes.yaml
    
    # ADD THIS LINE
    sensor: !include sensors.yaml
    

    Create sensors.yaml

    Note: You have to restart HA to apply those changes. At least I know no other way.

    # from: https://is.gd/koYX60 and https://is.gd/VK1oDj
    # this is to check if this file is actually read, go look for the "Home
    # Assistant Uptime" entity in HA configuration after restarting
    - platform: uptime
      name: Home Assistant Uptime
    
    # (modified) from: https://is.gd/vfRYi3
    - platform: template
      sensors:
        fritzbox_connection_uptime_human:
          friendly_name: Fritz!Box connection uptime
    
          # in the next line, adjust "sensor.fritz_box_6490_cable_connection_uptime"
          # according to YOUR sensor name.
          value_template: >
            {%- set up_time = as_timestamp(now())-as_timestamp(states('sensor.fritz_box_6490_cable_connection_uptime')) %}
    
            {% if states('sensor.last_boot') == '0.0' %}
              Soeben neu gestartet...
            {% else %}
    
            {%- macro phrase(name, divisor, mod=None) %}
              {%- set value = ((up_time // divisor) % (mod if mod else divisor)) | int %}
              {{- '{} {}'.format(value, name) if value | int > 0 else '' }}
            {%- endmacro %}
    
            {%- set values = [
              phrase('w', 60*60*24*7),
              phrase('d', 60*60*24, 7),
              phrase('h', 60*60, 24),
              phrase('min', 60),
              phrase('s', 1, 60)
            ] | select('!=','') | list %}
    
            {{ values[:-1] | join(' ') ~ ' ' ~ values[-1] if values | length > 1 else values | first }}
            {% endif %}
    
  • Set DNS search path on Unifi USG with DHCP

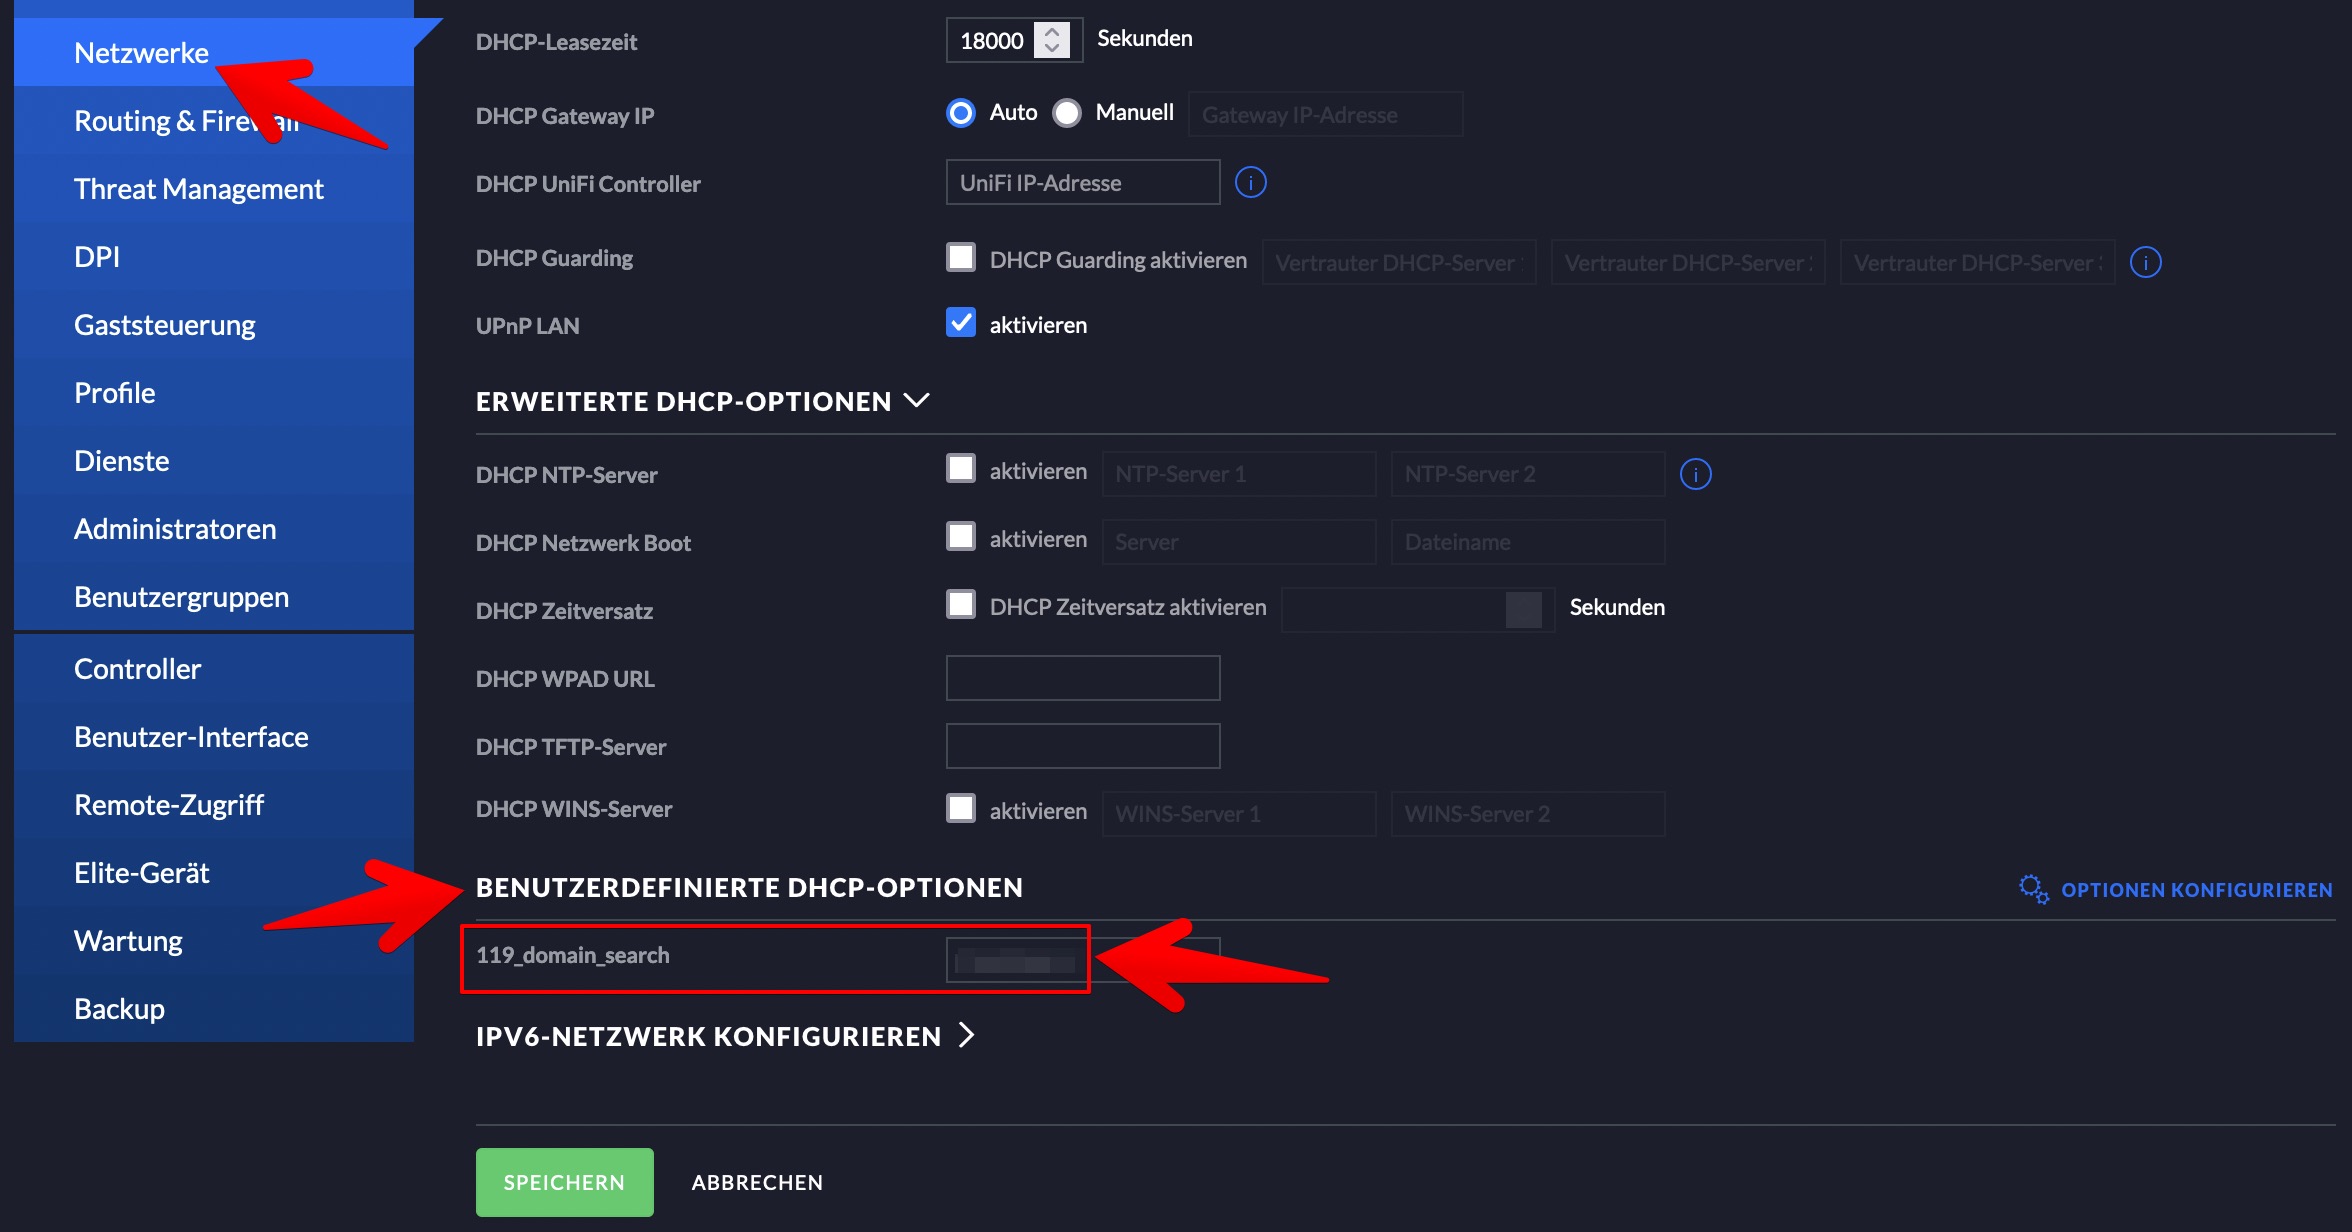
    I have a home network with a Unifi Security Gateway. I wanted to set my home’s domain as “domain search path”, alas, in the Unifi UI there is no option for this, but the community to the rescue.

    • add “custom DHCP option”
    • give it a name
    • use code “119” and type “text”

    Now in your “networks” in the UI you can set your pre-defined custom option on a per-network-basis (see image, and sorry for the German locale – I don’t know how to change that, and I didn’t kinda look hard).

    unifi network settings

  • Pi-Hole in Docker

    disable systemd-resolved stub

    First, disable systemd-resolved name server stub. You can use this command to do this:

    # This just changes "#DNSStubListener=yes" to "DNSStubListener=no"
    sudo sed -r -i.orig 's/#?DNSStubListener=yes/DNSStubListener=no/g' /etc/systemd/resolved.conf
    

    You also have to remove the symlink /etc/resolv.conf, and replace it with a file:

    rm /etc/resolv.conf
    echo "nameserver 1.1.1.1" >  /etc/resolv.conf
    echo "nameserver 8.8.8.8" >> /etc/resolv.conf
    

    Then do systemctl restart systemd-resolved. (Source)

    run pi-hole in docker-compose

    I am using this docker-compose.yml file for pi-hole:

    version: "3"
    
    # More info at https://github.com/pi-hole/docker-pi-hole/ and https://docs.pi-hole.net/
    services:
      pihole:
        container_name: pihole
        image: pihole/pihole:latest
    
        ports:
          - "53:53/tcp"
          - "53:53/udp"
          - "67:67/udp"
          - "80:80/tcp"
    
        environment:
          ServerIP: "192.168.1.2" # ADJUST FOR YOUR PI-HOLE IP OF COURSE
          TZ: "Europe/Berlin"
          WEBPASSWORD: "mysupersecretpassword"
    
        volumes:
          - "./data/etc-pihole/:/etc/pihole/"
          - "./data/etc-dnsmasq.d/:/etc/dnsmasq.d/"
    
        dns: # THIS IS IMPORTANT
          - 127.0.0.1 # SPECIALLY THIS LINE. I DON'T KNOW WHY.
          - 172.198.179.1
    
        # Recommended but not required (DHCP needs NET_ADMIN)
        #   https://github.com/pi-hole/docker-pi-hole#note-on-capabilities
        cap_add:
          - NET_ADMIN
    
        restart: unless-stopped
    

    Update pi-hole entries

    Then update the pi-hole when it runs under: WebUI -> Tools -> Update Gravity -> Press “Update”.

  • Proxmox and home assistant

    A couple of hints to get proxmox and a home assistant VM up and running on a home server.

    Installing Proxmox

    Tip: Youtube “First 11 Things on Proxmox“.

    Graphical installer doesn’t run

    If the graphical installer does not come up (after DHCP) try this:

    # FIRST START PROXMOX INSTALLATION IN   D E B U G   M O D E   ! ! !
    
    # then in the shell starting before the installer runs, do ...
    $ Xorg -configure
    
    # COULD also be under /root/xorg.conf.new - read the command output
    $ cp /xorg.conf.new /etc/X11/xorg.conf
    
    # now replace all ocurrences of `amdgpu` with `fbdev` in /etc/X11/xorg.conf
    
    # exit the shell
    $ <CTRL-D>
    

    Now the installer should just come up.

    Source: This blog post and that comment below.

    Enable updates without subscription

    Change /etc/apt/sources.list.d/pve-enterprise.list to this:

    # /etc/apt/sources.list.d/pve-enterprise.list
    deb http://download.proxmox.com/debian/pve buster pve-no-subscription
    

    Install HASS.io

    SSH into your proxmox box and use this command:

    # (I didn't need sudo, I connected as root)
    bash -c "$(wget -qLO - https://raw.githubusercontent.com/Kanga-Who/home-assistant/master/hassos_install.sh)"
    
  • FritzBox, Unify Security Gateway, and router replacements

    My respect for network changes went up two or three … hundred notches.

    What happened. At my mother’s place, there was a German FritzBox, which handles a VPN between my place and hers, phone lines, the doorbell, WiFi, DHCP, and maybe even more. Now we rent our parts of our house with AirBnB, and those people want – WiFi.

    I don’t want them to be in the same WiFi as myself and – more important – my mother, also I wanted to manage the whole house-WiFi from one central place. Unify / Ubiquity does a great job of delivering really capable products to a reasonable price, so I went for it. During the whole weekend (really, every waking second except for two 10k runs to get the anger out of my system) this is what I learned:

    • This article about how to configure a FritzBox to just do the modem part is still and fully correct for 1und1 in Germany.
    • FritzBox PPPoE passthrough might not work if the model is too old. It won’t tell you anything.
    • You don’t need to set a VLAN ID in the USG then.
    • You do not need to prefix the 1und1 username with “H”, at least for my contract.
    • You must not configure any duplicate IPs in the Unify Control Center, ever. The thing works declaratively – if you hit “apply” or “save” the Control Center tries to create this scenario.
    • What do I mean? I configured the local “network” in the USG with the existing router/gateway IP. But when hitting “save” the USG is immediately configured to use that IP, battling the FritzBox, and provisioning will fail.
    • A FritzBox cannot connect two site networks without the usage of the proprietary “MyFritz” service out of the box. You have to tinker. Which sucks. (Really, AVM?! No site2site VPNs without MyFritz?!)
    • This is the last open item btw, this is the only thing I couldn’t rebuild so far.
    • “systemd-resolved” really want to use DNSSEC. It shouldn’t when using a USG as name server though.
    • /etc/systemd/resolved.conf does not like comments after settings (“THING=value # with a comment behind” will not work)
    • cron jobs are “out”, using systemd timers is “in”.
    • a systemd timer has to be treated the same way as a systemd service (“systemctl enable thing.timer ; systemd start thing.timer“)
    • systemd really wants to do everything
    • … but I kinda like it, it’s one thinking behind everything, and really flexible
    • … if it works.
    • … which it sometimes really doesn’t
    • … and then you have no f*cking clue why.

    In the end, I’m about 90% there. The results are very, very good – Unifi does a great job in providing ready-for-use products which satisfy SMB requirements just fine. Some annoyances, well, really solid and flexible and insanely useful nonetheless.

  • Synology and Git, II

    Don’t use the synology git package.

    But then Git’s not installed.

    I found a compromise:

    • Install the package
    • disable it
    • switch back the shells in /etc/passwd from to /bin/sh

    Be happy.

  • NAS Performance & Mac

    Ich bin stolzer Besitzer eines Synology NAS. Das hängt mit meinem Mac an einem Gigabit-Ethernet, und funktioniert ziemlich gut. Große Dateien bekomme ich mit Transferraten von +- 100 MB/sec rüber.

    Aber.

    Möchte ich von meinem Mac aus eine Netzwerkfreigabe im Finder browsen – dann dauert das listen von Verzeichnissen SEKUNDEN. Anzeigen von JPGs (kleinen!) in der Vorschau auch gerne mal 10-20 davon.

    Abhilfe schafften nach langem googlen folgende Erste-Hilfe-Maßnahmen im Terminal:

    defaults write com.apple.desktopservices DSDontWriteNetworkStores true<br />
    sudo sysctl -w net.inet.tcp.delayed_ack=0<br />
    

    … und seitdem flutscht’s 😀

  • Synology Git Server

    Ich besitze ab neulich eine wundervolle Synology DS414. Schönes Teil.

    Und da ich aktuell ein wenig programmiere zu Hause wollte ich mir hier ein Git repository server einrichten. Das ist nicht ganz trivial, und wer sich github- oder gitlab-ähnlichen Komfort erhofft … ah, nö. Es ist commandline only, und davon viel. Aber zum Punkt – der schnellstmöglichen Einrichtung eines Git-Repo-Servers auf einer Diskstation.

    • Der SSH-Zugriff unter Systemsteuerung > Terminal muss aktiviert sein.
    • Es müssen Benutzer angelegt sein, und diese müssen ein Home-Verzeichnis haben (für die ssh-Schlüssel, ohne die es keinen Spaß macht). Das home-Verzeichnis aktiviert man in der Systemsteuerung > Benutzer, dann oben ein Knopf Benutzerbasis (der 2. von rechts bei mir)
    • Wenn die Benutzer vorhanden sind legt man eine Freigabe an, das macht die Sache einfacher. Ich nutze /volume1/gitrepos.
    • Den eigenen ssh-Schlüssel ins home-Verzeichnis kopieren. Das sollte unter /volume1/homes/<Benutzer> erreichbar sein, das Volume hat man vorhin in Schritt (1) ausgewählt. (natürlich muss .ssh/ 0600 und . sein, und .ssh/authorized_keys 0700 und ., aber das muss ich ja nicht extra erwähnen, oder?)
    • Jetzt den Git-Service aktivieren, dem gewünschten Benutzer den Zugriff erlauben.
    • Ein repository anlegen ist leider Handarbeit:
    • Anmelden als root, dann nach /volume1/gitrepos wechseln, ein Verzeichnis anlegen …
    • … git init --bare ausführen, … und
    • und jetzt entweder alles word-writable machen (bäh), oder dem entsprechenden Benutzer mittels chown zuweisen (yup).
    • Beispiel: /volume1/gitrepos/my_repo
    • Schließlich auf dem Arbeitsrechner noch git das neue Repo übergeben: git remote add origin <user>@<diskstation>:/volume1/gitrepos/my_repo
    • … und das wars.

    Ganz einfach, oder? Naja.

    Quellen: Synology Wiki, Synology Forum