Tag: linux

  • Shutter can’t edit images on Arch

    Unfortunately shutter does no longer work (or not yet, maybe, hopefully 😉 with Wayland on Arch. But I still use it for image editing, namely screenshot annotations, for which this is the best tool by far I have ever found. Not to mention the most private one, cause everybody and his dog wants you to upload “to the cloud” nowadays.

    On a freshly installed system you will find the “Edit” button grayed out though after you installed Shutter. Reason being there’s a lib missing which is not installed by default. This is how you install it:

    $ yaourt -S perl-goo-canvas
    

    And the editing continues.

    (Original source: this one. Thanks!)

  • Install Arch with full disk encryption, btrfs and EFI

    Updates:

    • 2022-06-23 | some minor corrections, added wifi link
    • 2018-03-27 | fixed a typo in the HOOKS documentation, clarified kernel boot parameters

    Introduction

    I recently had to re-install my beloved Arch Linux. For security I need (and use) full disk encryption. This is a cheatsheet for the whole procedure, because although the Arch Linux Wiki is excellent, it is also huge and sometimes you must pick your stuff together from many pages.

    This is what I am doing here 🙂

    NOTE: Usually you only have to follow the one subsection I link to!

    Overview

    One after another, we will do the following steps

    • Download and prepare Arch USB stick (skipped, you should know that 😉
    • Prepare the hard disk
    • Prepare the disk partitions
    • Add LVM “inside” the crypted partition
    • Create filesystems & mount partitions
    • Install arch
    • Configure boot manager

    Prepare the hard disk

    Use parted to init the disk and …

    1. init the disk using a GPT partitioning scheme, then create
    2. a GPT boot partition and put 100% of the remaining space in another partition (the first two actions behind the link)

    Prepare the disk partitions

    Basically,

    1. use the cryptsetup command to encrypt the main (big) partition,
    2. and create a file system on the boot partition (remember: it must be FAT32 for EFI boot, and it must be _un_encrypted!)

    Add an LVM “inside” the encrypted partition

    Cause we want “properly” encrypted swap (you can also encrypt swap using a /dev/random key every time, but then you will not persist data between reboots and you can’t do things like suspend-to-disk), we need at least two “partitions” “inside” the crypted volume. Sounds like LVM on LUKS? It does. We already used it 🙂 .

    1. Create LVM partitions inside the encrypted volume (Don’t forget to use cryptsetup luksOpen before, usually in step 1 in the last section 🙂

    NOTE: Do not follow the above link down to “prepare the boot partition”, cause they use ext2 and we need FAT32 for EFI boot partitions. Just don’t.

    I use the name “secure” for the VG, and I use btrfs cause I am so incredibly elite, and so we don’t need to set a specific size for the / and /home “partitions” and can just use btrfs subvolumes, while still being able to wipe the system without the home directories. That’s pretty neat if you need it (I never did, but now I can ;). So that’s the final setup:

    /dev/mapper/secure-swap    40 GB, swap
    /dev/mapper/secure-system  rest, btrfs with 2 subvols: root & home
    

    Create filesystems & mount partitions

    Of course, Arch has already a wiki page section for that. I did it 3 times in a different way until I found it and had to do it again. So here is my summary.

    # CREATE BTRFS & SUBVOLUMES
    $ mkfs.btrfs /dev/mapper/secure-system
    $ mount /dev/mapper/secure-system /mnt
    $ btrfs subvolume create /mnt/@
    $ btrfs subvolume create /mnt/@home
    $ btrfs subvolume create /mnt/@snapshots
    $ umount /mnt
    
    # MOUNT PARTITIONS
    $ mount -o subvol=@ /dev/mapper/crypted-system /mnt
    $ mkdir -p /mnt/home /mnt/boot
    $ mount -o subvol=@home /dev/mapper/crypted-system /mnt/home
    $ mount /dev/sda1 /mnt/boot
    

    NOTE: /boot is not on an encrypted partition 😉 , and the leading “@” is a convention for subvolumes which should be mounted somewhere. I also don’t use compress=...  parameters, cause I don’t need / want transparent compression.

    Install arch

    Set up networking

    Nowadays nobody uses LAN cables any more. And of course, with Arch you can do it over WiFi as well. This is the short form:

    $ iwctl
    [iwd] station list
    # get the name of your "station" here
    [iwd] station wlan0 scan
    [iwd] station wlan0 get-networks
    # see the list of networks
    [iwd] station wlan0 connect NETWORK_NAME
    

    Also useful: IWD docs, connecting to the internet on the arch Wiki.

    Install base system

    Then you follow up with the usual installation procedure, but you stop at the “Initramfs” section. Here we will pick up again. In the chroot, this is what is needed and useful. (Yes, we’re installing multiple network managers, Linux “is about choice” …)

    pacman -S lvm2 vim \
              iwd netctl dialog wpa_supplicant \
              networkmanager \
              dhcclient \
              udev nano zsh sudo iproute2 net-tools \
              git
    

    Configure boot manager & boot files

    We are using systemd-boot. Or bootctl, as the binary is called. It should be already installed. The procedure is also outlined here. We also enable TRIM support, it seems to lessen security, but it raises SSD performance and life time.

    1. First, check if your system EFI is all right.
    2. Optionally install the Intel microcode updater package if you have an Intel CPU by doing pacman -S intel-ucode.
    3. Then run … bootctl -path=/boot install to install systemd-boot.
      (If you ran into this error File system ... has wrong type for EFI System Partition, then you forgot set 1 esp on on your boot partition in parted during partitioning)

    Now create/modify the files below. Remember: /mnt/boot should be a mounted directory, and since you’re in a chroot this should be /boot for you.

    FILE: /boot/loader/entries/arch.conf

    title Arch Linux
    linux /vmlinuz-linux
    initrd /intel-ucode.img       # ONLY FOR INTEL CPUs!!
    initrd /initramfs-linux.img
    options luks.uuid=FS_UUID root=/dev/mapper/secure-system rootflags=subvol=@ rd.luks.options=discard
    

    Some hints:

    • use blkid to get the UUID
    • Note that the FS_UUID is the UUID of the *encrypted luks partition* (/dev/sda2 or similar), and not the filesystem within!
    • use a mouse to copy-paste the UUID\
    • gpm -m /dev/input/mice -t imps2; you may have to disable vim’s mouse support using set mouse= and set ttymouse=
    • the list of normal and dm-crypt related kernel parameters … well, is also in the Arch wiki.

    FILE: /boot/loader/loader.conf

    default arch    # the file above without .conf extension, can have wildcards!!
    timeout 2
    editor  0
    

    FILE: /etc/mkinitcpio.conf

    # Just MODIFY that file, to be precisely this line:
    HOOKS=(base systemd autodetect modconf keyboard sd-vconsole block sd-encrypt sd-lvm2 filesystems fsck)
    

    The key idea is to use the “systemd” parameters instead of the “normal” ones. The full list of hooks is of course also available, and the order is important.

    Install boot manager

    Now execute:

    mkinitcpio -p linux
    

    If you run into some vmlinuz-linux - file not found issues, just re-install linux and intel-ucode while making sure /boot is mounted.

    Reboot

    We should be done here 🙂 …

    … but we’re paranoid:

    • did you install lvm2? (if not – install it and run mkinitcpio again)
    • did you install iwd? (if not – no wifi in the final system)
    • did you set a root password? (if not, set it)

    Then you can safely …

    $ reboot
    

    Further reading 😉
  • CUPS is … weird

    CUPS is the printing system developed by Apple which is now also in use on pretty much every other Linux / Unix / *BSD box there is. Unfortunately, the process of managing printers is way more painful than the process on Arch Linux. At least with my setup, which is i3 running in a weirdly crippled GNOME session.

    This is what you have to do to get CUPS working on your machine:

    $ pacman -S cups
    [...]
    $ usermod -aG sys MY_USER
    [...]
    $ systemctl enable org.cups.cupsd
    $ systemctl start org.cups.cupsd
    

    The magic is line 2 – adding your user to the sys group. If you don’t do this, you won’t be able to use the web interface at all. Which is a shame, since then you can’t do anything useful (install printers, manage jobs, etc …).

  • Linux font rendering sucks, a.k.a “Where is Boohomil”?

    For some reason, the maintainer behind the “*-infinality” packages in Arch Linux “has gone missing” for a while.

    Why is that important to me? Because infinality is a patch set to a bunch of font and rendering packages, which make fonts under Linux look SO much better than the default setup. (Yes, there are still a couple of things that Linux just absolutely cannot compete in with Mac and / or Win, and font rendering is one of them. Ubuntu does a reasonable job of this, every other distro just sucks.

    Except when you were using infinality. And now it’s defunct.

    Anyway, after experiencing the unbelievably ugly phenomenon described in here, I tried this guide here now, and it seems to fix it.

  • PyCharm, Arch linux & Python 3.6

    Love Python. Love PyCharm. Love Arch Linux.

    Unfortunately Arch sneakily updated Python to 3.6. Cool, new version … but hey, why don’t my debug runs in PyCharm work any more??

    ImportError: libpython3.5m.so.1.0: cannot open shared object file: No such file or directory
    

    Yup, pretty confusing. It seems unable to find shared python 3.5 library. Well. After some cursing, turns out the solution is pretty simple (if you know what to do):

    • get pyenv
    • use pyenv to install Python 3.5.2, but with -enable-shared option set
    • use this python version for PyCharm projects (it does not matter if it’s in a virtualenv or not)

    Like this:

    $ PYTHON_CONFIGURE_OPTS="--enable-shared" pyenv install 3.5.2
    [...]
    $ sudo $HOME/.pyenv/versions/3.5.2/bin/python "/opt/pycharm-professional/helpers/pydev/setup_cython.py" build_ext --inplace
    [...]
    $ _
    

    That solved it for me 🙂

    References:

  • Shared clipboard for Arch Linux as VMWare guest

    … aaaand I wanted to have a shared clipboard. It’s again all in the wiki, but again a bit distributed. So here we go.

    First: Install open-vm-tools and gtkmm, then add some modules to system bootup

    • “sudo pacman -S open-vm-tools gtkmm“
    • “sudo vim /etc/mkinitcpio.conf”
    • Under “MODULES=…” add the following: “vmxnet3 vmw_vmci vmw_pvscsi vmwballoon” (You probably don’t need most of them, but this is the config which worked for me. I didn’t try to remove them one-by-one to see which ones are _actually needed)
    • “sudo mkinitcpio -p linux”
    • reboot

    Second, make sure “vmware-user-suid-wrapper” is stared on login:

    • echo vmware-user-suid-wrapper > ~/.xinitrc
    • Logout and log in (or reboot)

    Done.

  • Fedora, docker and self-signed SSL certs

    I am behind a company firewall with a man-in-the-middle SSL certificate for secure connections. Can’t have viruses over SSL, can we?

    But apps which actually verify SSL connections (which is all of the apps using standard SSL/TLS/whatnot libs) do not like this. And rightfully so. But then we’re left with the following problem:

    $ docker search test
    FATA[0000] Error response from daemon: GEt https://index.docker.io/v1/search?q=test: x509: certificate signed by unknown authority
    $
    

    Now, to solve this on Fedora we do the following (all as root):

    • get a file with the signing certificate as PEM or DER format
    • place this file under /etc/pki/ca-trust/source/anchors
    • run “update-ca-trust extract”
    • restart docker (“systemctl restart docker.service”)

    A “man update-ca-trust” is also helpful to understand what’s happening.

    Sources:

    • http://is.gd/rzKxsO
    • http://is.gd/t9to1R
  • The year of … the Printer.

    Ah, ich bin langsam – der Post schimmelt schon eine Weile hier vor sich hin, weil ich den Screenshot hochlade. Jetzt isses soweit. Es geht also weiter mit: Drucken. Denn irgendwann lief das System schließlich, und ich kam an den Punkt, an dem ich etwas drucken wollte. Gnome war installiert, Firefox auch, also theoretisch (kenne ich ja vom Mac, da verrichtet CUPS ja auch hervorragende Dienste) einfach die WebGui aufrufen, Drucker auswählen, fertig.

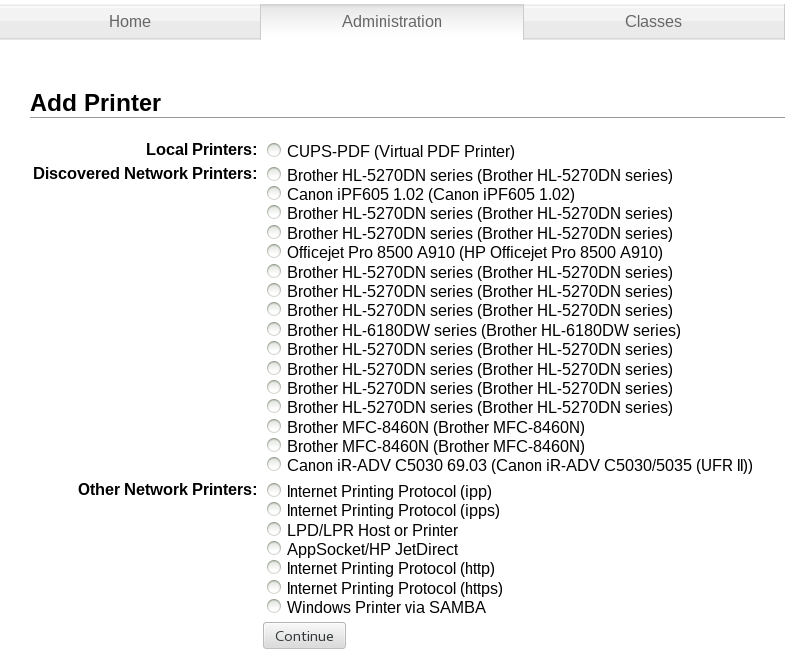
    Zuallererst musste ich an Linus denken: root-Passwort-Eingabe für die Administration von CUPS nötig. Hm. Egal, eingegeben, dann “Add Printer” geklickt, und erst mal erfreut folgendes gesehen:

    add printer dialog

    Hm. Sieht erst mal gut aus, oder? Na, jedenfalls bis man sich die Frage stellt: Welcher der Drucker ist jetzt genau der hier im Büro? Nur Typenbezeichnungen, kein Standort, keine IP? Nicht optimal.

    Der Einfachheit halber einfach manuell installieren. IP vom Kollegen erfragt, und los. Und stop. Drucker URL eingeben … nur wie? Mit “http://”? Oder “lpd://”? Oder “ipp://”? Und hier dann mit oder ohne “/ipp” am Ende? Ich entschied mich für “ipp://” ohne “/ipp”. Dann bitte “Make and Model” auswählen, Brother war nicht in der Liste, Ende.

    Aber kein Problem, Brother gibt ja eigens Linux-Treiber raus. Nur nicht auf der “normalen” Brother-Downloads-Seite, die hat nur Mac und Windows-Treiber. Hm. Ich bin faul, also mal die Variante versucht, die früher mal ging: Zurück, HP Drucker ausgewählt, PCL6, Testseite gedruckt, klappt … nicht. Na gut, wäre auch nicht schön gewesen, aber trotzdem.

    Nochmal zurück, Drucker gelöscht. Dann Google bemüht, die “richtige normale” Brother-Homepage für den Linux-Support gefunden (wäre unter Support -> Linux gewesen, und nicht Support -> Downloads, aber ehrlich, wer schaut noch den Rest der Seite an wenn er das Bild unten sieht? Ich jedenfalls nicht).

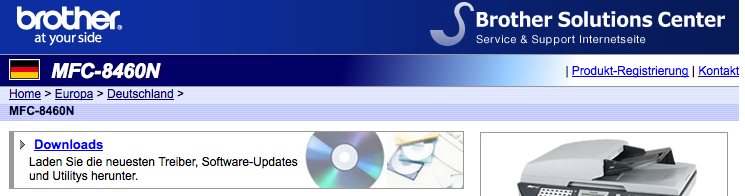
    brother homepage download section

    Dort gibts für das von mir gesuchte Modell 5 Treiber zum herunterladen, und zwar folgende:

    • LPR driver (jeweils als rpm + deb)
    • cupswrapper driver (jeweils als rpm + deb)
    • ppd file

    Aha. Ich entschied mich für PPD, ich bin ja CUPS, ne, und nochmal von vorn: Drucker hinzufügen, manuell, URL diesmal mit “ipp://…/ipp” (also mit “/ipp” am Ende), und siehe da – jetzt kamen auch automatisch Brother-Geräte in der Liste (WTF?), wenn auch nicht das Modell hier im Büro. Daher runtergeladenes PPD eingebunden, bestätigt, Testseite gedruckt, fertig.

    Nicht so ganz optimal.

  • The year of … the Installation.

    Wie versprochen – ein klein wenig gemecker über die Linux Desktop Bemühungen. Erste Hürde: Die Installation.

    Meine Wahl fiel auf Arch Linux, das sollte gut sein, und ich wollte nicht auf den Ubuntu-Zug aufspringen. Bedingungen: Vollverschlüsselte Festplatte (incl. Swap und System), verlangt der Kunde. Ist prinzipiell gut dokumentiert, auch durch eine Howto eines Kollegen. Aber ich wollte statt LVM auf Partition mal BTRFS testen – wenn schon denn schon.

    Um es kurz zu machen – die Installation dauerte knapp 3 Tage.

    Zuerst bootete das System nicht. Grub 2 wollte partout nicht starten und hing – auch nach mehrfachem neu schreiben des Bootsektors – in einer Boot-Loop fest. Zwischendrin hatte ich Arch schon aufgegeben und es mit Ubuntu 13.04 versucht – nur auch hier startete Grub nicht durch, sondern hing einfach. Schließlich gelang mir ein Systemstart nach einem vollständigen Überschreiben der ersten 50 MB der Festplatte durch /dev/random, und einer Neuinstallation von Arch vom allerersten Schritt an.

    Anschließend installierte ich Grafiktreiber, X, Gnome, aktivierte Swap in der /etc/crypttab und startete neu.

    Der Laptop startete, ich muss mein Passwort für die Festplatten-Entschlüsselung eingeben, der Bildschirm flackert, und der Rechner steht. Erste Vermutung: Grafiktreiber. Keinerlei Debug-Meldungen nirgendwo.

    Nach einer weiteren Arch Neuinstallation, da ich irgendwann einfach nicht weiter wusste, kam ich irgendwann durch Zufall und Faulheit auf den Trichter, dass es nicht die Grafik war (denn die ging dann auf einmal), sondern ein fehlerhaftes Einbinden der swap-Partition in der /etc/crypttab. Stand – wie ich im Nachhinein erfuhr – auch sehr klein im Kleingedruckten. So halb meine Schuld also, dennoch sehr, sehr schlecht zu diagnostizieren, und mit enormem Zeitverlust verbunden. Dass vergesse ich auch so schnell nicht wieder.

  • The Year Of The Linux Desktop!

    Es ist eine Ewigkeit her, seitdem ich hauptsächlich mit dem Linux-Desktop gearbeitet habe. Linux Server? Ständig. Dauernd. Immer. Aber Linux Desktop? Über 7 Jahre nicht mehr, mindestens. Und jetzt – die erste Frage in meinem aktuellen Projekt war: Was magst haben? Linux? Windows? 🙂 . Oh wie geil – Linux natürlich! Endlich konnte ich mal mit einer der aktuellen, vielgelobten, gut gereiften Linux-Distris arbeiten.

    Dennoch bin ich von der Entwicklung der letzten Jahre alles andere als begeistert. In den nächsten Posts erläutere ich anhand einiger Beispiele aus erster Hand, warum.

    Und ja, ich fange mein neues Blog mit einem klein wenig Gemecker an. Man gönnt sich ja sonst nix 🙂 . Trotz allem bin ich ein Fan, man redet schließlich nicht über Dinge, die einem egal sind.