Blog

  • Convert RAW files on a Mac using “sips”

    I recently needed to convert Canon *.CR2 RAW files to JPEG. What I did not know is that a Mac brings all you need preinstalled in form of a CLI tool called sips.

    for i in *.CR2; do
      sips -s format jpeg $i --out "${i%.*}.jpg"
    done
    

    Also: man sips works just fine for more information.

    Source: Coderwall

  • Unattended upgrades in Debian/Ubuntu

    If you want to automatically install package upgrades on a Debian/Ubuntu server system – there’s an app for that. First, install the package:

    apt-get install unattended-upgrades apt-listchanges
    

    Then configure the package by editing (Ubuntu) /etc/apt/apt.conf.d/50unattended-upgrades:

    // /etc/apt/apt.conf.d/50unattended-upgrades without comments
    // my version
    Unattended-Upgrade::Allowed-Origins {
            "${distro_id}:${distro_codename}";
        "${distro_id}:${distro_codename}-security";
        "${distro_id}ESMApps:${distro_codename}-apps-security";
        "${distro_id}ESM:${distro_codename}-infra-security";
        "${distro_id}:${distro_codename}-updates";
    };
    Unattended-Upgrade::Package-Blacklist {
    };
    Unattended-Upgrade::DevRelease "false";
    Unattended-Upgrade::Remove-Unused-Kernel-Packages "true";
    Unattended-Upgrade::Remove-Unused-Dependencies "true";
    Unattended-Upgrade::Automatic-Reboot "true";
    Unattended-Upgrade::Automatic-Reboot-Time "02:00";
    

    Apparently in Debian there are a couple more ways to achieve the same goal, this one works pretty well for me.

  • Set DNS search path on Unifi USG with DHCP

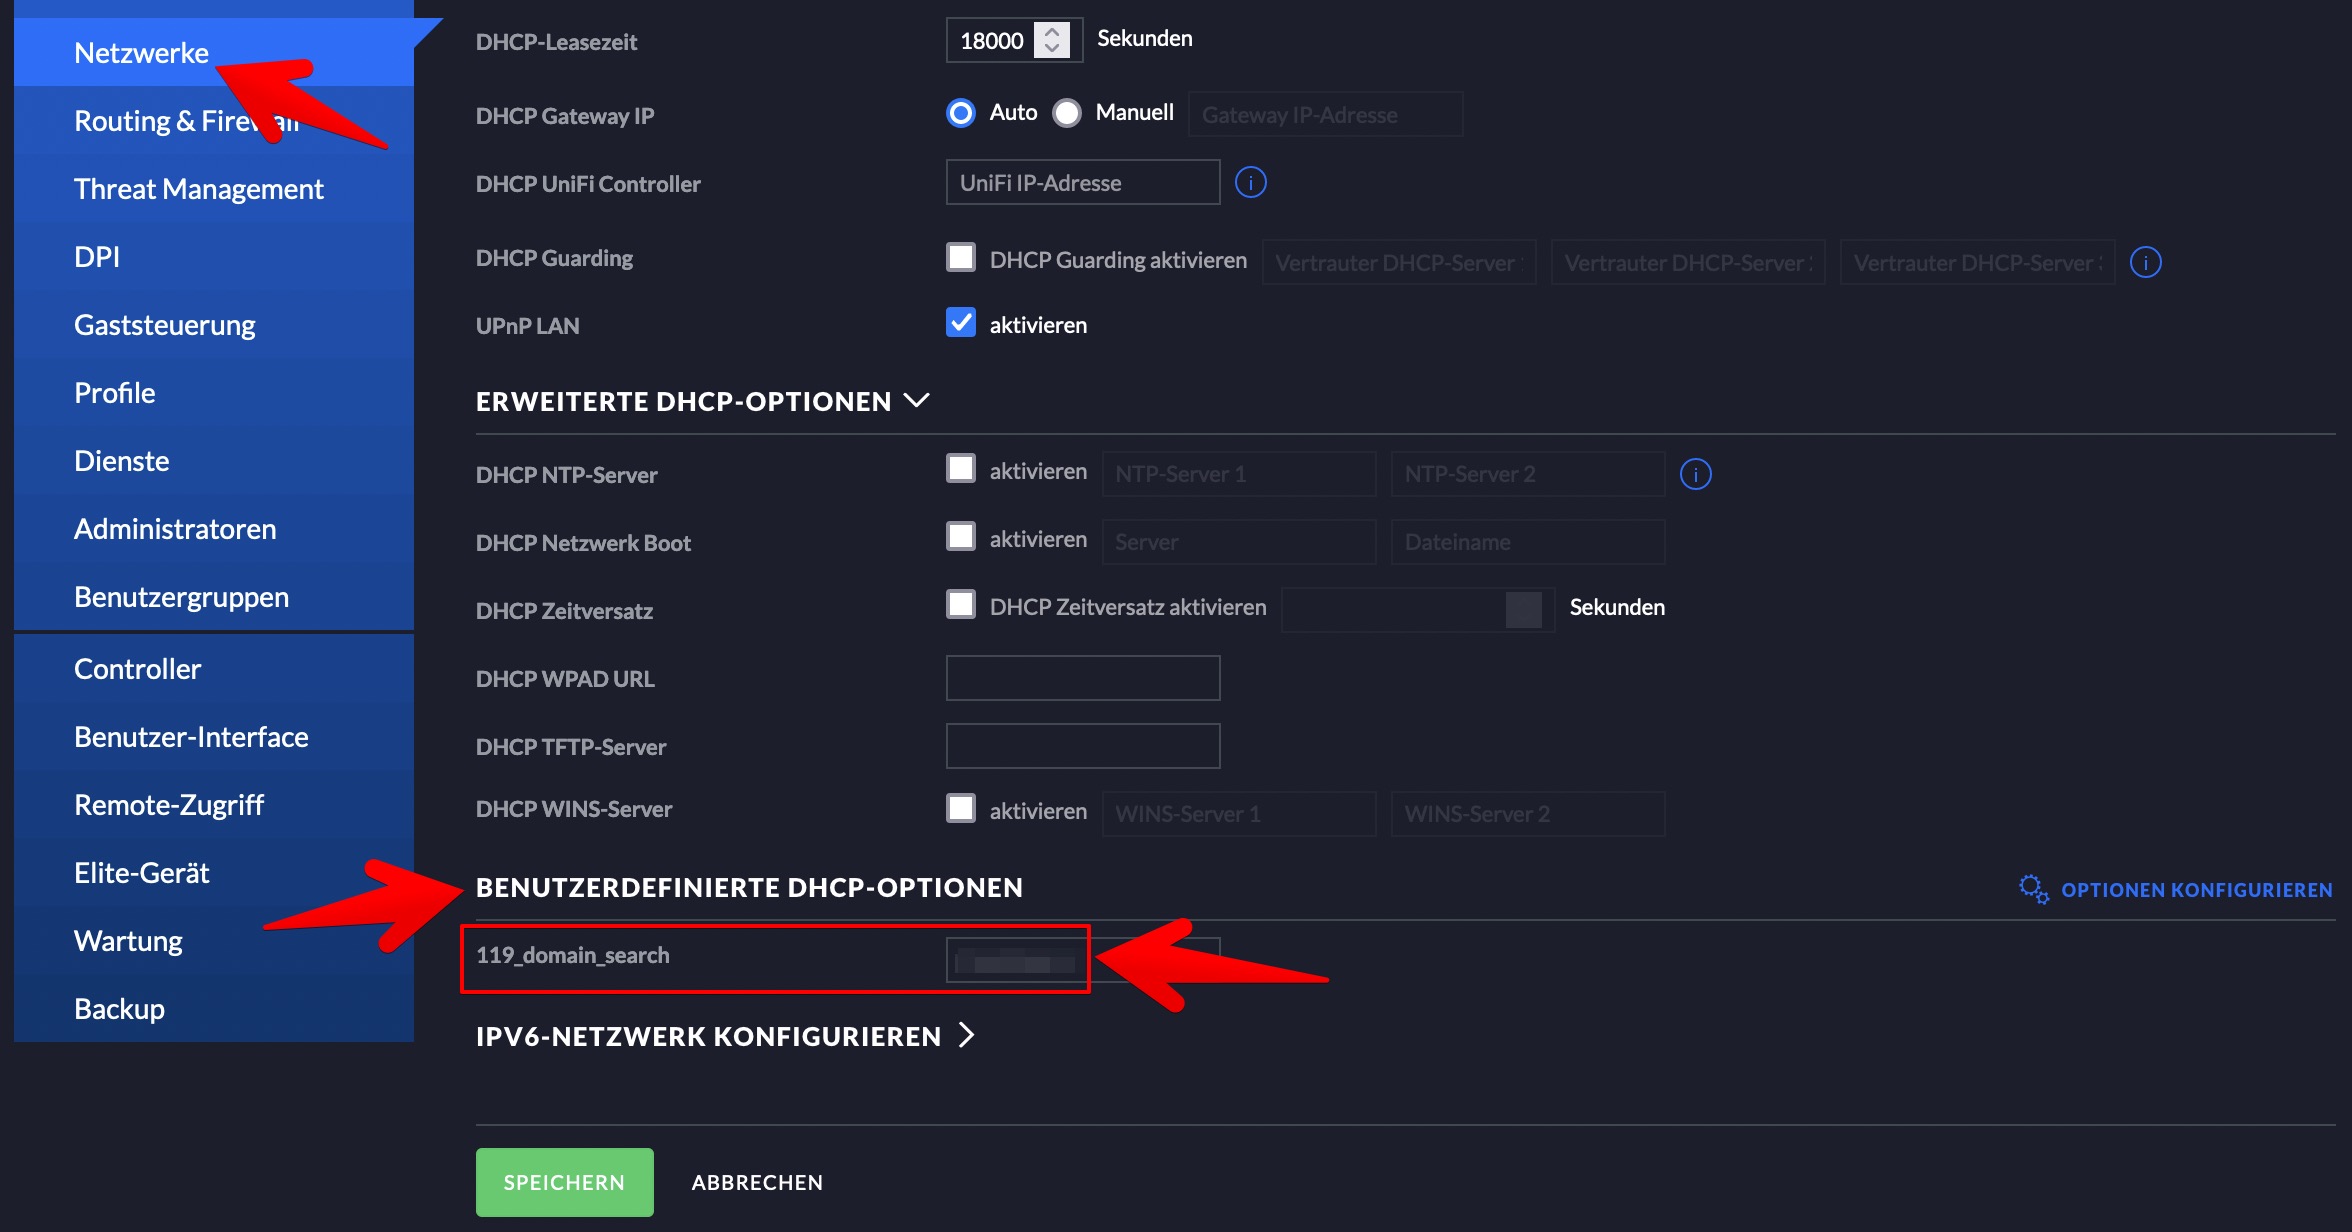
    I have a home network with a Unifi Security Gateway. I wanted to set my home’s domain as “domain search path”, alas, in the Unifi UI there is no option for this, but the community to the rescue.

    • add “custom DHCP option”
    • give it a name
    • use code “119” and type “text”

    Now in your “networks” in the UI you can set your pre-defined custom option on a per-network-basis (see image, and sorry for the German locale – I don’t know how to change that, and I didn’t kinda look hard).

    unifi network settings

  • Add swap space in Ubuntu

    My DigitalOcean Droplet started dropping containers while kswapd ate up CPU cycles like Pacman. Time to add a swap space, or rather a swap file cause I did not want to add a dedicated volume.

    # swap usage check - swapon: no output, no use; free: should read "0"
    sudo swapon --show
    free -h
    
    # as root: create swap (make sure you have enough disk space available)
    fallocate -l 4G /swapfile
    chmod 600 /swapfile
    mkswap /swapfile
    swapon /swapfile
    echo '/swapfile none swap sw 0 0' | sudo tee -a /etc/fstab
    
    # reboot and check (see first two commands) if swap is available
    reboot
    

    Optinonally you can also tune swappiness and cache pressure settings. Both is described in this article’s source (DigitalOcean).

  • Pi-Hole in Docker

    disable systemd-resolved stub

    First, disable systemd-resolved name server stub. You can use this command to do this:

    # This just changes "#DNSStubListener=yes" to "DNSStubListener=no"
    sudo sed -r -i.orig 's/#?DNSStubListener=yes/DNSStubListener=no/g' /etc/systemd/resolved.conf
    

    You also have to remove the symlink /etc/resolv.conf, and replace it with a file:

    rm /etc/resolv.conf
    echo "nameserver 1.1.1.1" >  /etc/resolv.conf
    echo "nameserver 8.8.8.8" >> /etc/resolv.conf
    

    Then do systemctl restart systemd-resolved. (Source)

    run pi-hole in docker-compose

    I am using this docker-compose.yml file for pi-hole:

    version: "3"
    
    # More info at https://github.com/pi-hole/docker-pi-hole/ and https://docs.pi-hole.net/
    services:
      pihole:
        container_name: pihole
        image: pihole/pihole:latest
    
        ports:
          - "53:53/tcp"
          - "53:53/udp"
          - "67:67/udp"
          - "80:80/tcp"
    
        environment:
          ServerIP: "192.168.1.2" # ADJUST FOR YOUR PI-HOLE IP OF COURSE
          TZ: "Europe/Berlin"
          WEBPASSWORD: "mysupersecretpassword"
    
        volumes:
          - "./data/etc-pihole/:/etc/pihole/"
          - "./data/etc-dnsmasq.d/:/etc/dnsmasq.d/"
    
        dns: # THIS IS IMPORTANT
          - 127.0.0.1 # SPECIALLY THIS LINE. I DON'T KNOW WHY.
          - 172.198.179.1
    
        # Recommended but not required (DHCP needs NET_ADMIN)
        #   https://github.com/pi-hole/docker-pi-hole#note-on-capabilities
        cap_add:
          - NET_ADMIN
    
        restart: unless-stopped
    

    Update pi-hole entries

    Then update the pi-hole when it runs under: WebUI -> Tools -> Update Gravity -> Press “Update”.

  • Proxmox and home assistant

    A couple of hints to get proxmox and a home assistant VM up and running on a home server.

    Installing Proxmox

    Tip: Youtube “First 11 Things on Proxmox“.

    Graphical installer doesn’t run

    If the graphical installer does not come up (after DHCP) try this:

    # FIRST START PROXMOX INSTALLATION IN   D E B U G   M O D E   ! ! !
    
    # then in the shell starting before the installer runs, do ...
    $ Xorg -configure
    
    # COULD also be under /root/xorg.conf.new - read the command output
    $ cp /xorg.conf.new /etc/X11/xorg.conf
    
    # now replace all ocurrences of `amdgpu` with `fbdev` in /etc/X11/xorg.conf
    
    # exit the shell
    $ <CTRL-D>
    

    Now the installer should just come up.

    Source: This blog post and that comment below.

    Enable updates without subscription

    Change /etc/apt/sources.list.d/pve-enterprise.list to this:

    # /etc/apt/sources.list.d/pve-enterprise.list
    deb http://download.proxmox.com/debian/pve buster pve-no-subscription
    

    Install HASS.io

    SSH into your proxmox box and use this command:

    # (I didn't need sudo, I connected as root)
    bash -c "$(wget -qLO - https://raw.githubusercontent.com/Kanga-Who/home-assistant/master/hassos_install.sh)"
    
  • Accessing data from defunct iOS apps

    I had an app called “TankPro” in which I tracked all my car expenses, including – and this was the crucial part – each and every refueling and service cost. Now with the latest update of iOS that app stopped working – “This app is too old, the developer has to update”. I had that fear, but I never got around to export and look for something new. So now – boom, you’re fucked, no more data for you today.

    Internet to the rescue.

    Assumptions

    Since a fuel cost tracking app is basically something for which you’d use a database, I assumed that developer did the same and used the Apple-provided database API internally. Which is good since this is backed by SQLite. (none of this I knew for sure, this is all stuff I just picked up over time – yet I was just hoping to be right).

    Now the question is how to access this data.

    Get access to the data

    Accessing the data using iTunes (now Music) did not work, the developer never added this functionality. Export did not work because the app didn’t start any longer. The developer’s web page was also quite discouraging. Finally I found a blog post which gave me hope, describing how to access the application’s files in an iOS backup performed by Music to the local Mac. Boom.

    So first step, connect the iPhone to the Mac and perform a backup using the ‘Music’ app (yes, this is as stupid as it sounds, it should be a separate app now if you ask me).

    Now find what you’re looking for …

    After the backup is complete, all the backup data will be available here:

    # the last part MIGHT change
    $HOME/Library/Application Support/MobileSync/Backup/746acd60cc3e4674ab61071e390c4bce601c259f
    

    The directory contents look like this:

    # DIRS                            |   # FILES
    0a/                               |   Info.plist
    0b/                               |   Manifest.db
    0c/                               |   Manifest.db-shm
    [...maaany more directories...]   |   Manifest.db-wal
    fe/                               |   Manifest.plist
    ff/                               |   Status.plist
    

    Turns out the file called Manifest.db is itself a SQLite database. Let’s analyze:

    $ sqlite3 Manifest.db
    sqlite> .schema
    CREATE TABLE Files (fileID TEXT PRIMARY KEY, domain TEXT, relativePath TEXT, flags INTEGER, file BLOB);
    CREATE INDEX FilesDomainIdx ON Files(domain);
    CREATE INDEX FilesRelativePathIdx ON Files(relativePath);
    CREATE INDEX FilesFlagsIdx ON Files(flags);
    CREATE TABLE Properties (key TEXT PRIMARY KEY, value BLOB);
    

    Hmmh. One table, with content of files. The domain field looked interesting:

    sqlite> select distinct domain from Files;
    [...]
    AppDomainPlugin-net.whatsapp.WhatsApp.TodayExtension
    AppDomainPlugin-org.linphone.phone.linphoneExtension
    AppDomainPlugin-org.linphone.phone.msgNotificationContent
    AppDomainPlugin-org.linphone.phone.msgNotificationService
    AppDomainPlugin-org.whispersystems.signal.NotificationServiceExtension
    AppDomainPlugin-org.whispersystems.signal.shareextension
    AppDomainPlugin-org.wordpress.WordPressAllTimeWidget
    AppDomainPlugin-org.wordpress.WordPressDraftAction
    AppDomainPlugin-org.wordpress.WordPressIntents
    [...]
    

    All right. It seems those are the apps. Now the defunct app’s name is “TankPro” by “osxwerk”, let’s see if it’s in there.

    sqlite> select distinct domain from Files where domain like '%werk%';
    AppDomain-de.osxwerk.TankPro
    

    I’m on to something. More digging lead to this:

    sqlite> select fileID, relativePath from Files where domain = 'AppDomain-de.osxwerk.TankPro';
    607abd5ade35b2839a2fbd83378797ef6a66e74e|
    521dd6d864d15473f598c8376e22177654039d17|Library
    83a94dda1e6957a7dd823e07b76a117605912688|Library/Preferences
    c3c18f8333773453136410a4210f1aea0b9fe199|Library/Preferences/com.apple.PeoplePicker.plist
    ff0500ead582024057d7b4202da23d13ba9aee39|Library/Preferences/.GlobalPreferences.plist
    078e4d9f26a620de79bd950cac5ffbb41db6f07f|Library/Cookies
    e5aa547333c2d26ee8866db1ec4d6ab4826751cc|Documents
    1c70ac9b8b843a69c96b29b202958834a12f159a|Documents/tankbuch.sqlite
    967d44623183390c36989f8574a946222e5dee63|Documents/tankpro.sqlite.old
    787938b3c7f21fe178d59f4c030e3451f2f3dd23|Library/Preferences/de.osxwerk.TankPro.plist
    

    Very promising, right?? Let’s see what 1c70ac9b8b843a69c96b29b202958834a12f159a might be … :

    $ find . -iname 1c70ac9b8b843a69c96b29b202958834a12f159a
    ./1c/1c70ac9b8b843a69c96b29b202958834a12f159a
    
    $ ll ./1c/1c70ac9b8b843a69c96b29b202958834a12f159a
    Permissions Size User Date Modified Name
    .rw-r--r--   77k tm   30 Apr 18:56  ./1c/1c70ac9b8b843a69c96b29b202958834a12f159a
    
    $ file ./1c/1c70ac9b8b843a69c96b29b202958834a12f159a
    ./1c/1c70ac9b8b843a69c96b29b202958834a12f159a: SQLite 3.x database, last written using SQLite version 3032003
    
    $ sqlite3 ./1c/1c70ac9b8b843a69c96b29b202958834a12f159a
    
    sqlite> .schema
    CREATE TABLE ZCAR ( Z_PK INTEGER PRIMARY KEY, Z_ENT INTEGER, Z_OPT INTEGER, ZACTIVE INTEGER, ZCONSUMPTIONDISPLAYUNIT INTEGER, ZFUELCAPACITYUNIT INTEGER, ZFUELTYPE INTEGER, ZODOMETERUNIT INTEGER, ZIMAGE INTEGER, ZCREATEDAT TIMESTAMP, ZUPDATEDAT TIMESTAMP, ZLICENSEPLATE VARCHAR, ZMAKE VARCHAR, ZMODEL VARCHAR, ZNAME VARCHAR, ZREMARK VARCHAR );
    CREATE TABLE ZCARIMAGE ( Z_PK INTEGER PRIMARY KEY, Z_ENT INTEGER, Z_OPT INTEGER, ZCAR INTEGER, ZCREATEDAT TIMESTAMP, ZUPDATEDAT TIMESTAMP, ZIMAGE BLOB );
    CREATE TABLE ZCOST ( Z_PK INTEGER PRIMARY KEY, Z_ENT INTEGER, Z_OPT INTEGER, ZODOMETER INTEGER, ZREFUND INTEGER, ZCAR INTEGER, ZAMOUNT FLOAT, ZCREATEDAT TIMESTAMP, ZDUEDATE TIMESTAMP, ZUPDATEDAT TIMESTAMP, ZCOMMENT VARCHAR, ZREASON VARCHAR );
    CREATE TABLE ZFILLUP ( Z_PK INTEGER PRIMARY KEY, Z_ENT INTEGER, Z_OPT INTEGER, ZFUELTYPE INTEGER, ZODOMETER INTEGER, ZQUANTITYUNIT INTEGER, ZTYPE INTEGER, ZCAR INTEGER, ZCREATEDAT TIMESTAMP, ZDATE TIMESTAMP, ZLATITUDE FLOAT, ZLONGITUDE FLOAT, ZPRICE FLOAT, ZQUANTITY FLOAT, ZUPDATEDAT TIMESTAMP, ZCOMMENT VARCHAR );
    CREATE TABLE Z_PRIMARYKEY (Z_ENT INTEGER PRIMARY KEY, Z_NAME VARCHAR, Z_SUPER INTEGER, Z_MAX INTEGER);
    CREATE TABLE Z_METADATA (Z_VERSION INTEGER PRIMARY KEY, Z_UUID VARCHAR(255), Z_PLIST BLOB);
    CREATE TABLE Z_MODELCACHE (Z_CONTENT BLOB);
    CREATE INDEX ZCAR_ZIMAGE_INDEX ON ZCAR (ZIMAGE);
    CREATE INDEX ZCARIMAGE_ZCAR_INDEX ON ZCARIMAGE (ZCAR);
    CREATE INDEX ZCOST_ZCAR_INDEX ON ZCOST (ZCAR);
    CREATE INDEX ZFILLUP_ZCAR_INDEX ON ZFILLUP (ZCAR);
    

    … aaaand I got my receipts back. Boom baby!! Happy day.
  • Install Zalando Postgres operator

    This was a bit painful, yet I managed. Used apparently v1.6.2.

    Add helm repos

    If you pull a little trick you can install the operator using helm, just add a helm repo pointing to the github repo:

    # found here: https://git.io/J3C7S
    export ZALANDO_BASE=https://raw.githubusercontent.com/zalando/postgres-operator
    helm repo add zalando-pg $ZALANDO_BASE/master/charts/postgres-operator/
    helm repo add zalando-ui $ZALANDO_BASE/master/charts/postgres-operator-ui/
    helm repo update
    

    Install postgres-operator

    To use CRD configuration (recommended) this must be present in the helm values.yaml file:

    # values.yaml - INCOMPLETE; DO NOT USE; use the one further down.
    configTarget: "OperatorConfigurationCRD"
    

    Unfortunately the helm chart is broken, and you have to re-create the default values.yaml file (see also below). Using this file you can now install the operator:

    helm upgrade -i \
    --create-namespace -n zalando-pg-operator \
    -f values.yaml \
    pg-operator \
    zalando-pg/postgres-operator
    

    Install operator-ui

    Just use default values, so no values.yaml needed.

    helm upgrade -i \
    --create-namespace -n zalando-pg-operator \
    pg-operator-ui \
    zalando-ui/postgres-operator-ui
    

    To access the service you have to do a port-forward, since there is no authentication that I know of:

    kubectl port-forward svc/pg-operator-ui-postgres-operator-ui 8081:80 -n zalando-pg
    curl localhost:8081
    

    Uninstallation

    Since it’s helm I’d assume a simple helm uninstall.

    Impressions

    • I dislike the helm chart quality.
    • I have a feeling the thing is pretty AWS specific, in the UI you can enable “ELB”s, which is AWS speak for “load balancers”
    • I really like the UI, and I like the way you see which objects are created.

    Resources

    values.yaml for helm

    The settings in the default values.yaml file do not have the correct data type and validation will fail once you try to install it. A working version can be found in this gist or below (identical contents). The file has the exact same values but in the correct data types (so a boolean is actually true and not "true", which is a string and not a bool value).

    ## INSTALL / UPGRADE:
    ##   helm upgrade -i --create-namespace -n zalando-pg pg-operator zalando/postgres-operator -f values.yaml
    
    # enable CRD configuration
    configTarget: OperatorConfigurationCRD
    
    # the following values ARE THE DEFAULT VALUES. unfortunately they are coded as
    # strings in the default values.yaml, and the verification (rightfully) complains
    # that either boolean or integer values are needed. so we have to re-include them
    # here but with the correct data type.
    # the only exceptions to this are the commented-out values, which contain integers,
    # but are needed as strings. what a mess.
    
    configGeneral:
      enable_crd_validation: true
      enable_lazy_spilo_upgrade: false
      enable_pgversion_env_var: true
      enable_shm_volume: true
      enable_spilo_wal_path_compat: false
      min_instances: -1
      max_instances: -1
      workers: 8
    
    configKubernetes:
      cluster_labels:
        application: spilo
      enable_init_containers: true
      enable_pod_antiaffinity: false
      enable_pod_disruption_budget: true
      enable_sidecars: true
      spilo_privileged: false
      spilo_allow_privilege_escalation: true
    
    #configPostgresPodResources:
    #  default_cpu_limit: 1
    
    configLoadBalancer:
      enable_master_load_balancer: false
      enable_replica_load_balancer: false
    
    configDebug:
      debug_logging: true
      enable_database_access: true
    
    configLoggingRestApi:
      api_port: 8080
      cluster_history_entries: 1000
      ring_log_lines: 100
    
    configAwsOrGcp:
      enable_ebs_gp3_migration: false
    
    configTeamsApi:
      enable_postgres_team_crd: false
      enable_teams_api: false
    
    configConnectionPooler:
      connection_pooler_max_db_connections: 60
      connection_pooler_number_of_instances: 2
      #connection_pooler_default_cpu_limit: 1
    
  • Install Crunchy Data Postgres operator

    It’s pretty simple, following the documentation, and tested with version 4.6.2 (commands super slightly adapted). Normally you might download the YAML file and adjust the installation settings in there, this is not done here (mainly because this is just a handling test).

    export CRUNCHY_BASE=https://raw.githubusercontent.com/CrunchyData/postgres-operator
    kubectl create namespace pgo
    kubectl apply -f $CRUNCHY_BASE/v4.6.2/installers/kubectl/postgres-operator.yml
    
    # install pgo binary - https://is.gd/U00wux
    curl $CRUNCHY_BASE/v4.6.2/installers/kubectl/client-setup.sh > client-setup.sh
    bash client-setup.sh
    rm client-setup.sh
    
    # THIS IS IMPORTANT
    kubectl delete job -n pgo pgo-deploy
    

    Using the pgo binary

    Every time you want to use the binary you have to port-forward to the operator container, and set PGO_APISERVER_URL:

    # keep running
    kubectl -n pgo port-forward svc/postgres-operator 8443:8443
    
    # second shell
    export PGO_APISERVER_URL="https://127.0.0.1:8443"
    pgo version
    

    Upgrading the operator (untested)

    Just apply the same manifest, but set the DEPLOY_ACTION in the YAML postgres-operator.yaml manifest to upgrade. You can do this by downloading and modifying, or just in a one-liner:

    export CRUNCHY_BASE=https://raw.githubusercontent.com/CrunchyData/postgres-operator
    export CRUNCHY_YAML=$CRUNCHY_BASE/v4.6.2/installers/kubectl/postgres-operator.yml
    curl $CRUNCHY_YAML | sed 's/value: install/value: upgrade/g' | kubectl apply -f -
    

    NOTE: If you get a huge error message you forgot to delete the job after the installation.

    Uninstalling the operator

    Like upgrade, but with the value uninstall.

    export CRUNCHY_BASE=https://raw.githubusercontent.com/CrunchyData/postgres-operator
    export CRUNCHY_YAML=$CRUNCHY_BASE/v4.6.2/installers/kubectl/postgres-operator.yml
    curl $CRUNCHY_YAML | sed 's/value: install/value: uninstall/g' | kubectl apply -f -
    

    NOTE: If you get a huge error message you forgot to delete the job after the installation.

    Afterwards clean up the remaining stuff which is created by $CRUNCHY_YAML defined above:

    kubectl delete job -n pgo pgo-deploy
    kubectl delete clusterrolebinding pgo-deployer-crb
    kubectl delete configmap pgo-deployer-cm
    kubectl delete clusterrole pgo-deployer-cr
    kubectl delete serviceaccount pgo-deployer-sa
    kubectl delete namespace pgo
    

    Impressions

    • Installing using the operator framework at operatorhub didn’t work. The framework failed to install.
    • I don’t like that the pgo binary is installed for every namespace you are using. This seems weird, it should somehow follow “standard” k8s RBAC, or the principle of kubectl contexts.
    • I also don’t like that the installation method is static and you cannot change the namespace without downloading and editing the files apparently.
    • I very much like the CLI approach, yet at the same time …
    • … it leaves the declarative “everything is a CRD / an API object” approach.

    So … mixed. Haven’t tried the databases – yet.

  • Nextcloud cron job

    I switched to system cron for my nextcloud cron jobs. Using docker, this is my cron job command:

    */5  *  *  *  *    /usr/bin/docker exec -u 33 srv_nc_1 /bin/bash -c 'php -f /var/www/html/cron.php'