Blog

  • Home Assistant behind proxy

    You want to place Home Assistant behind a reverse proxy, for example for SSL termination and the like? You wonder why you get a “403 Bad Request”, while being able to connect directly?

    It’s the configuration.

    # /config/configuration.yaml
    
    # ...
    http:
      use_x_forwarded_for: true
      trusted_proxies:
        - 192.168.179.13 # Add the IP address of the proxy server
    # ...
    

    Quellen:

  • Configure static IP address on Debian systems

    I have now two home servers in two locations, and they should be “identical”. Both have a static IP address, which is surprisingly hard to configure, since there are actually four different ways in doing it:

    • netplan (Ubuntu only it seems)
    • ifup/down
    • NetworkManager
    • systemd-networkd

    I am using the last one, systemd-networkd. This is how it’s done:

    1. uninstall network-manager: apt-get remove network-manager
    2. make sure the only configured interface in /etc/network/interfaces is lo
    3. create /etc/systemd/network/10-static.network (contents below)
    4. enable (do not start!) systemd-resolved: systemctl enable systemd-resolved
    5. enable (do not start!) systemd-networkd: systemctl enable systemd-networkd
    6. convert /etc/resolv.conf to a symlink: ln -sf /run/systemd/resolve/stub-resolv.conf /etc/resolv.conf
    # FILE: /etc/systemd/network/10-static.network
    
    [Match]
    Name=enp*                   # match the name of your hardware eth interface
    
    [Network]
    Address=192.168.10.10/24    # your IP including netmask
    Gateway=192.168.10.1        # your default gateway
    DNS=8.8.8.8                 # your dns server
    Domains=mi.casa             # your domain search paths
    

    If you plan to run a DNS server on the same host, do this:

    1. Use DNS=192.168.10.10 in the file 10-static.network (point to the same host)
    2. Add DNSStubListener=no to the file /etc/systemd/resolved.conf

    … otherwise you’ll run into port troubles, cause both systemd-resolved and your DNS server want to own port 53.

    Now REBOOT.

  • AWS – auto-join Windows clients to a managed AD

    Notes:

    • This post is part of a series: Part 1
    • I still consider this post a “snippet”, cause it is just a bit of – hopefully – copy-pastable Terraform code, with a bit of explanation.)

    All right. in the previous post we created a VPC including an AD, and configured route53 to forward requests regarding “AD stuff” to it. But, an AD is quite useless without Windows clients. And Windows clients are annoying, cause you have to join them to the AD. Luckily, there’s an automation for that.

    AWS introduced the AWS Systems Manager (formerly SSM), which is a small software component pre-installed on most (all?) AWS AMIs and connects to an AWS-internal management instance to perform actions. Like “domain auto-join”.

    Approach

    There are two ways to do this:

    1. Configure each host to join the AD, or
    2. Tell AWS to perform the auto-join action on every host with a certain tag

    I’m following option (2) here, using the tag key/value combination { "adjoin": "true" }. Easy.

    WARNING: AWS SSM was key in at least one massive data leak. SO BE VERY CAREFUL in how you use the Systems Manager and if in doubt refer to further documentation. I think this approach is safe, because we do not use any credentials in the following code.

    Having said that, let’s go.

    The code

    resource "aws_ssm_document" "ad_join_domain" {
      name          = "ad-join-domain"
      document_type = "Command"
      content = jsonencode(
        {
          "schemaVersion" = "2.2"
          "description"   = "aws:domainJoin"
          "mainSteps" = [
            {
              "action" = "aws:domainJoin",
              "name"   = "domainJoin",
              "inputs" = {
                "directoryId"    = aws_directory_service_directory.ad.id,
                "directoryName"  = aws_directory_service_directory.ad.name,
                "dnsIpAddresses" = aws_directory_service_directory.ad.dns_ip_addresses
              }
            }
          ]
        }
      )
    }
    
    resource "aws_ssm_association" "windows_server" {
      name = aws_ssm_document.ad_join_domain.name
      targets {
        key    = "tag:adjoin"
        values = ["true"]
      }
    }
    
    resource "aws_iam_role" "ad_autojoin" {
      name = "ad-autojoin"
      assume_role_policy = jsonencode({
        "Version" = "2012-10-17",
        "Statement" = [
          {
            "Effect" = "Allow",
            "Principal" = {
              "Service" = "ec2.amazonaws.com"
            },
            "Action" = "sts:AssumeRole"
          }
        ]
      })
    }
    
    # required it seems
    resource "aws_iam_role_policy_attachment" "ssm-instance" {
      role       = aws_iam_role.ad_autojoin.id
      policy_arn = "arn:aws:iam::aws:policy/AmazonSSMManagedInstanceCore"
    }
    
    # required it seems
    resource "aws_iam_role_policy_attachment" "ssm-ad" {
      role       = aws_iam_role.ad_autojoin.id
      policy_arn = "arn:aws:iam::aws:policy/AmazonSSMDirectoryServiceAccess"
    }
    
    resource "aws_iam_instance_profile" "ad_autojoin" {
      name = "ad-autojoin"
      role = aws_iam_role.ad_autojoin.name
    }
    

    The Windows instance

    Some notes:

    • NOTE: I am using a terraform module here, but in my code I am using a modified version of it. So it might be that this code needs some adjustments.
    • AWS does not yet provide Windows 10 images as AMIs. So we use Windows Server.

    Let’s go.

    data "aws_ami" "win2019server" {
      owners      = ["amazon"]
      most_recent = true
    
      filter {
        name   = "name"
        values = ["Windows_Server-2019-German-Full-Base*"]
      }
    
      filter {
        name   = "platform"
        values = ["windows"]
      }
    
      filter {
        name   = "architecture"
        values = ["x86_64"]
      }
    }
    
    module "ec2-instance" {
      source  = "terraform-aws-modules/ec2-instance/aws"
      version = "3.2.0"
    
      ami           = data.aws_ami.win2019server.id
      instance_type = "t3.large"
      cpu_credits   = "unlimited"
      subnet_id     = element(module.vpc.private_subnets, 0)
    
      # THIS IS WHAT WE NEED TO AUTO_JOIN!! :))
      iam_instance_profile = aws_iam_instance_profile.ad_autojoin.name
      tags                 = merge({ "adjoin" = "true" }, local.tags)
    
      # yes, weird syntax
      root_block_device = [{
        volume_size = 50
        tags = {
          Name = "my-root-block"
        }
      }]
    }
    

    References

  • AWS – create VPC and a managed AD with terraform

    Note:

    • This post is part of a series: Part 2

    AWS offers a managed AD service, in two flavors (Samba-based, and “original” Microsoft). This shows how you create …

    • a VPC
    • a managed Microsoft AD
    • an internal DNS zone
    • an internal DNS forwarder for the “AD domain” to the AD

    … with terraform.

    Let’s go.

    Part 1 – the VPC and the AD

    locals {
      name                  = "testproject"
      internal_dns_zone     = "testproject.local"
      ad_domain             = "testad.aws"
      cidr                  = "10.0.0.0/24"
      azs                   = ["eu-central-1b", "eu-central-1c"]
      database_subnets      = [cidrsubnet(local.cidr, 3, 0), cidrsubnet(local.cidr, 3, 1)]
      private_subnets       = [cidrsubnet(local.cidr, 3, 2)]
      public_subnets        = [cidrsubnet(local.cidr, 3, 3)]
      secret_winad_password = "uiuiuiui_super_secret"
      tags                  = { broughttoyouby = "flypenguin ;)" }
    }
    
    module "vpc" {
      source  = "terraform-aws-modules/vpc/aws"
      version = "3.7.0"
    
      azs                   = local.azs
      cidr                  = local.cidr
      create_igw            = true # for jump hosts, see also: https://is.gd/2Ry3H7
      database_subnets      = local.database_subnets
      enable_dns_hostnames  = true
      enable_nat_gateway    = true
      enable_vpn_gateway    = false # not yet
      name                  = local.name
      private_subnets       = local.private_subnets
      public_subnets        = local.public_subnets
      single_nat_gateway    = true
    }
    
    resource "aws_directory_service_directory" "ad" {
      name      = local.ad_domain
      password  = local.secret_winad_password
      edition   = "Standard"
      type      = "MicrosoftAD"
      tags      = local.tags
    
      vpc_settings {
        vpc_id     = module.vpc.vpc_id
        subnet_ids = module.vpc.database_subnets
      }
    }
    
    resource "aws_route53_zone" "vpc" {
      name = local.internal_dns_zone
    
      vpc {
        vpc_id = module.vpc.vpc_id
      }
    }
    

    Part 2 – the resolver

    Now this was pretty easy. Problem: Windows thinks it is responsible for performing autoritative (I think) DNS lookups for the AD “domain”. And the internal DNS resolver has absolutely no clue about any AD related stuff. Amazon itself offers two possibilities:

    1. using the managed AD as the primary DNS “servers”, forwarding requests to route53, or
    2. configure route53 to forward to the managed AD for requests regarding “testad.aws” (our AD “domain”)

    This describes option (1), because in my eyes the VPC should not stop functioning without the AD (which it does if you give the AD primary DNS responsibility).

    resource "aws_route53_resolver_endpoint" "ad_hcm_resolver" {
      name      = "ad-hcm-resolver"
      direction = "OUTBOUND"
      tags      = local.tags
    
      ip_address { subnet_id = module.vpc.database_subnets[0] }
      ip_address { subnet_id = module.vpc.database_subnets[1] }
    }
    
    resource "aws_route53_resolver_rule" "ad_fwd" {
      domain_name          = local.ad_domain
      name                 = "ad_hcm_forward"
      rule_type            = "FORWARD"
      resolver_endpoint_id = aws_route53_resolver_endpoint.ad_hcm_resolver.id
      tags                 = local.tags
    
      target_ip { ip = sort(aws_directory_service_directory.ad.dns_ip_addresses)[0] }
      target_ip { ip = sort(aws_directory_service_directory.ad.dns_ip_addresses)[1] }
    }
    
    # WE NEED THIS. without it does not work.
    resource "aws_route53_resolver_rule_association" "ad_fwd" {
      resolver_rule_id = aws_route53_resolver_rule.ad_fwd.id
      vpc_id           = module.vpc.vpc_id
    }
    

    WARNING: That stupid forwarder costs about 180$ / month (about 90¢ per IP address, and you must have two). It is REALLY expensive for what it does.

  • Backup tool selected

    I enacted an act of choosing. I chose restic.

    Reasons why

    Single binary. The contender with the even better stats was duplicati, which is available from the Ubuntu repositories, but requires 130+ MB of packages to be installed. This is a server system, so a single binary is just what I want – and very easy to duplicate if we switch operating systems. It also comes with a first-class-citizen web UI, which can be bad – cause once you need the backup tool you don’t want to have click orgies in web UIs to get stuff back.

    Somewhat good performace according to the comparison from the last post. I don’t expect to back up huge amounts of data, but I will keep an eye on the restore times. Also this is backing up data from a VM in a data center, so the link bandwidth should be sufficient in all directions.

    Best ever update process for a single binary. Just invoke restic self-update, and it does the rest. So cool.

    Nice docs – at least compared to, for example, duplicity.

    The remaining open question is whether it will back up all file metadata, which I will see shortly.

    Noteworthy

    Like all fiels in IT “backup” has the same drawbacks. On one side you have god-almighty-powerful tools for license cost that makes you scream while needing at least 5 certifications on top to operate them, on the other side you have … tar. Luckily, for backups you get at least some middle ground, namely all the tools I mentioned in my first post.

    I think all of them have certain advantages and disadvantages, while all being “good” tools for the job. The reasons I chose restic are above. Personally I would really like to try bupstash, but with backup software it does not pay to go for the “unstable” software which “might lose data”.

    Current state

    I have (blog post(s) with details forthcoming) …

    • created an S3 bucket and an IAM user with limited access to this
    • installed restic on one machine
    • initialized the restic repository in said bucket
    • created a run script which performs backups and handles service states
    • I want to update databases, and the safest way to do this is to stop them before
    • created a cron job which executes this script every 3 days
  • Home Assistant – human readable Fritz!Box uptime

    The Fritz!Box uptime in my Home Assistant dashboard sensor looked like this:

    2021-10-15T20:45:18.294Z
    

    Super hard to read. To achieve a human readable form I had to perform a couple of steps which helped me understand HA a bit better, and serve as a good starting point for other similar actions. Here we go.

    Modify configuration.yaml

    To do this you can install the addon File Editor, which gives you a nice GUI for doing this.

    # Configure a default setup of Home Assistant (frontend, api, etc)
    default_config:
    
    # Text to speech
    tts:
      - platform: google_translate
    
    group: !include groups.yaml
    automation: !include automations.yaml
    script: !include scripts.yaml
    scene: !include scenes.yaml
    
    # ADD THIS LINE
    sensor: !include sensors.yaml
    

    Create sensors.yaml

    Note: You have to restart HA to apply those changes. At least I know no other way.

    # from: https://is.gd/koYX60 and https://is.gd/VK1oDj
    # this is to check if this file is actually read, go look for the "Home
    # Assistant Uptime" entity in HA configuration after restarting
    - platform: uptime
      name: Home Assistant Uptime
    
    # (modified) from: https://is.gd/vfRYi3
    - platform: template
      sensors:
        fritzbox_connection_uptime_human:
          friendly_name: Fritz!Box connection uptime
    
          # in the next line, adjust "sensor.fritz_box_6490_cable_connection_uptime"
          # according to YOUR sensor name.
          value_template: >
            {%- set up_time = as_timestamp(now())-as_timestamp(states('sensor.fritz_box_6490_cable_connection_uptime')) %}
    
            {% if states('sensor.last_boot') == '0.0' %}
              Soeben neu gestartet...
            {% else %}
    
            {%- macro phrase(name, divisor, mod=None) %}
              {%- set value = ((up_time // divisor) % (mod if mod else divisor)) | int %}
              {{- '{} {}'.format(value, name) if value | int > 0 else '' }}
            {%- endmacro %}
    
            {%- set values = [
              phrase('w', 60*60*24*7),
              phrase('d', 60*60*24, 7),
              phrase('h', 60*60, 24),
              phrase('min', 60),
              phrase('s', 1, 60)
            ] | select('!=','') | list %}
    
            {{ values[:-1] | join(' ') ~ ' ' ~ values[-1] if values | length > 1 else values | first }}
            {% endif %}
    
  • (AWS managed) AD – give local admin rights to domain users

    Note: This post is part of a series (Part 4):

    Situation: You have a bunch of systems in an (AWS managed) AD, and you want to give AD users local admin rights.

    Problem: You don’t know how.

    Solution: This post or this very nice video, or both.

    • Basically there are two ways.
    • One, you have an AWS managed AD, then you get …
    • Two, you don’t want to use the AWS groups or have a standard AD, then …
      • stick to the video.

    Hint: It’s easiest if you perform thost actions as the DOMAIN\Admin user, so you don’t have to enter that user’s password all the time.

  • Standard AD – auto-map a network drive

    Note: This post is part of a series (Part 3):

    Situation: You have this beautiful AD system, and you want to auto-map a network drive for your users using AD GPOs.

    Problem: You don’t know how.

    Solution: This post.

    • open group policy editor
    • create USER policy “AD GPO map network drive”
    • edit it
    • select “USER configuration / preferences / windows settings / drive maps”
    • right-click “new”
    • create share
    • you should force-apply the new GPOs on the target host using gpupdate /force

    Hint: It’s easiest if you perform thost actions as the DOMAIN\Admin user, so you don’t have to enter that user’s password all the time.

  • AWS managed AD – add user RDP permissions

    Note: This post is part of a series (Part 2):

    Situation: You have an AWS managed AD, some clients, and some AD users. Now the users should be able to log in to servers using RDP.

    Problem: Just by creating a user it does not have the appropriate permissions.

    Solution: Follow the AWS documentation or watch the AWS youtube video on the subject. This is basically it, with some screenshots and additional notes.

    Hint: It’s easiest if you perform thost actions as the DOMAIN\Admin user, so you don’t have to enter that user’s password all the time.

    • if you are paranoid check some local server configurations (it should already be correct though)
    • open AD user / group management
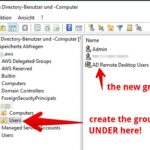
    • create a group
      • e.g. “AD Remote Desktop User” under Users/ in your domain
      • so if your domain is “domain.aws”, create it under “domain.aws/domain/Users/HERE”
    • add the user to the newly created group
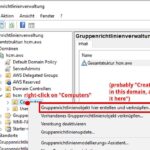
    • open group policy editor
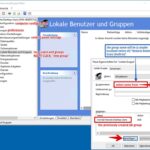
    • create new group under “computer configuration / preferences / control panel settings / local users and groups”
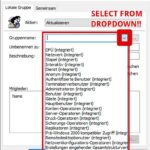
      • select Remote Desktop Users (built-in) FROM DROPDOWN!!!
      • add the previously created AD group as members
  • AWS managed AD – first steps after creation

    Note: This post is part of a series (Part 1):

    Situation: You have created a managed AD. Now you want to manage it.

    Problem: The servers probably don’t have the appropriate software installed.

    Solution:

    Hint: It’s easiest if you perform thost actions as the DOMAIN\Admin user, so you don’t have to enter that user’s password all the time.