Tag: aws

  • opnSense reply-to & AWS’ source/destiny check

    Never forget those two things:

    • disable the AWS source/destiny check
    • disable the reply-to check (functionality?) in opnSense (Firewall -> Settings -> Advanced)
    • interestingly, this applies to “WAN interfaces” according to the help string, yet my instance only has a LAN interface … 🤷🏼‍♂️
  • Managing S3 bucket permissions with terraform

    This is what I did today, and I found it useful. And yes, sometimes I over-engineer a bit.

      # IN FILE: locals_constants.tf
    
      iam_s3_perms_list = ["s3:List*",]
      iam_s3_perms_read = ["s3:List*", "s3:Get*",]
      iam_s3_perms_write = ["s3:List*", "s3:Get*", "s3:PutObject",]
    
      s3_permissions_rw = distinct(concat(
        local.iam_s3_perms_list,
        local.iam_s3_perms_read,
        local.iam_s3_perms_write,
      ))
    
      s3_permissions_ro = distinct(concat(
        local.iam_s3_perms_list,
        local.iam_s3_perms_read,
      ))
    
    
    # IN FILE: locals.tf
    
    team_dev_bucket_configs = {
      "ReadWrite" = {
        actions = local.s3_permissions_rw
        buckets = [
          "yo-corp-yoman-dev",
          "yo-corp-yoman-test",
          "yo-corp-playground",
        ]
      }
      "ReadOnly" = {
        actions = local.s3_permissions_ro
        buckets = [
          "yo-corp-yoman-prod",
          "yo-corp-yoman-archive",
        ]
      }
    }
    
    
    # IN FILE: permissions.tf
    
    # so this policy is now assigned to a group with every dev team member.
    # easy. :)
    resource "aws_iam_policy" "s3_team_dev_bucket_permissions" {
      name        = "s3-team-dev-bucket-permissions"
      description = "Dev team S3 bucket permissions"
      policy      = data.aws_iam_policy_document.s3_team_dev_bucket_permissions_document.json
    }
    
    data "aws_iam_policy_document" "s3_team_dev_bucket_permissions_document" {
      dynamic "statement" {
        for_each = local.team_dev_bucket_configs
        content {
          sid     = "TeamDevBuckets${statement.key}"
          effect  = "Allow"
          actions = statement.value["actions"]
          resources = flatten(
            [
              for bucket in statement.value["buckets"] :
              [
                "arn:aws:s3:::${bucket}", "arn:aws:s3:::${bucket}/*"
              ]
            ]
          )
        }
      }
    }
    
  • GitLab runners, EKS, IRSA and S3 caching

    The problem

    • You do not want to set AWS_* credentials all over your gitlab pipelines
    • You have distributed GitLab runners hosted on kubernetes, and you want to use S3 as a build cache.
    • You want to access AWS resources from your build chain

    The solution

    There’s an official AWS solution: “IRSA”, which stands for “IAM roles for k8s service accounts”. (There is at least another non-AWS one, kube2iam, but this is not subject of this post.)

    IRSA assigns an AWS IAM role to a K8S serviceaccount, which then in turn can be specified for a running pod. There are a couple of pages documenting this, but they are all either too much or too little. I now try do write what I wanted to have.

    Also, nobody has ever documented using that for configuring S3 caching on a K8S GitLab runner. Which is not easy, cause the documentation could honestly be better.

    Advantages of this solution

    • That works with k8s runners just as well as with fargate runners (the way I do them)
    • You are independent from AWS_* credentials in your pipeline
    • You can simply change the IAM role in your pipeline job to get different permissions, you don’t need to create a new user and create new credentials and set them as CI variables, etc.

    What you need

    You need (out of scope):

    For every role you want to use in the cluster, you need …

    • … an IAM role with referencing k8s namespace & service account name
    • … a K8S cluster service account referencing the role ARN
    • this is a reciprocal reference, one references the other, and vice versa!

    That’s what we will do in here.

    The IAM role

    You basically configure a role as every other one, but you will specify a special trust policy. That policy references the OIDC provider, the k8s namespace and the service account in that namespace.

    # terraform code - die hard terraform addict here, sorry.
    
    locals {
      oidc_arn = "arn:aws:iam::123456789012:oidc-provider/oidc.eks.eu-central-1.amazonaws.com/id/deadbeefaffe1234deadbeefaffe1234"
      oidc_url = "https://oidc.eks.eu-central-1.amazonaws.com/id/deadbeefaffe1234deadbeefaffe1234"
      k8s_namespace = "gitlab"
      k8s_service_account_name = "gitlab-runner"
    }
    
    # eks / pod / role stuff: https://is.gd/2skBH7
    resource "aws_iam_role" "k8s_irsa_example_role" {
      name                = "k8s-irsa-example-role"
      assume_role_policy  = data.aws_iam_policy_document.trust_k8s_irsa_example_role.json
      managed_policy_arns = [aws_iam_policy.some_policy.arn]
    }
    
    # this is the PERMISSIONS policy
    data "aws_iam_policy_document" "perms_k8s_irsa_example_role" {
      statement {
        actions = ["s3:*", ]
        resources = [
          "arn:aws:s3:::my-super-duper-gitlab-runner-cache",
          "arn:aws:s3:::my-super-duper-gitlab-runner-cache/*",
        ]
      }}
    
    # this is the TRUST policy
    # the TRUST policy references k8s namespace and service account
    data "aws_iam_policy_document" "trust_k8s_irsa_example_role" {
      statement {
        effect  = "Allow"
        actions = ["sts:AssumeRoleWithWebIdentity"]
        principals {
          type        = "Federated"
          identifiers = [local.oidc.arn]
        }
        condition {
          test     = "StringEquals"
          variable = "${replace(var.oidc_url, "https://", "")}:sub"
          values   = ["system:serviceaccount:${local.k8s_namespace}:${local.k8s_service_account_name}"]
        }
      }
    }
    

    For completeness the trust policy as JSON:

    {
      "Version": "2012-10-17",
      "Statement": [
        {
          "Effect": "Allow",
          "Principal": {
            "Federated": "arn:aws:iam::123456789012:oidc-provider/oidc.eks.eu-central-1.amazonaws.com/id/deadbeefaffe1234deadbeefaffe1234"
          },
          "Action": "sts:AssumeRoleWithWebIdentity",
          "Condition": {
            "StringEquals": {
              "oidc.eks.eu-central-1.amazonaws.com/id/deadbeefaffe1234deadbeefaffe1234:sub": "system:serviceaccount:gitlab:gitlab-runner"
            }
          }
        }
      ]
    }
    

    This is, in fact, all you need from the AWS side of things.

    Some notes:

    • Be absolutely aware that this policy references the name and the namespace in k8s. Also, the service account will reference this policy ARN. So if you change either name, you have to always adjust the other side!

    • For GitLab, you might want to have two of those (you’ll see why later)

    General serviceAccount info

    So this is how any serviceAccount connected to an IAM role looks like:

    apiVersion: v1
    kind: ServiceAccount
    metadata:
      annotations:
        # this is the magic
        # it references the role ARN, which contains the role's name
        eks.amazonaws.com/role-arn: arn:aws:iam::123456789012:role/k8s-irsa-example-role
    
      # the name referenced in the AWS IAM trust policy
      # ("system:serviceaccount:<namespace>:<SERVICEACCOUNTNAME>")
      name: gitlab-runner
    
      # ("system:serviceaccount:<NAMESPACE>:<serviceaccountname>")
      # if you change one, you change both - they reference each other BY NAME
      namespace: gitlab
    

    If you want to test this right now, feel free:

    # $ kubectl apply -n gitlab -f THIS_FILE.yml
    # $ kubectl exec -ti -n gitlab quick-debug-pod -- /bin/bash
    # and then install awscli & ca-certificates to try accessing your s3 bucket :)
    apiVersion: v1
    kind: Pod
    metadata:
      name: quick-debug-pod
      namespace: gitlab
    spec:
      serviceAccountName: gitlab-runner
      containers:
        - name: shell
          image: "ubuntu:latest"
          args: [sleep, infinity]
          resources:
            limits:
              memory: "128Mi"
              cpu: "500m"
    

    General info about GitLab configuration

    REMARK: If you only want to enable your jobs to access AWS resources, you’re in luck. You can skip straight to “Addendum – enabling gitlab JOBS” and you’re done.

    If you want to use the S3 cache, well, … more work.

    Let’s start like this: WHAT YOU MUST KNOW, SUPER IMPORTANT:

    • The main gitlab runner instance will create a pre-signed S3 URL for the gitlab job, and pass it to the k8s pod running the actual job, so the pod running the gitlab job will not need those cache access rights.
    • That means, the S3 policy from above must be attached to the runner itself, and not the pods created by the runner that run the actual pipelines.

    Also, going forward I assume you deploy the gitlab runner using the GitLab runner helm chart.

    Annotate runner pod, short variant

    If you …

    • have only one GitLab runner,
    • and you know the serviceAccount name created by the helm chart,

    … you’re almost done.

    You just need to replace the serviceAccount name (gitlab-runner) name with the actual serviceAccount name on your system, and change one thing in the helm chart:

    ## https://is.gd/Qu1gGv
    rbac:
      create: true
      serviceAccountAnnotations:
        eks.amazonaws.com/role-arn: arn:aws:iam::123456789012:role/k8s-irsa-example-role
    

    See the bottom on how to configure the cache, this is just the role association.

    Annotate runner pod, LONG variant

    In my case it was not so easy:

    • First, I have several runners deployed, and all of them use a different serviceAcount, so that one Role is not going to cut it.
    • Second, I like to have more control over naming, I don’t want to “guess” which name the helm chart gives my serviceAccount, and I don’t want to be vulnerable to name changes.

    So I had to do a bit more work.

    To work in K8S, the GitLab runner needs a …

    • serviceAccount,
    • role,
    • roleBinding.

    We will create those three resources manually now, so we have control over naming and they can be re-used by several gitlab runners (e.g. fargate & cluster).

    In K8S objects, that looks like this:

    # the role
    apiVersion: rbac.authorization.k8s.io/v1
    kind: Role
    metadata:
      name: gitlab-runner-common
      namespace: gitlab
    rules:
      - apiGroups:
          - ""
        resources:
          - "*"
        verbs:
          - "*"
    ---
    # the service account
    apiVersion: v1
    automountServiceAccountToken: true
    kind: ServiceAccount
    metadata:
      annotations:
        eks.amazonaws.com/role-arn: arn:aws:iam::123456789012:role/k8s-irsa-gitlab-runner-common
      name: gitlab-runner-common
      namespace: gitlab
    ---
    # the role binding
    apiVersion: rbac.authorization.k8s.io/v1
    kind: RoleBinding
    metadata:
      name: gitlab-runner-common
      namespace: gitlab
    roleRef:
      apiGroup: rbac.authorization.k8s.io
      kind: Role
      name: gitlab-runner-common
    subjects:
      - kind: ServiceAccount
        name: gitlab-runner-common
        namespace: gitlab
    

    (Btw, I’m using the serviceaccount, role & rolebinding charts here to simplify things – I only want to deal with helm and not with “plain” k8s objects.)

    Adjust your helm chart

    Let’s recap: We now have …

    • An AWS IAM role
    • referencing a namespace & serviceAccount in k8s by name
    • with permissions to access S3
    • A k8s role bound to a serviceAccount in a certain namespace via a rolebinding

    To do that, we need to …

    • disable RBAC creation and reference “our” serviceAccount, and
    • configure the cache.

    Here are the relevant values.yaml file parts:

    ## https://is.gd/Qu1gGv
    rbac:
      # this is basically documented NOWHERE, except here:
      #   https://gitlab.com/gitlab-org/gitlab-runner/-/issues/25972#note_477243643
      create: false
      serviceAccountName: gitlab-runner-common
    

    Configure GitLab S3 cache

    Finally, still in the helm chart’s values file, we do this:

    runners:
      name: "whatever-runner"
    
      config: |
        [[runners]]
          # ...
          [runners.cache]
            Type = "s3"
            Path = "runners-all"
            Shared = true
            [runners.cache.s3]
              ServerAddress = "s3.amazonaws.com"
              BucketName = "my-super-duper-gitlab-runner-cache"
              BucketLocation = "eu-central-1"
              Insecure = false
          # ...
    

    Yup, that’s actually it.

    We should be done.

    Enjoy 🙂

    Addendum – enabling gitlab JOBS

    Now, remember that anything from above will NOT give the actual pipline jobs any additional AWS permissions.

    If you want to access AWS resources out of your jobs, just do this:

    • Create another role, with another association to a serviceAccount,
    • and configure this serviceAccount to be used by the job pods.

    How? Simple. Modify the values file:

    runners:
      config: |
        [[runners]]
          # ...
          [runners.kubernetes]
            # ...
            service_account = "gitlab-jobs"
    

    Bonus – a test pipeline

    # .gitlab-ci.yml
    stages:
      - test
    
    variables:
      CACHE_DIR: hey-ho-cache
    
    .all: &all
      before_script:
        - mkdir -p "$CACHE_DIR"
        - NOWDATE=$(date +%Y%m%d_%H%M%S)
        - CACHEFILE="${CACHE_DIR}/heyho_${NOWDATE}"
        - set -x
    
    .cache: &cache
      paths: [hey-ho-cache]
    
    runner-test-create-cache:
      <<: *all
      image: alpine:edge
      stage: test
      script:
        - echo "waahwaahboogah $NOWDATE" > $CACHEFILE
      cache:
        <<: *cache
      tags:
        - fargate-small
    
    runner-test-check-cache:
      <<: *all
      image: alpine:edge
      stage: test
      script:
        - cat $CACHE_DIR/*
      cache:
        <<: *cache
      needs:
        - runner-test-create-cache
      tags:
        - cluster
        - kubernetes
    

    Troubleshooting

    It doesnt work

    It does.

    If it does not, you have a naming error in your references, or you’re using a wrong serviceAccount for your pods, or you assigned the permission to the wrong entity (jobs instead of runner, or vice versa).

    First, check your annotations and that they reference exiting things.

    It still doesnt work

    It does. Your references are wrong.

    I checked.

    Check again.

    Really.

    Believe me.

    But …

    NO. REALLY.

    And if not, I can’t help you, cause this works.

    (If I have an error here, the principle should be clear – nevertheless I would appreciate a hint if you find one)

    Sources
  • AWS – Forced MFA and the CLI

    Let’s say you want to force every user to enable MFA for AWS IAM accounts. Sure, that is possible.

    Now there’s just one problem: This does not work on the CLI. The credentials in $HOME/.aws/credentials are “static”, they never have a aws:MultiFactorAuthPresent flag attached.

    That would mean that CLI users are either not forced to use MFA, or they just can’t use the CLI any more. Which would – for example – break terraform.

    There’s a solution though. Just get a token using aws sts get-session-token --serial-number ... --token-code ....

    To ease this process (cause it’s really annoying) I created this function, which you can add to your .bashrc or .zshrc (or equivalent shell startup script).

    Enjoy.

    Update 2026-09-03: source available on github

  • AWS – auto-join Windows clients to a managed AD

    Notes:

    • This post is part of a series: Part 1
    • I still consider this post a “snippet”, cause it is just a bit of – hopefully – copy-pastable Terraform code, with a bit of explanation.)

    All right. in the previous post we created a VPC including an AD, and configured route53 to forward requests regarding “AD stuff” to it. But, an AD is quite useless without Windows clients. And Windows clients are annoying, cause you have to join them to the AD. Luckily, there’s an automation for that.

    AWS introduced the AWS Systems Manager (formerly SSM), which is a small software component pre-installed on most (all?) AWS AMIs and connects to an AWS-internal management instance to perform actions. Like “domain auto-join”.

    Approach

    There are two ways to do this:

    1. Configure each host to join the AD, or
    2. Tell AWS to perform the auto-join action on every host with a certain tag

    I’m following option (2) here, using the tag key/value combination { "adjoin": "true" }. Easy.

    WARNING: AWS SSM was key in at least one massive data leak. SO BE VERY CAREFUL in how you use the Systems Manager and if in doubt refer to further documentation. I think this approach is safe, because we do not use any credentials in the following code.

    Having said that, let’s go.

    The code

    resource "aws_ssm_document" "ad_join_domain" {
      name          = "ad-join-domain"
      document_type = "Command"
      content = jsonencode(
        {
          "schemaVersion" = "2.2"
          "description"   = "aws:domainJoin"
          "mainSteps" = [
            {
              "action" = "aws:domainJoin",
              "name"   = "domainJoin",
              "inputs" = {
                "directoryId"    = aws_directory_service_directory.ad.id,
                "directoryName"  = aws_directory_service_directory.ad.name,
                "dnsIpAddresses" = aws_directory_service_directory.ad.dns_ip_addresses
              }
            }
          ]
        }
      )
    }
    
    resource "aws_ssm_association" "windows_server" {
      name = aws_ssm_document.ad_join_domain.name
      targets {
        key    = "tag:adjoin"
        values = ["true"]
      }
    }
    
    resource "aws_iam_role" "ad_autojoin" {
      name = "ad-autojoin"
      assume_role_policy = jsonencode({
        "Version" = "2012-10-17",
        "Statement" = [
          {
            "Effect" = "Allow",
            "Principal" = {
              "Service" = "ec2.amazonaws.com"
            },
            "Action" = "sts:AssumeRole"
          }
        ]
      })
    }
    
    # required it seems
    resource "aws_iam_role_policy_attachment" "ssm-instance" {
      role       = aws_iam_role.ad_autojoin.id
      policy_arn = "arn:aws:iam::aws:policy/AmazonSSMManagedInstanceCore"
    }
    
    # required it seems
    resource "aws_iam_role_policy_attachment" "ssm-ad" {
      role       = aws_iam_role.ad_autojoin.id
      policy_arn = "arn:aws:iam::aws:policy/AmazonSSMDirectoryServiceAccess"
    }
    
    resource "aws_iam_instance_profile" "ad_autojoin" {
      name = "ad-autojoin"
      role = aws_iam_role.ad_autojoin.name
    }
    

    The Windows instance

    Some notes:

    • NOTE: I am using a terraform module here, but in my code I am using a modified version of it. So it might be that this code needs some adjustments.
    • AWS does not yet provide Windows 10 images as AMIs. So we use Windows Server.

    Let’s go.

    data "aws_ami" "win2019server" {
      owners      = ["amazon"]
      most_recent = true
    
      filter {
        name   = "name"
        values = ["Windows_Server-2019-German-Full-Base*"]
      }
    
      filter {
        name   = "platform"
        values = ["windows"]
      }
    
      filter {
        name   = "architecture"
        values = ["x86_64"]
      }
    }
    
    module "ec2-instance" {
      source  = "terraform-aws-modules/ec2-instance/aws"
      version = "3.2.0"
    
      ami           = data.aws_ami.win2019server.id
      instance_type = "t3.large"
      cpu_credits   = "unlimited"
      subnet_id     = element(module.vpc.private_subnets, 0)
    
      # THIS IS WHAT WE NEED TO AUTO_JOIN!! :))
      iam_instance_profile = aws_iam_instance_profile.ad_autojoin.name
      tags                 = merge({ "adjoin" = "true" }, local.tags)
    
      # yes, weird syntax
      root_block_device = [{
        volume_size = 50
        tags = {
          Name = "my-root-block"
        }
      }]
    }
    

    References

  • AWS – create VPC and a managed AD with terraform

    Note:

    • This post is part of a series: Part 2

    AWS offers a managed AD service, in two flavors (Samba-based, and “original” Microsoft). This shows how you create …

    • a VPC
    • a managed Microsoft AD
    • an internal DNS zone
    • an internal DNS forwarder for the “AD domain” to the AD

    … with terraform.

    Let’s go.

    Part 1 – the VPC and the AD

    locals {
      name                  = "testproject"
      internal_dns_zone     = "testproject.local"
      ad_domain             = "testad.aws"
      cidr                  = "10.0.0.0/24"
      azs                   = ["eu-central-1b", "eu-central-1c"]
      database_subnets      = [cidrsubnet(local.cidr, 3, 0), cidrsubnet(local.cidr, 3, 1)]
      private_subnets       = [cidrsubnet(local.cidr, 3, 2)]
      public_subnets        = [cidrsubnet(local.cidr, 3, 3)]
      secret_winad_password = "uiuiuiui_super_secret"
      tags                  = { broughttoyouby = "flypenguin ;)" }
    }
    
    module "vpc" {
      source  = "terraform-aws-modules/vpc/aws"
      version = "3.7.0"
    
      azs                   = local.azs
      cidr                  = local.cidr
      create_igw            = true # for jump hosts, see also: https://is.gd/2Ry3H7
      database_subnets      = local.database_subnets
      enable_dns_hostnames  = true
      enable_nat_gateway    = true
      enable_vpn_gateway    = false # not yet
      name                  = local.name
      private_subnets       = local.private_subnets
      public_subnets        = local.public_subnets
      single_nat_gateway    = true
    }
    
    resource "aws_directory_service_directory" "ad" {
      name      = local.ad_domain
      password  = local.secret_winad_password
      edition   = "Standard"
      type      = "MicrosoftAD"
      tags      = local.tags
    
      vpc_settings {
        vpc_id     = module.vpc.vpc_id
        subnet_ids = module.vpc.database_subnets
      }
    }
    
    resource "aws_route53_zone" "vpc" {
      name = local.internal_dns_zone
    
      vpc {
        vpc_id = module.vpc.vpc_id
      }
    }
    

    Part 2 – the resolver

    Now this was pretty easy. Problem: Windows thinks it is responsible for performing autoritative (I think) DNS lookups for the AD “domain”. And the internal DNS resolver has absolutely no clue about any AD related stuff. Amazon itself offers two possibilities:

    1. using the managed AD as the primary DNS “servers”, forwarding requests to route53, or
    2. configure route53 to forward to the managed AD for requests regarding “testad.aws” (our AD “domain”)

    This describes option (1), because in my eyes the VPC should not stop functioning without the AD (which it does if you give the AD primary DNS responsibility).

    resource "aws_route53_resolver_endpoint" "ad_hcm_resolver" {
      name      = "ad-hcm-resolver"
      direction = "OUTBOUND"
      tags      = local.tags
    
      ip_address { subnet_id = module.vpc.database_subnets[0] }
      ip_address { subnet_id = module.vpc.database_subnets[1] }
    }
    
    resource "aws_route53_resolver_rule" "ad_fwd" {
      domain_name          = local.ad_domain
      name                 = "ad_hcm_forward"
      rule_type            = "FORWARD"
      resolver_endpoint_id = aws_route53_resolver_endpoint.ad_hcm_resolver.id
      tags                 = local.tags
    
      target_ip { ip = sort(aws_directory_service_directory.ad.dns_ip_addresses)[0] }
      target_ip { ip = sort(aws_directory_service_directory.ad.dns_ip_addresses)[1] }
    }
    
    # WE NEED THIS. without it does not work.
    resource "aws_route53_resolver_rule_association" "ad_fwd" {
      resolver_rule_id = aws_route53_resolver_rule.ad_fwd.id
      vpc_id           = module.vpc.vpc_id
    }
    

    WARNING: That stupid forwarder costs about 180$ / month (about 90¢ per IP address, and you must have two). It is REALLY expensive for what it does.

  • (AWS managed) AD – give local admin rights to domain users

    Note: This post is part of a series (Part 4):

    Situation: You have a bunch of systems in an (AWS managed) AD, and you want to give AD users local admin rights.

    Problem: You don’t know how.

    Solution: This post or this very nice video, or both.

    • Basically there are two ways.
    • One, you have an AWS managed AD, then you get …
    • Two, you don’t want to use the AWS groups or have a standard AD, then …
      • stick to the video.

    Hint: It’s easiest if you perform thost actions as the DOMAIN\Admin user, so you don’t have to enter that user’s password all the time.

  • Standard AD – auto-map a network drive

    Note: This post is part of a series (Part 3):

    Situation: You have this beautiful AD system, and you want to auto-map a network drive for your users using AD GPOs.

    Problem: You don’t know how.

    Solution: This post.

    • open group policy editor
    • create USER policy “AD GPO map network drive”
    • edit it
    • select “USER configuration / preferences / windows settings / drive maps”
    • right-click “new”
    • create share
    • you should force-apply the new GPOs on the target host using gpupdate /force

    Hint: It’s easiest if you perform thost actions as the DOMAIN\Admin user, so you don’t have to enter that user’s password all the time.

  • AWS managed AD – add user RDP permissions

    Note: This post is part of a series (Part 2):

    Situation: You have an AWS managed AD, some clients, and some AD users. Now the users should be able to log in to servers using RDP.

    Problem: Just by creating a user it does not have the appropriate permissions.

    Solution: Follow the AWS documentation or watch the AWS youtube video on the subject. This is basically it, with some screenshots and additional notes.

    Hint: It’s easiest if you perform thost actions as the DOMAIN\Admin user, so you don’t have to enter that user’s password all the time.

    • if you are paranoid check some local server configurations (it should already be correct though)
    • open AD user / group management
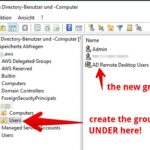
    • create a group
      • e.g. “AD Remote Desktop User” under Users/ in your domain
      • so if your domain is “domain.aws”, create it under “domain.aws/domain/Users/HERE”
    • add the user to the newly created group
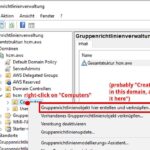
    • open group policy editor
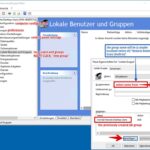
    • create new group under “computer configuration / preferences / control panel settings / local users and groups”
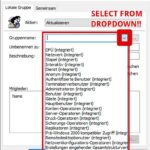
      • select Remote Desktop Users (built-in) FROM DROPDOWN!!!
      • add the previously created AD group as members
  • AWS managed AD – first steps after creation

    Note: This post is part of a series (Part 1):

    Situation: You have created a managed AD. Now you want to manage it.

    Problem: The servers probably don’t have the appropriate software installed.

    Solution:

    Hint: It’s easiest if you perform thost actions as the DOMAIN\Admin user, so you don’t have to enter that user’s password all the time.