Tag: paas

  • AWS managed AD – first steps after creation

    Note: This post is part of a series (Part 1):

    Situation: You have created a managed AD. Now you want to manage it.

    Problem: The servers probably don’t have the appropriate software installed.

    Solution:

    Hint: It’s easiest if you perform thost actions as the DOMAIN\Admin user, so you don’t have to enter that user’s password all the time.

  • GitLab, App Service & CI/CD – Variant 1

    [Updates]

    • 2020-11-29 – reference terraform simple-appservice module
    • 2020-11-29 – add small fix for GitLab CI script

    Since I spent way more time fighting with this I though I might write a proper recap and maybe help others to get started. I also set up a repository with example code which should (!) be a “pull-and-run” thing once you have your ARM_ACCESS_KEY ready, which goes along with this blog post.

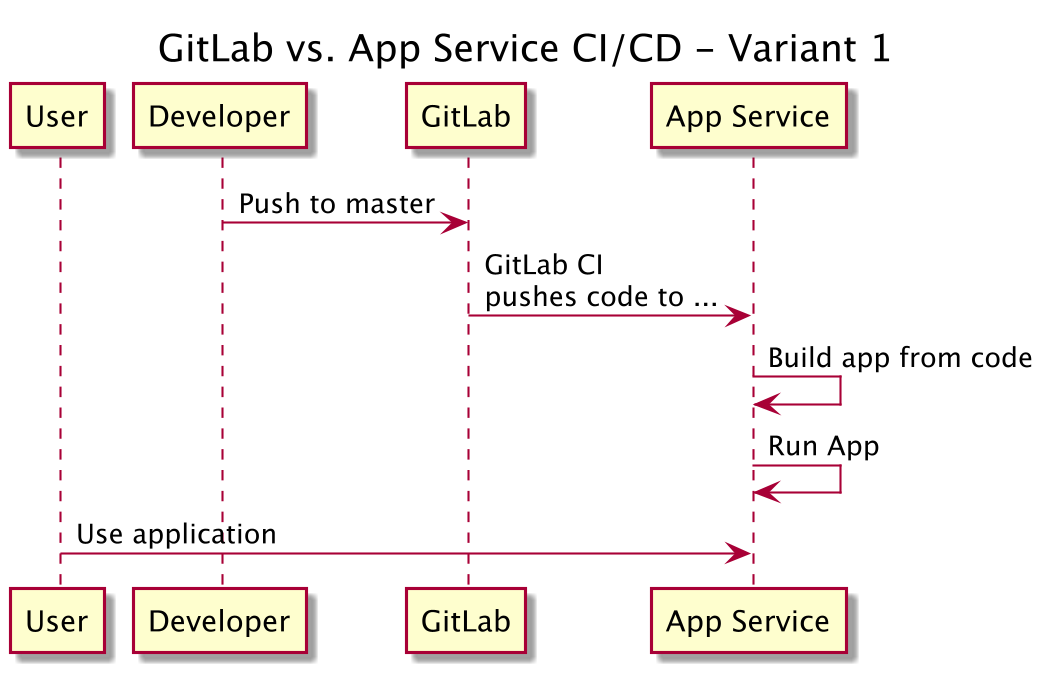
    Now, let’s get started. What we want to do here is basically pretty simple, and detailed in the picture below:

    git flow variant 1

    This sounds easy, right? It is, if you are done fighting Azure stupidity and know a couple of things. So what we need to do for this? We need to …

    • Create the App Service (I use terraform for this, and you can use my example repo or my terraform simple-appservice module to get started)
    • Create a GitLab repo (of course, that’s what this is all about, right? An example “hello world” flask up can also be found in the mentioned repo)
    • Configure the GitLab CI system to contain some credentials for the App Service
    • Add a .gitlab-ci.yml file to your GitLab repo to enable CI
    • … done.

    That should be exactly all. Let’s get started.

    Create the app service

    As said – please use my example repo and terraform. That should be enough:

    • make init
    • make plan
    • make do

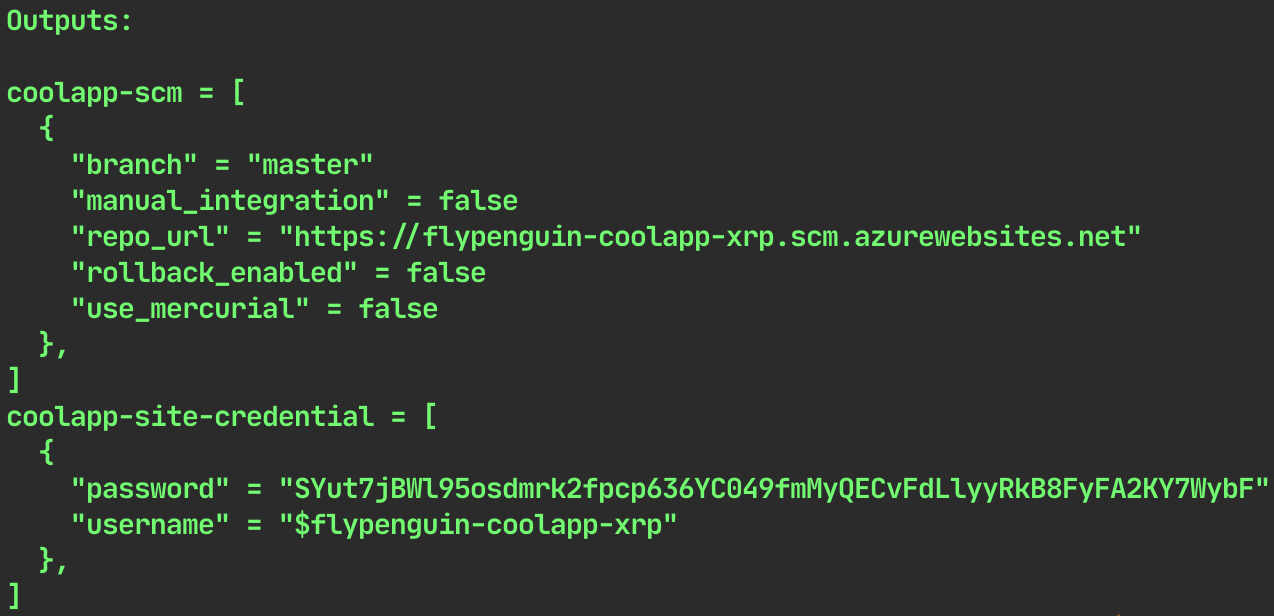
    Terraform should just output the needed credentials.

    terraform credential output

    Important to know:

    • use at least “B1 | Basic” for your SKU settings
    • your “source_control” setting should be “LocalGit” I guess. There is an error in either Terraform or Azure (I think the latter) if you use “ExternalGit”, which would be “variant 2” (a blog post to follow)

    Create a GitLab repo

    This one should do, and if you are rightfully annoyed by Azure give Render a try, they look cool (just found them about 2 mintes ago). To fork the repo you have to click the very unobtrusive “fork” button in the top right.

    Configure GitLab CI

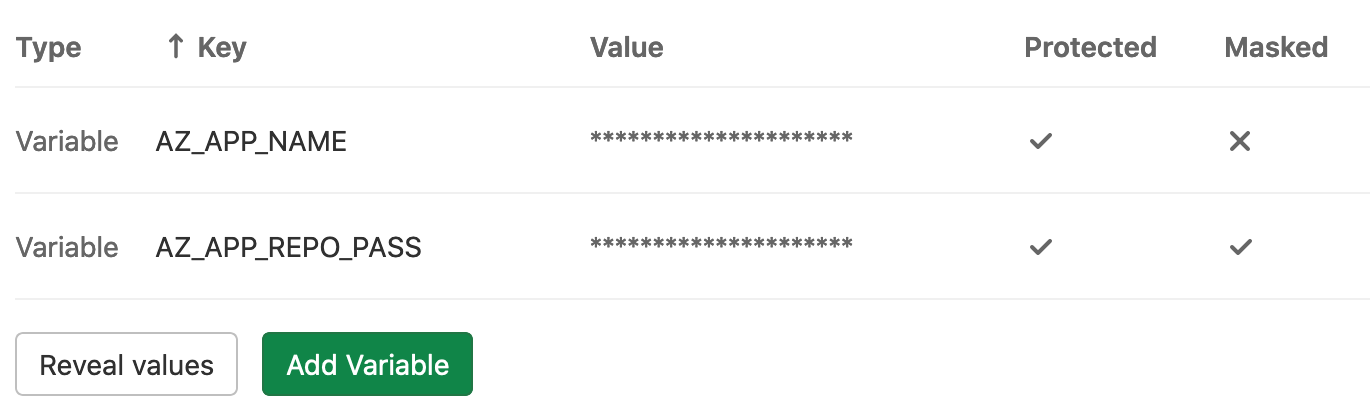
    The only thing to do is set two environment variables for the test runner. The information you need can be found either from my terraform output, or fom the Azure portal (images below). Then you add two variables in GitLab CI (GitLab repo -> settings -> CI/CD -> Variables):

    • AZ_APP_NAME (in this case this would be “flypenguin-coolapp-xrp”)
    • AP_APP_REPO_PASS (in this case this would be “SYut….”)

    set gitlab variables

    There are again a few caveats:

    • Basically the whole thing is based on the app name. Your user name should be your app name prefixed by a “$” sign, which is highly annoying.
    • If you ever want to use a “$” sign in any GitLab runner environment variable, you have to escape it with another “$”. Example: “my$variable” should be “my**$$**variable” in the “value” field of GitLab.

    Add .gitlab-ci.yml file to repo

    Well, just add the file and push the repo.

    stages:
      - push_to_azure
    push_it:
      stage: push_to_azure
      only:
        - master
      allow_failure: false
      before_script:
        - git config --global user.email "some@email.address"
        - git config --global user.name "GitLab CI Pipeline"
      script:
        - export REPO_FQDN="$AZ_APP_NAME.scm.azurewebsites.net"
        - export REPO_URL="https://\$$AZ_APP_NAME:$AZ_APP_REPO_PASS@$REPO_FQDN/$AZ_APP_NAME.git"
        - git remote add azure_app_service "$REPO_URL"
        - git remote -v
        # DEEP DIVE INFORMATION, DELETE ME IF YOU WANT
        # the local branch is 'detached head' - which is fucked.
        # we can't do "git push --force azure HEAD:master" on the FIRST push.
        # we can't push into an empty repository at all, even when using
        #   git push --force azure HEAD:refs/heads/master
        # because on the first push this will still not work.
        # the actually easiest way seems to be to not do "detached head" here.
        # so let's try to "unshallow" that thing.
        # https://is.gd/t7y7LM / https://is.gd/8YE4Ua
        # https://is.gd/rZDwxy / https://is.gd/rZDwxy
        - git fetch --unshallow origin || true
        - git push --force azure_app_service HEAD:refs/heads/master
    

    Finally – test.

    Just push a change to your repo and see if it works. The first obvious change is the addition of the .gitlab-ci.yml file … .

    Hope that helped, hope it works 🙂

  • Azure App Service & Python, Part II

    God I hate Microsoft.

    TL;DR – use “Basic” and “B1” as your app service SKUs. Anything “below” won’t work and you won’t know why.

    So, why I am again angry? Cause I want to deploy an app service, using terraform. Sounds soooooooooo simple, right? Except I fail at the creation of the app service (even without code, yet).

    Example:

    resource "azurerm_app_service_plan" "plan" {
      name                = "pkd-appservices0"
      location            = azurerm_resource_group.rg.location
      resource_group_name = azurerm_resource_group.rg.name
      kind                = "Linux"
      reserved            = true
    
      sku {
        tier = "Dynamic"     # WRONG, use at least "Basic"
        size = "Y1"          # WRONG, use at least "B1"
      }
    }
    
    resource "azurerm_app_service" "appservice" {
      name                = random_string.server.result
      location            = azurerm_resource_group.rg.location
      resource_group_name = azurerm_resource_group.rg.name
      app_service_plan_id = azurerm_app_service_plan.plan.id
    
      site_config {
        scm_type         = "LocalGit"
        linux_fx_version = "PYTHON|3.8"
      }
    }
    

    Now. What happens? Let’s see:

    Error creating App Service "wzkytawt" (Resource Group "pkd-it-appservices0"):
       web.AppsClient#CreateOrUpdate: Failure sending request: StatusCode=0 --
       Original Error: autorest/azure: Service returned an error. Status=<nil> <nil>
    

    What? Okay, our app service fails without any indication. By setting “TF_LOG=TRACE” and reading through 100s of lines of code we get this:

    Consumption pricing tier cannot be used for regular web apps
    

    What the fuck is a “consumption pricing tier”? Well, turns out MS doesn’t know as well, at least it’s described exactly nowhere. Also, can you get a list of tiers? No! Of course not! Why would you?  Stackoverflow to the rescue, again, btw, and no idea where that guy pulled that priceless list from.

    So, set things to “F1 | Free” and everything works.

    … or not. Now we get this:

    There was a conflict.                                              (really?!)
    
    64 Bit worker processes cannot be used for the site as the plan
    does not allow it.                                                 (WTF?)
    
    For more information on pricing and features, please see:
    https://aka.ms/appservicepricingdetails                            (oh! a link! NICE)
    

    Formatting and comments by me … . Now, wondering why the fuck a multi-billion-dollar corp can do less than my Raspi (run 64bit code) I head over to said page. And find nothing. There is not a single mention about 64bit, 32bit, or anything helpful. Just … prices.

    Assuming the fuckers just want more money I upgrade SKU to “B1 | Basic”, and everything works. (Update: I just saw that this is actually mentioned in the terraform docs 🙂

    This time for real, and I think I might be onto the path of finally understanding everything Microsoft does.

  • Azure App Service & Python, Part I

    A.k.a. “you’ve got to be fucking kidding me”. Azure App Service sucks, as basically any part of Azure. What’s surprising this time is that terraform actually contributes to the sucking on this occasion – usually the Hashi folks do a very good job at reducing the annoyance. But maybe they’ve given up, I wouldn’t blame them.

    So what happened?

    What confused the sh*t out of me the last days is that I see tutorials (all really, really, really bad) that do use Python versions newer than 3.4 (not surprisingly). But, alas, there’s this: the site_config.python_version field of terraform’s azurerm_app_service resource. It allows the values “2.7” and “3.4” (a Python version which eol’ed in March ’19).

    After a shit ton of googling I found this, though. Turns out, it’s not even the right field to use!! To select the Python runtime you should use linux_fx_version, which nobody, nowhere, ever documented. And naive me just assumed that something with “python” in its name would be the right thing to use. Stupid, I know, we’re talking Azure here …

  • The 6 ways of returning data from an Azure Function

    Why have one if you can have many? Well, beats me, but I thought I’d collect them here so I have my personal reference. Disclaimer: This is only for JavaScript based functions (most of the examples on the MS pages are C#).

    So, most of them have to do with the file function.json  file:

    {
      "bindings": [
        {
          "type": "httpTrigger",
          "name": "req",
          "and": "so on ..."
        },
        {
          "type": "http",
          "name": "thisIsAnOutputBinding",
          "direction": "out"
        },
        {
          "type": "someOtherType",
          "name": "anotherBinding",
          "direction": "out"
        }
      ]
    }
    

    More precisely, with the “out” type binding that is defined in the 2nd “bindings” object. The “out” binding has a “name” property, which is basically relevant for all of the methods.

    !!!!! WARNING !!!!! – It seems the name of the binding property must be camelCase**. At least I consistently get “invalid binding” errors when I use snake_case**

    Method 1 – context property

    The context object has one property per defined “out” binding. So if our property is named “thisIsAnOutputBinding”, our result property is context.thisIsAnOutputBinding , or as MicroSoft puts it:

    Outputs (bindings of direction === "out" ) can be written to by a function in a number of ways. In all cases, the name property of the binding as defined in function.json corresponds to the name of the object member written to in your function.

    Simply put, you just assign the value to a context  member and you’re done:

    module.exports = function (context, req) {
      context.thisIsAnOutputBinding = {
        my: "return value",
        "in this case": "an object",
      };
      // contect.done() is only needed for synchronous functions context.done();
    };
    

    Source here.

    Method 2 – return an object (async functions only)

    With the bindings given above, you can assign the values to the context property, but you can also return an object whose keys correspond to the binding names:

    module.exports = async function (context) {
      return { thisIsAnOutputBinding: 42, anotherBinding: 43 };
      // of course, instead of 42/43 you can put any js object here.
    };
    

    Source here.

    Method 3 – using context.bindings

    This is basically a variant of method 1. Why does it exist? No one knows. Apparently the context object has a .bindings  property, which in turn again has properties which name-match the defined out bindings. So this is another possibility, and I think the return  is unnecessary:

    module.exports = async function (context) {
      let retMsg = "Hello, world!";
      context.bindings.thisIsAnOutputBinding = {
        body: retMsg,
      };
      context.bindings.anotherBinding = retMsg;
      return;
    };
    

    Source here.

    Method 4 – using context.done()

    If you’re using a sync method, you can’t return an object, but you can call context.done(err, obj) .

    module.exports = async function (context) {
      context.done(null, {
        thisIsAnOutputBinding: { text: "hello there, world", anotherBinding: 42 },
      });
    };
    

    Source here.

    Method 5 – just return it already (only async functions)

    Probably someone said “Well, if I only have one output binding, why should I explicitly address it?”, which is a valid thought. So another way to return data was invented.

    For this the configuration in function.json looks a bit different:

    {
      "bindings": [
        { "type": "someType", "name": "req", "direction": "in" },
        { "type": "someOutType", "direction": "out", "name": "$return" }
      ]
    }
    

    You have to set exactly one “out” type binding, and the name must be “$return”. Then you can do this:

    module.exports = async function (context, req) {
      return "woohooo!!";
    };
    

    Source here.

    Methods 6 – special for http outputs

    You thought we were done? Noooooo. For http methods, you can diretly return the body object which is then used to create the body

    // actually NO IDEA if this works sync, async or both
    // my guess is: sync, because "context.done() is implicitly called"
    module.exports = async function (context, req) {
      rv = { body: "<html/>", status: 201 };
      context.res.send(rv);
    };
    

    Source here.

    Summary

    Let’s just say it’s a mess, and too many ways ruin the map.

    It works though.

  • Build your own PaaS with Dokku

    I was looking for some “play” deployment method for a couple of things I want to try out. Most of them require a database. And it should be cheap, cause I don’t have any load on them and don’t earn any money, so I don’t want to spend basically no money if possible. The usual suspects are too expensive – AWS, Heroku, etc.

    So I looked around and found Dokku.

    Dokku is a set of – hang on – shell scripts – which basically emulate Heroku on a machine of your own. It’s integrated with Digital Ocean droplets out of the box, if you want it. And the whole thing is 5 € / month, which is perfect. It also integrates with a Dockerfile based deployment, so you do git push and everything just works.

    It’s amazing.

    This is how you get started. But before you can get started, you need a domain you control, either on AWS or any other hoster. This is for routing traffic to your deployments later. You also need a public SSH key, or better a public / private key pair. Once you have both you can …

    1. create a Digital Ocean account, and …
    2. add your SSH public key to your account, and …
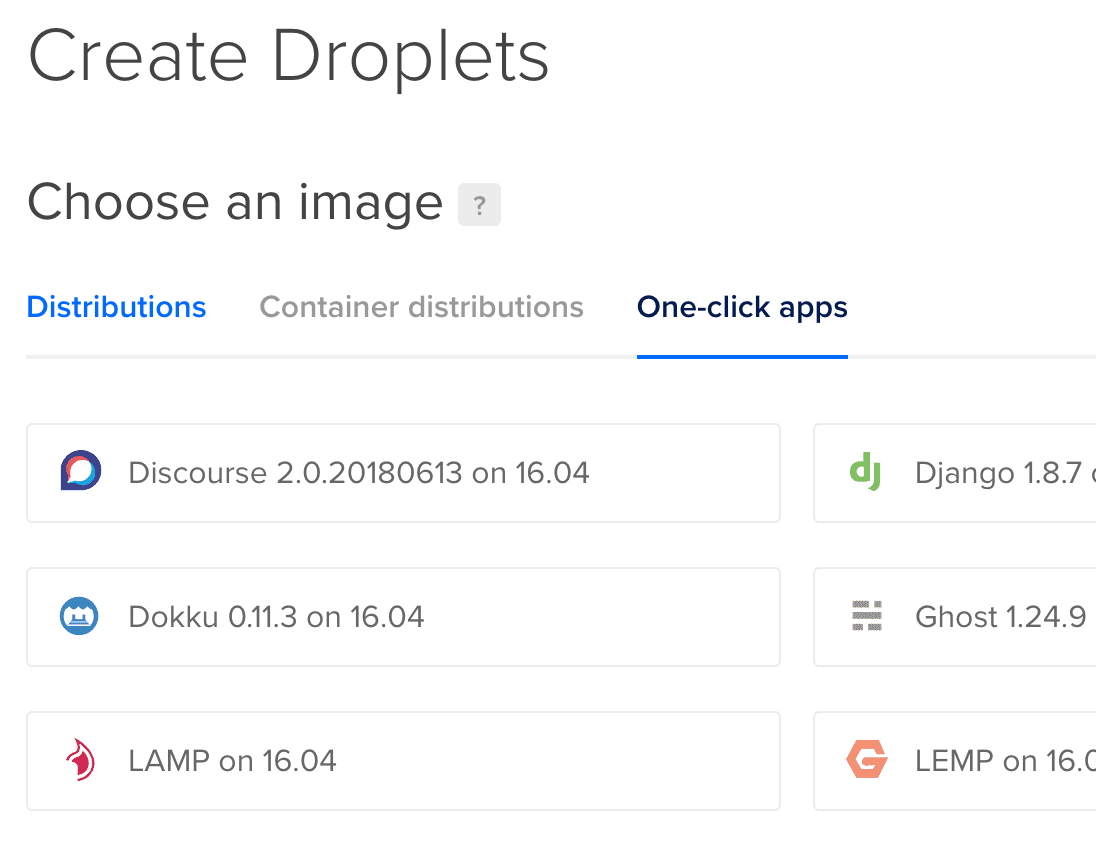
    3. in that account, create a new droplet with a “Dokku” image preinstalled.
    4. Wait until the droplet finished provisioning.

    create new droplet

    While the droplet is being created, you can also create a project locally to test it later:

    $ mkdir dokku-test
    $ cd dokku-test
    $ git init
    $ echo "FROM tutum/hello-world" > Dockerfile
    $ git add Dockerfile
    $ git commit -m "Initial commit"
    

    In this little test project we only create a Dockerfile from an hello-world image which displays “Hello world” in a browser so we can verify it worked.

    Once the droplet is done, you can start setting up your personal little PaaS. First, you have to configure your DNS. We will set up a wildcard entry for our deployments, and a non-wildcard entry for git. Let’s assume your domain is for-myself.com, then you would add …

    • my-paas.for-myself.com , type “A” (or “AAAA” if you are IPv6) to your droplet IP
    • *.my-paas.for-myself.com just the same

    Then you SSH into your droplet, and create your dokku project. (This is something you have to do for every project). All you have to do for this is:

    $ ssh root@DROPLET_IP
    ~# dokku apps:create hello-world
    -----> Creating hello-world... done
    ~# _
    

    Done.

    Now you configure a git remote URL for your project, and push it:

    $ git remote add dokku dokku@my-paas.for-myself.com:hello-world
    

    Again – done. If you push your project now (assuming DNS is already set), everything should happen automagically:

    $ git push --set-upstream dokku master
    X11 forwarding request failed
    Enumerating objects: 3, done.
    Counting objects: 100% (3/3), done.
    Writing objects: 100% (3/3), 241 bytes | 241.00 KiB/s, done.
    Total 3 (delta 0), reused 0 (delta 0)
    -----> Cleaning up...
    -----> Building hello-world from dockerfile...
    remote: build context to Docker daemon  2.048kB
    Step 1/1 : FROM tutum/hello-world
    latest: Pulling from tutum/hello-world
    658bc4dc7069: Pulling fs layer
    [... TRUNCATED ...]
    983d35417974: Pull complete
    Digest: sha256:0d57def8055178aafb4c7669cbc25ec17f0acdab97cc587f30150802da8f8d85
    Status: Downloaded newer image for tutum/hello-world:latest
     ---> 31e17b0746e4
    Successfully built 31e17b0746e4
    Successfully tagged dokku/hello-world:latest
    -----> Setting config vars
           DOKKU_DOCKERFILE_PORTS:  80/tcp
    -----> Releasing hello-world (dokku/hello-world:latest)...
    -----> Deploying hello-world (dokku/hello-world:latest)...
    -----> Attempting to run scripts.dokku.predeploy from app.json (if defined)
    -----> No Procfile found in app image
    -----> DOKKU_SCALE file not found in app image. Generating one based on Procfile...
    -----> New DOKKU_SCALE file generated
    =====> web=1
    -----> Attempting pre-flight checks
           For more efficient zero downtime deployments, create a file CHECKS.
           See http://dokku.viewdocs.io/dokku/deployment/zero-downtime-deploys/ for examples
           CHECKS file not found in container: Running simple container check...
    -----> Waiting for 10 seconds ...
    -----> Default container check successful!
    -----> Running post-deploy
    -----> Creating new /home/dokku/hello-world/VHOST...
    -----> Setting config vars
           DOKKU_PROXY_PORT_MAP:  http:80:80
    -----> Configuring hello-world.my-paas.for-myself.com...(using built-in template)
    -----> Creating http nginx.conf
    -----> Running nginx-pre-reload
           Reloading nginx
    -----> Setting config vars
           DOKKU_APP_RESTORE:  1
    =====> Renaming container (14c349cb496d) amazing_snyder to hello-world.web.1
    -----> Attempting to run scripts.dokku.postdeploy from app.json (if defined)
    =====> Application deployed:
           http://hello-world.my-paas.for-myself.com
    
    To my-paas.for-myself.com:hello-world
     * [new branch]      master -> master
    Branch 'master' set up to track remote branch 'master' from 'dokku'.
    

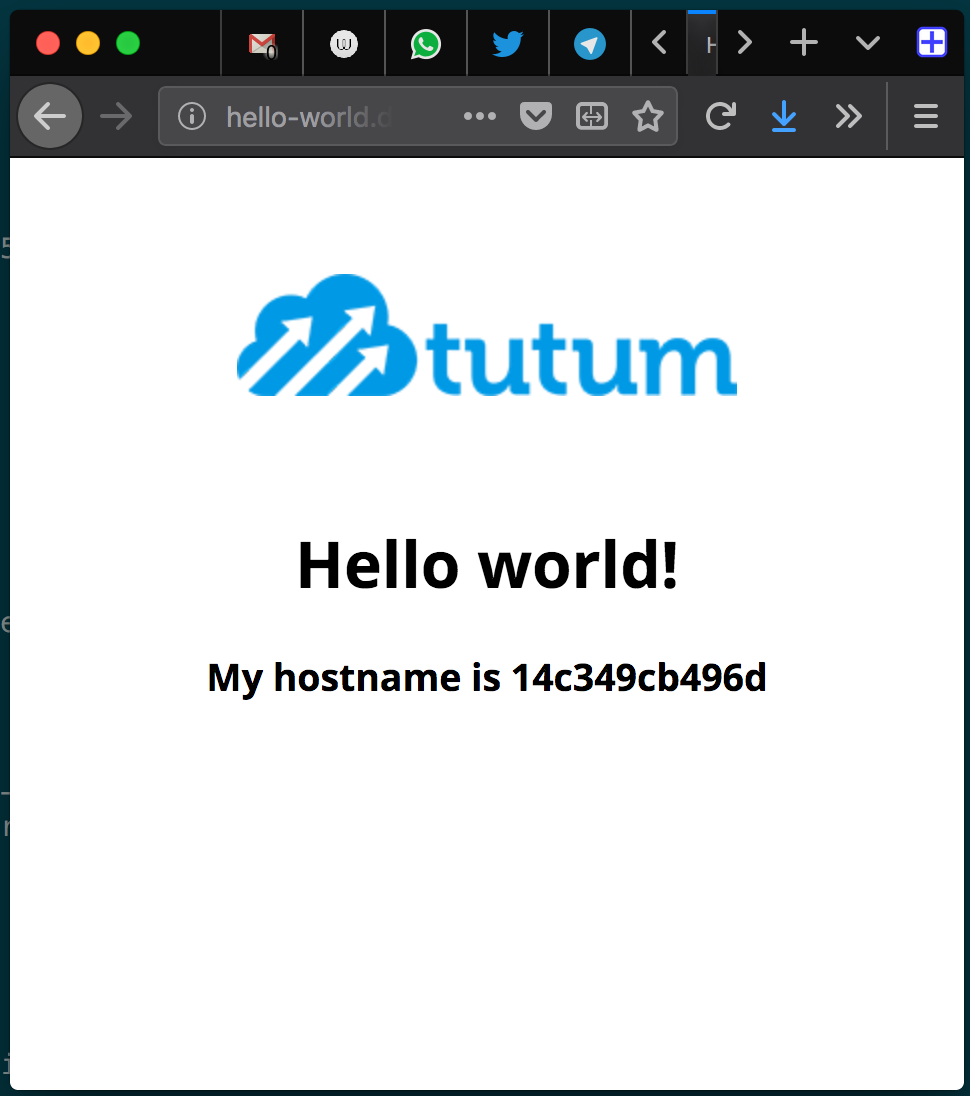
    And if you open your URL now (which is hello-world.my-paas.for-myself.com) you should see this image:

    browser display of deployed example site

    Now, for 5 € / month you get:

    • A heroku-like, no-nonsense, fully automated, git-based deployment platform
    • A server which you control (and have to maintain, okay, but on which you can deploy …)
    • A database (or many of them – dokku provides great integration for databases btw; more on that in another post)
    • Publicly reachable deployments (for customers, testing, whatever)
    • Let’s Encrypt certificates (dokku provides support for these as well, again more in a later post)
    • And for 1 € more (it’s always 20% of the base price) you get backups of your system)

    That’s absolutely incredible. Oh, and did I mention that the maintainers are not only friendly, but also super responsive and incredibly helpful on Slack?

  • jq makes AWS “describe-instances” actually useful

    Just so I don’t forget 🙂

    aws ec2 describe-instances | \
      jq '.Reservations[].Instances[] | {IP: .PrivateIpAddress, ID: .InstanceId, Name: .Tags[] | select(.Key=="Name").Value}'
    
  • Elastic Beanstalk with Docker using Terraform

    I just investigate AWS Elastic Beanstalk. And I want to use terraform for this. This is what I’ve done, and how I’ve got it running. I basically do this because the docs for this are either super-long (and are still missing critical points) or super-short (and are also missing critical points), at least what I’ve found.

    This should get you up and running in very little time. You can also get all the code from a demo github repository.

    General principles

    The Architectural Overview is a good page to read to get an idea of what you’re about to do. It’s not that long.

    In short, Elastic Beanstalk runs a version of an application in an environment. So the process is: Declaring an application, defining a couple of versions and environments, and then combine one specific version with one specific environment of an app to create an actually running deployment.

    The environment is just a set of hosts configured in a special way (autoscaling & triggers, subnets, roles, etc.), whereas the application version is the info about how to deploy the containers on that environment (ports, env variables, etc.). Naturally, you think of having a DEV environment which runs “latest”, and a PROD environment which runs “stable” or so. Go crazy.

    Prerequisites & Preparation

    For the example here you need a couple of things & facts:

    • An AWS account
    • In that account, you need:
    • an S3 bucket to save your app versions
    • a VPC ID
    • subnet IDs for the instance networks
    • an IAM roles for the hosts
    • an IAM service roles elastic beanstalk. (see bottom for how to create that)
    • Terraform 🙂
    • The aws command line client

    Get started

    The files in the repository have way more parameters, but this is the basic set which should get you running (I tried once, then added all that stuff). The main.tf  file below will create the application and an environment associated with it.

    # file: main.tf
    
    resource "aws_elastic_beanstalk_application" "test" {
      name        = "ebs-test"
      description = "Test of beanstalk deployment"
    }
    
    resource "aws_elastic_beanstalk_environment" "test_env" {
      name                = "ebs-test-env"
      application         = "ebs-test"
      cname_prefix        = "mytest"
    
      # the next line IS NOT RANDOM, see "final notes" at the bottom
      solution_stack_name = "64bit Amazon Linux 2016.09 v2.5.2 running Docker 1.12.6"
    
      # There are a LOT of settings, see here for the basic list:
      # https://is.gd/vfB51g
      # This should be the minimally required set for Docker.
    
      setting {
        namespace = "aws:ec2:vpc"
        name      = "VPCId"
        value     = "${var.vpc_id}"
      }
      setting {
        namespace = "aws:ec2:vpc"
        name      = "Subnets"
        value     = "${join(",", var.subnets)}"
      }
      setting {
        namespace = "aws:autoscaling:launchconfiguration"
        name      = "IamInstanceProfile"
        value     = "${var.instance_role}"
      }
      setting {
        namespace = "aws:elasticbeanstalk:environment"
        name      = "ServiceRole"
        value     = "${var.ebs_service_role}"
      }
    
    }
    

    If you run this, at least one host and one ELB should appear in the defined subnets. Still, this is an empty environment, there’s no app running in it. If if you ask yourself, “where’s the version he talked about?” – well, it’s not in there. We didn’t create one yet. This is just the very basic platform you need to run a version of an app.

    In my source repo you can now just use the script app_config_create_and_upload.sh , followed by deploy.sh . You should be able to figure out how to use them, and they should work out of the box. But we’re here to explain, so this is what happens behind the scenes if you do this:

    1. create a file “Dockerrun.aws.json ” with the information about the service (Docker image, etc.) to deploy
    2. upload that file into an S3 bucket, packed into a ZIP file (see “final notes” below)
    3. tell Elastic Beanstalk to create a new app version using the info from that file (on S3)

    That obviously was app_config_create_and_upload.sh . The next script, deploy.sh , does this:

    1. tell EBS to actually deploy that configuration using the AWS cli.

    This is the Dockerrun.aws.json  file which describes our single-container test application:

    {
      "AWSEBDockerrunVersion": "1",
      "Image": {
        "Name": "flypenguin/test:latest",
        "Update": "true"
      },
      "Ports": [
        {
          "ContainerPort": "5000"
        }
      ],
      "Volumes": [],
      "Logging": "/var/log/flypenguin-test"
    }
    

    See “final notes” for the “ContainerPort” directive.

    I also guess you know how to upload a file to S3, so I’ll skip that. If not, look in the script. The Terraform declaration to add the version to Elastic Beanstalk looks like this: (if you used my script, a file called app_version_<VERSION>.tf  was created for you automatically with pretty much this content):

    # define elastic beanstalk app version "latest"
    resource "aws_elastic_beanstalk_application_version" "latest" {
      name        = "latest"
      application = "${aws_elastic_beanstalk_application.test_app.name}"
      description = "Version latest of app ${aws_elastic_beanstalk_application.test_app.name}"
      bucket      = "my-test-bucket-for-ebs"
      key         = "latest.zip"
    }
    

    Finally, deploying this using the AWS cli:

    $ aws elasticbeanstalk update-environment \
      --application-name test-app \
      --version-label latest \
      --environment-name test-env
    

    All done correctly, this should be it, and you should be able to access your app now under your configured address.

    Wrap up & reasoning

    My repo works, at least for me (I hope for you as well). I did not yet figure out the autoscaling, for which I didn’t have time. I will catch up in a 2nd blog post once I figured that out. First tests gave pretty weird results 🙂 .

    The reason why I did this (when I have Rancher available for me) is the auto-scaling, and the host-management. I don’t need to manage any more hosts and Docker versions and Rancher deployments just to deploy a super-simle, CPU-intensive, scaling production workload, which relies on very stable (even pretty conservative) components in that way. Also I learned something.

    Finally, after reading a lot of postings and way to much AWS docs, I am surprised how easy this thing actually is. It certainly doesnt look that way if you start reading up on it. I tried to catch the essence of the whole process in that blog post.

    Final notes & troubleshooting

    1. I have no idea what the aws_elastic_beanstalk_configuration_template  Terraform resource is for. I would like to understand it, but the documentation is rather … sparse.
    2. The solution stack name has semantic meaning. You must set something that AWS understands. This can be found out by using the following command: $ aws elasticbeanstalk list-available-solution-stacks ** ** … or on the AWS documentation. Whatever is to your liking.
    3. If you don’t specify a security group (aws:autoscaling:launchconfiguration  – “SecurityGroups “) one will be created for you automatically. That might not be convenient because this means that on “terraform destroy” this group might not be destroyed automatically. (which is just a guess, I didn’t test this)
    4. The same goes for the auto scaling group scaling rules.
    5. When trying the minimal example, be extra careful when you can’t access the service after everything is there. The standard settings seem to be: Same subnet for ELB and hosts (obviously), and public ELB (with public IPv4 address). Now, placing a public-facing ELB into an internal-only subnet does not work, right? 🙂
    6. The ZIP file: According to the docs you can only upload the JSON file (or the Dockerfile file if you build the container in the process) to S3. But the docs are not extremely clear, and Terraform did not mention this. So I am using ZIPs which works just fine.
    7. The ContainerPort is always the port the applications listens on in the container, it is not the port which is opened to the outside. That always seems to be 80 (at least for single-container deployments)

    Appendix I: Create ServiceRole IAM role

    For some reason on the first test run this did not seem to be necessary. On all subsequent runs it was, though. This is the way to create this. Sorry that I couldn’t figure out how to do this with Terraform.

    • open AWS IAM console
    • click “Create new role”
    • Step 1 – select role type: choose “AWS service role”, and under that “AWS Elastic Beanstalk”
    • Step 2 – establish trust: is skipped by the wizard after this
    • Step 3 – Attach policy: Check both policies in the table (should be “AWSElasticBeanstalkEnhancedHealth”, and “AWSElasticBeanstalkService”)
    • Step 4 – Set role name and review: Enter a role name (e.g. “aws-elasticbeanstalk-service-role”), and hit “Create role”

    Now you can use (if you chose that name) “aws-elasticbeanstalk-service-role” as your ServiceRole parameter.

    Appendix II: Sources
  • VPC with NAT to internet on AWS

    … and other TLAs.

    Anyways, as far as I remember OpenStack does not need this, so I thought I document it here. I at least was surprised.

    Situation: You want a private network sement in the cloud (in my case an Amazon VPC), and you don’t want all hosts to be accessible from the internet. So you don’t assign public IPs, and you need a router/gateway.

    Amazon creates a network internet gateway, but this thing does not do one thing: NATting. If your host does not have a private IP, it can’t connect to “the internet”.

    Solution: You actually need to instantiate an EC2 instance, which you have to configure to do NAT (which is forwarding and masquerading) with a public IP address. And you have to set routing tables which point to that instance for all networks which should be inaccessible from the internet.

    Thankfully there’s an article providing an example CloudFormation template.

    Really, thanks.

    Configuring the NAT instance is super-easy then. Amazon mentions in its docs that there are special Amazon Linux instances (“These AMIs include the string amzn-ami-vpc-nat in their names […]”) which come with NATting preconfigured. Just instantiate an instance using the appropriate AMI image, and you’re done. No further configuration needed.