Category: Snippets

  • Convert RAW files on a Mac using “sips”

    I recently needed to convert Canon *.CR2 RAW files to JPEG. What I did not know is that a Mac brings all you need preinstalled in form of a CLI tool called sips.

    for i in *.CR2; do
      sips -s format jpeg $i --out "${i%.*}.jpg"
    done
    

    Also: man sips works just fine for more information.

    Source: Coderwall

  • Unattended upgrades in Debian/Ubuntu

    If you want to automatically install package upgrades on a Debian/Ubuntu server system – there’s an app for that. First, install the package:

    apt-get install unattended-upgrades apt-listchanges
    

    Then configure the package by editing (Ubuntu) /etc/apt/apt.conf.d/50unattended-upgrades:

    // /etc/apt/apt.conf.d/50unattended-upgrades without comments
    // my version
    Unattended-Upgrade::Allowed-Origins {
            "${distro_id}:${distro_codename}";
        "${distro_id}:${distro_codename}-security";
        "${distro_id}ESMApps:${distro_codename}-apps-security";
        "${distro_id}ESM:${distro_codename}-infra-security";
        "${distro_id}:${distro_codename}-updates";
    };
    Unattended-Upgrade::Package-Blacklist {
    };
    Unattended-Upgrade::DevRelease "false";
    Unattended-Upgrade::Remove-Unused-Kernel-Packages "true";
    Unattended-Upgrade::Remove-Unused-Dependencies "true";
    Unattended-Upgrade::Automatic-Reboot "true";
    Unattended-Upgrade::Automatic-Reboot-Time "02:00";
    

    Apparently in Debian there are a couple more ways to achieve the same goal, this one works pretty well for me.

  • Set DNS search path on Unifi USG with DHCP

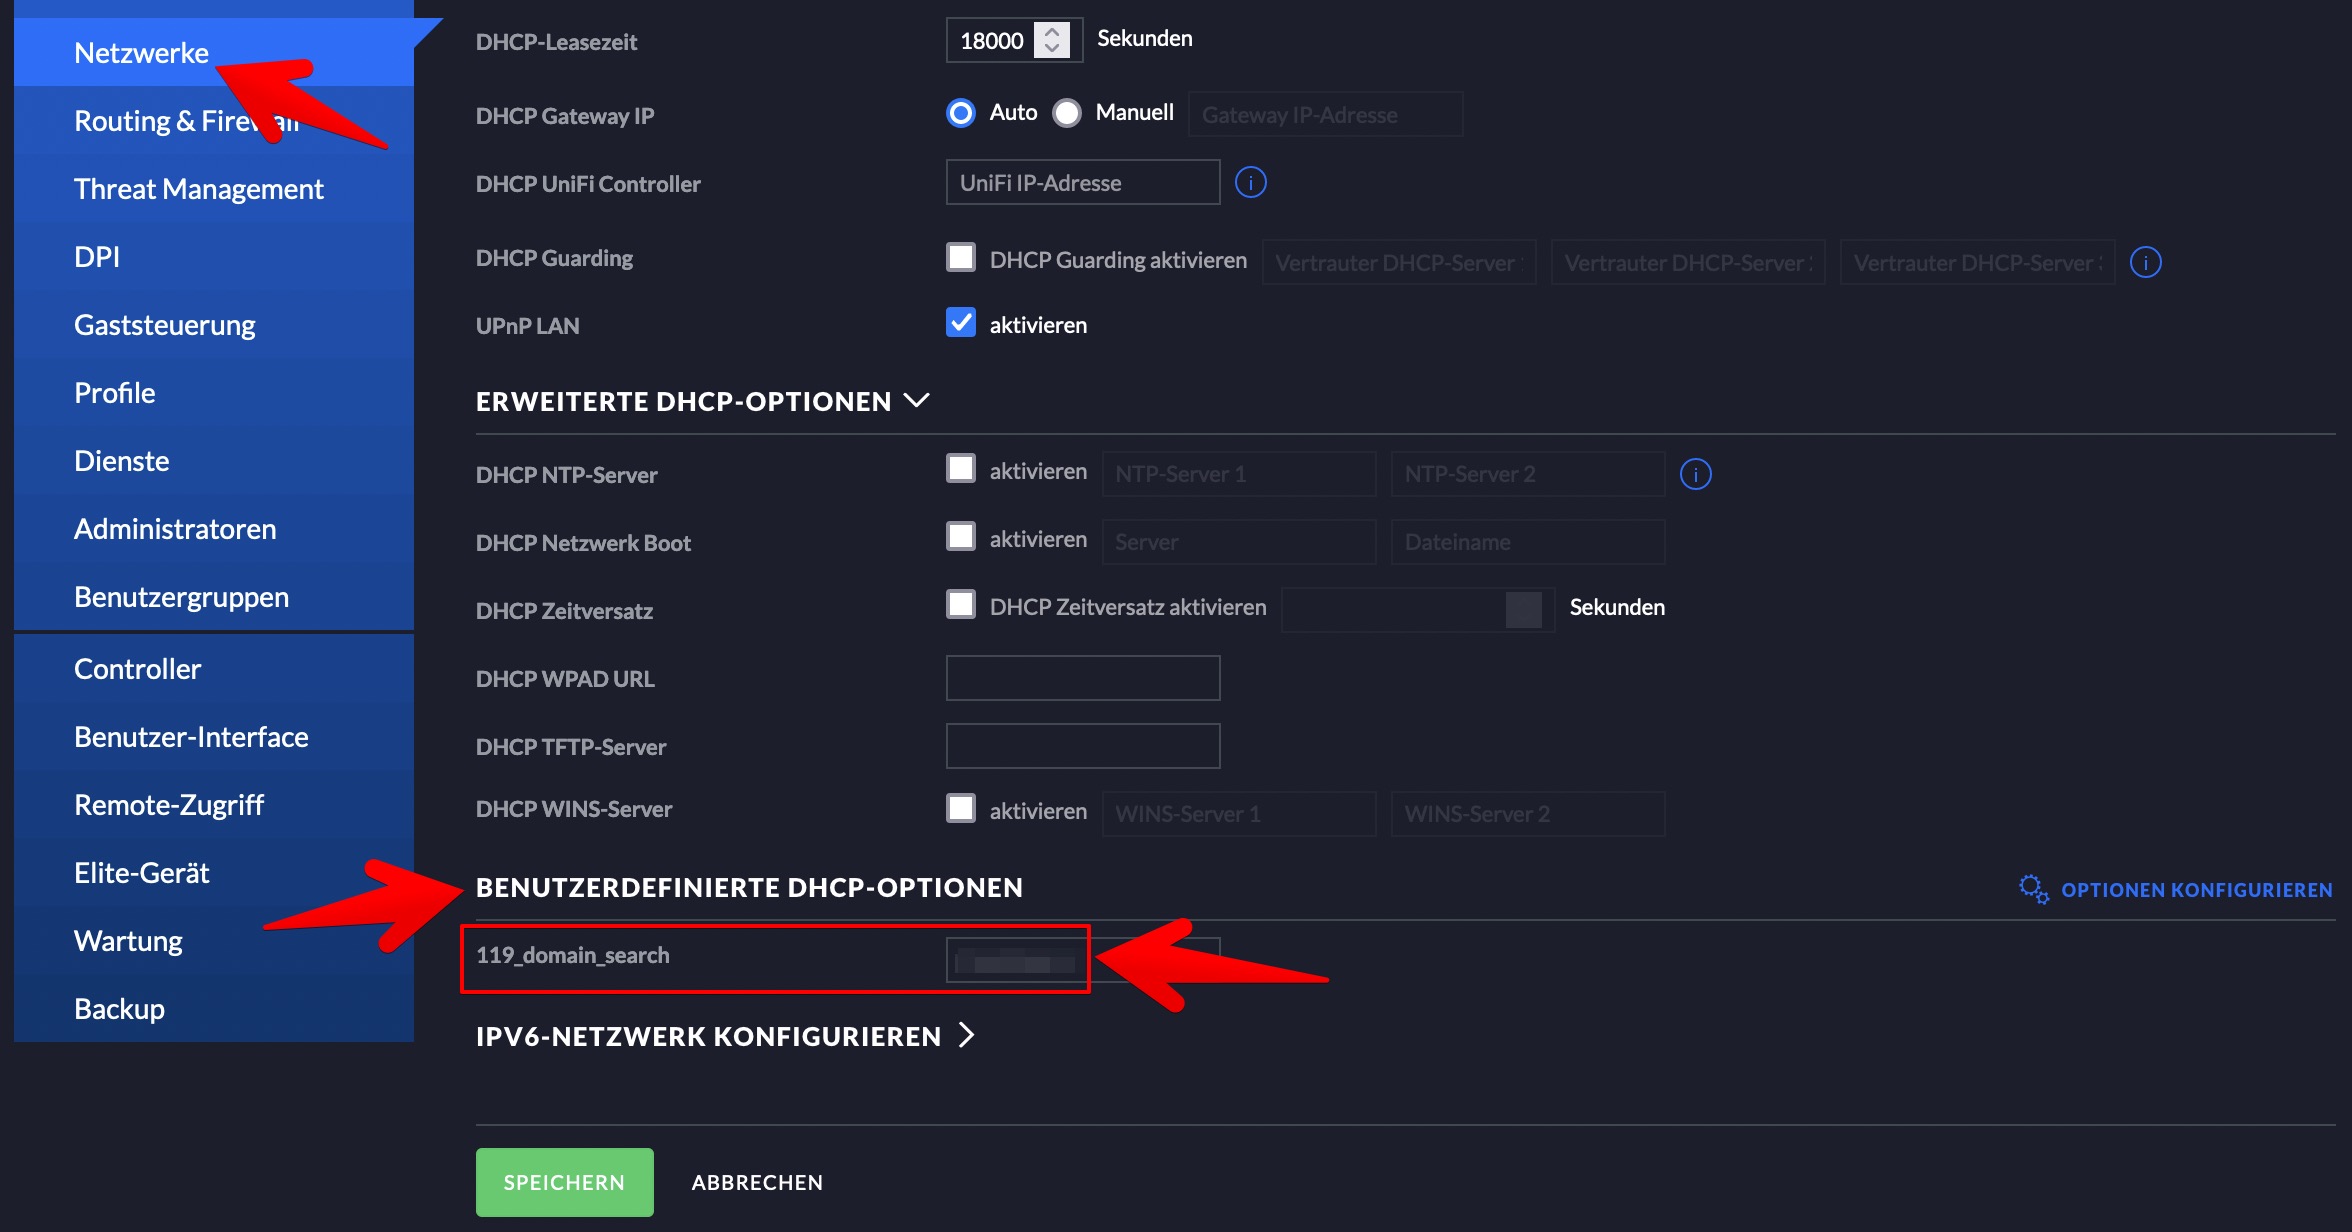
    I have a home network with a Unifi Security Gateway. I wanted to set my home’s domain as “domain search path”, alas, in the Unifi UI there is no option for this, but the community to the rescue.

    • add “custom DHCP option”
    • give it a name
    • use code “119” and type “text”

    Now in your “networks” in the UI you can set your pre-defined custom option on a per-network-basis (see image, and sorry for the German locale – I don’t know how to change that, and I didn’t kinda look hard).

    unifi network settings

  • Add swap space in Ubuntu

    My DigitalOcean Droplet started dropping containers while kswapd ate up CPU cycles like Pacman. Time to add a swap space, or rather a swap file cause I did not want to add a dedicated volume.

    # swap usage check - swapon: no output, no use; free: should read "0"
    sudo swapon --show
    free -h
    
    # as root: create swap (make sure you have enough disk space available)
    fallocate -l 4G /swapfile
    chmod 600 /swapfile
    mkswap /swapfile
    swapon /swapfile
    echo '/swapfile none swap sw 0 0' | sudo tee -a /etc/fstab
    
    # reboot and check (see first two commands) if swap is available
    reboot
    

    Optinonally you can also tune swappiness and cache pressure settings. Both is described in this article’s source (DigitalOcean).

  • Pi-Hole in Docker

    disable systemd-resolved stub

    First, disable systemd-resolved name server stub. You can use this command to do this:

    # This just changes "#DNSStubListener=yes" to "DNSStubListener=no"
    sudo sed -r -i.orig 's/#?DNSStubListener=yes/DNSStubListener=no/g' /etc/systemd/resolved.conf
    

    You also have to remove the symlink /etc/resolv.conf, and replace it with a file:

    rm /etc/resolv.conf
    echo "nameserver 1.1.1.1" >  /etc/resolv.conf
    echo "nameserver 8.8.8.8" >> /etc/resolv.conf
    

    Then do systemctl restart systemd-resolved. (Source)

    run pi-hole in docker-compose

    I am using this docker-compose.yml file for pi-hole:

    version: "3"
    
    # More info at https://github.com/pi-hole/docker-pi-hole/ and https://docs.pi-hole.net/
    services:
      pihole:
        container_name: pihole
        image: pihole/pihole:latest
    
        ports:
          - "53:53/tcp"
          - "53:53/udp"
          - "67:67/udp"
          - "80:80/tcp"
    
        environment:
          ServerIP: "192.168.1.2" # ADJUST FOR YOUR PI-HOLE IP OF COURSE
          TZ: "Europe/Berlin"
          WEBPASSWORD: "mysupersecretpassword"
    
        volumes:
          - "./data/etc-pihole/:/etc/pihole/"
          - "./data/etc-dnsmasq.d/:/etc/dnsmasq.d/"
    
        dns: # THIS IS IMPORTANT
          - 127.0.0.1 # SPECIALLY THIS LINE. I DON'T KNOW WHY.
          - 172.198.179.1
    
        # Recommended but not required (DHCP needs NET_ADMIN)
        #   https://github.com/pi-hole/docker-pi-hole#note-on-capabilities
        cap_add:
          - NET_ADMIN
    
        restart: unless-stopped
    

    Update pi-hole entries

    Then update the pi-hole when it runs under: WebUI -> Tools -> Update Gravity -> Press “Update”.

  • Proxmox and home assistant

    A couple of hints to get proxmox and a home assistant VM up and running on a home server.

    Installing Proxmox

    Tip: Youtube “First 11 Things on Proxmox“.

    Graphical installer doesn’t run

    If the graphical installer does not come up (after DHCP) try this:

    # FIRST START PROXMOX INSTALLATION IN   D E B U G   M O D E   ! ! !
    
    # then in the shell starting before the installer runs, do ...
    $ Xorg -configure
    
    # COULD also be under /root/xorg.conf.new - read the command output
    $ cp /xorg.conf.new /etc/X11/xorg.conf
    
    # now replace all ocurrences of `amdgpu` with `fbdev` in /etc/X11/xorg.conf
    
    # exit the shell
    $ <CTRL-D>
    

    Now the installer should just come up.

    Source: This blog post and that comment below.

    Enable updates without subscription

    Change /etc/apt/sources.list.d/pve-enterprise.list to this:

    # /etc/apt/sources.list.d/pve-enterprise.list
    deb http://download.proxmox.com/debian/pve buster pve-no-subscription
    

    Install HASS.io

    SSH into your proxmox box and use this command:

    # (I didn't need sudo, I connected as root)
    bash -c "$(wget -qLO - https://raw.githubusercontent.com/Kanga-Who/home-assistant/master/hassos_install.sh)"
    
  • Install Zalando Postgres operator

    This was a bit painful, yet I managed. Used apparently v1.6.2.

    Add helm repos

    If you pull a little trick you can install the operator using helm, just add a helm repo pointing to the github repo:

    # found here: https://git.io/J3C7S
    export ZALANDO_BASE=https://raw.githubusercontent.com/zalando/postgres-operator
    helm repo add zalando-pg $ZALANDO_BASE/master/charts/postgres-operator/
    helm repo add zalando-ui $ZALANDO_BASE/master/charts/postgres-operator-ui/
    helm repo update
    

    Install postgres-operator

    To use CRD configuration (recommended) this must be present in the helm values.yaml file:

    # values.yaml - INCOMPLETE; DO NOT USE; use the one further down.
    configTarget: "OperatorConfigurationCRD"
    

    Unfortunately the helm chart is broken, and you have to re-create the default values.yaml file (see also below). Using this file you can now install the operator:

    helm upgrade -i \
    --create-namespace -n zalando-pg-operator \
    -f values.yaml \
    pg-operator \
    zalando-pg/postgres-operator
    

    Install operator-ui

    Just use default values, so no values.yaml needed.

    helm upgrade -i \
    --create-namespace -n zalando-pg-operator \
    pg-operator-ui \
    zalando-ui/postgres-operator-ui
    

    To access the service you have to do a port-forward, since there is no authentication that I know of:

    kubectl port-forward svc/pg-operator-ui-postgres-operator-ui 8081:80 -n zalando-pg
    curl localhost:8081
    

    Uninstallation

    Since it’s helm I’d assume a simple helm uninstall.

    Impressions

    • I dislike the helm chart quality.
    • I have a feeling the thing is pretty AWS specific, in the UI you can enable “ELB”s, which is AWS speak for “load balancers”
    • I really like the UI, and I like the way you see which objects are created.

    Resources

    values.yaml for helm

    The settings in the default values.yaml file do not have the correct data type and validation will fail once you try to install it. A working version can be found in this gist or below (identical contents). The file has the exact same values but in the correct data types (so a boolean is actually true and not "true", which is a string and not a bool value).

    ## INSTALL / UPGRADE:
    ##   helm upgrade -i --create-namespace -n zalando-pg pg-operator zalando/postgres-operator -f values.yaml
    
    # enable CRD configuration
    configTarget: OperatorConfigurationCRD
    
    # the following values ARE THE DEFAULT VALUES. unfortunately they are coded as
    # strings in the default values.yaml, and the verification (rightfully) complains
    # that either boolean or integer values are needed. so we have to re-include them
    # here but with the correct data type.
    # the only exceptions to this are the commented-out values, which contain integers,
    # but are needed as strings. what a mess.
    
    configGeneral:
      enable_crd_validation: true
      enable_lazy_spilo_upgrade: false
      enable_pgversion_env_var: true
      enable_shm_volume: true
      enable_spilo_wal_path_compat: false
      min_instances: -1
      max_instances: -1
      workers: 8
    
    configKubernetes:
      cluster_labels:
        application: spilo
      enable_init_containers: true
      enable_pod_antiaffinity: false
      enable_pod_disruption_budget: true
      enable_sidecars: true
      spilo_privileged: false
      spilo_allow_privilege_escalation: true
    
    #configPostgresPodResources:
    #  default_cpu_limit: 1
    
    configLoadBalancer:
      enable_master_load_balancer: false
      enable_replica_load_balancer: false
    
    configDebug:
      debug_logging: true
      enable_database_access: true
    
    configLoggingRestApi:
      api_port: 8080
      cluster_history_entries: 1000
      ring_log_lines: 100
    
    configAwsOrGcp:
      enable_ebs_gp3_migration: false
    
    configTeamsApi:
      enable_postgres_team_crd: false
      enable_teams_api: false
    
    configConnectionPooler:
      connection_pooler_max_db_connections: 60
      connection_pooler_number_of_instances: 2
      #connection_pooler_default_cpu_limit: 1
    
  • Install Crunchy Data Postgres operator

    It’s pretty simple, following the documentation, and tested with version 4.6.2 (commands super slightly adapted). Normally you might download the YAML file and adjust the installation settings in there, this is not done here (mainly because this is just a handling test).

    export CRUNCHY_BASE=https://raw.githubusercontent.com/CrunchyData/postgres-operator
    kubectl create namespace pgo
    kubectl apply -f $CRUNCHY_BASE/v4.6.2/installers/kubectl/postgres-operator.yml
    
    # install pgo binary - https://is.gd/U00wux
    curl $CRUNCHY_BASE/v4.6.2/installers/kubectl/client-setup.sh > client-setup.sh
    bash client-setup.sh
    rm client-setup.sh
    
    # THIS IS IMPORTANT
    kubectl delete job -n pgo pgo-deploy
    

    Using the pgo binary

    Every time you want to use the binary you have to port-forward to the operator container, and set PGO_APISERVER_URL:

    # keep running
    kubectl -n pgo port-forward svc/postgres-operator 8443:8443
    
    # second shell
    export PGO_APISERVER_URL="https://127.0.0.1:8443"
    pgo version
    

    Upgrading the operator (untested)

    Just apply the same manifest, but set the DEPLOY_ACTION in the YAML postgres-operator.yaml manifest to upgrade. You can do this by downloading and modifying, or just in a one-liner:

    export CRUNCHY_BASE=https://raw.githubusercontent.com/CrunchyData/postgres-operator
    export CRUNCHY_YAML=$CRUNCHY_BASE/v4.6.2/installers/kubectl/postgres-operator.yml
    curl $CRUNCHY_YAML | sed 's/value: install/value: upgrade/g' | kubectl apply -f -
    

    NOTE: If you get a huge error message you forgot to delete the job after the installation.

    Uninstalling the operator

    Like upgrade, but with the value uninstall.

    export CRUNCHY_BASE=https://raw.githubusercontent.com/CrunchyData/postgres-operator
    export CRUNCHY_YAML=$CRUNCHY_BASE/v4.6.2/installers/kubectl/postgres-operator.yml
    curl $CRUNCHY_YAML | sed 's/value: install/value: uninstall/g' | kubectl apply -f -
    

    NOTE: If you get a huge error message you forgot to delete the job after the installation.

    Afterwards clean up the remaining stuff which is created by $CRUNCHY_YAML defined above:

    kubectl delete job -n pgo pgo-deploy
    kubectl delete clusterrolebinding pgo-deployer-crb
    kubectl delete configmap pgo-deployer-cm
    kubectl delete clusterrole pgo-deployer-cr
    kubectl delete serviceaccount pgo-deployer-sa
    kubectl delete namespace pgo
    

    Impressions

    • Installing using the operator framework at operatorhub didn’t work. The framework failed to install.
    • I don’t like that the pgo binary is installed for every namespace you are using. This seems weird, it should somehow follow “standard” k8s RBAC, or the principle of kubectl contexts.
    • I also don’t like that the installation method is static and you cannot change the namespace without downloading and editing the files apparently.
    • I very much like the CLI approach, yet at the same time …
    • … it leaves the declarative “everything is a CRD / an API object” approach.

    So … mixed. Haven’t tried the databases – yet.

  • Nextcloud cron job

    I switched to system cron for my nextcloud cron jobs. Using docker, this is my cron job command:

    */5  *  *  *  *    /usr/bin/docker exec -u 33 srv_nc_1 /bin/bash -c 'php -f /var/www/html/cron.php'
    
  • Nextcloud out-of-memory PHP error

    I got this error when upgrading to nextcloud 21:

    PHP Fatal error: Allowed memory size of 536870912 bytes exhausted (tried to allocate 20480 bytes) [...]
    

    Turns out this is the way to solve it: Prefix PHP_MEMORY_LIMIT=512M to the commands. In combination with docker it looks like this:

    /usr/bin/docker exec -u 33 srv_nc_1 /bin/bash -c 'PHP_MEMORY_LIMIT=512M php occ db:add-missing-indices'
    
    ... OR USING -e ...
    
    /usr/bin/docker exec -u 33 -e PHP_MEMORY_LIMIT=512M srv_nc_1 /bin/bash -c 'php occ db:add-missing-indices'
    
    ... OR MANUALLY ...
    
    ~$ docker exec -tiu 33 srv_nc_1 /bin/bash
    ~# PHP_MEMORY_LIMIT=512M php occ db:add-missing-indices
    

    Source: https://is.gd/mua5wv